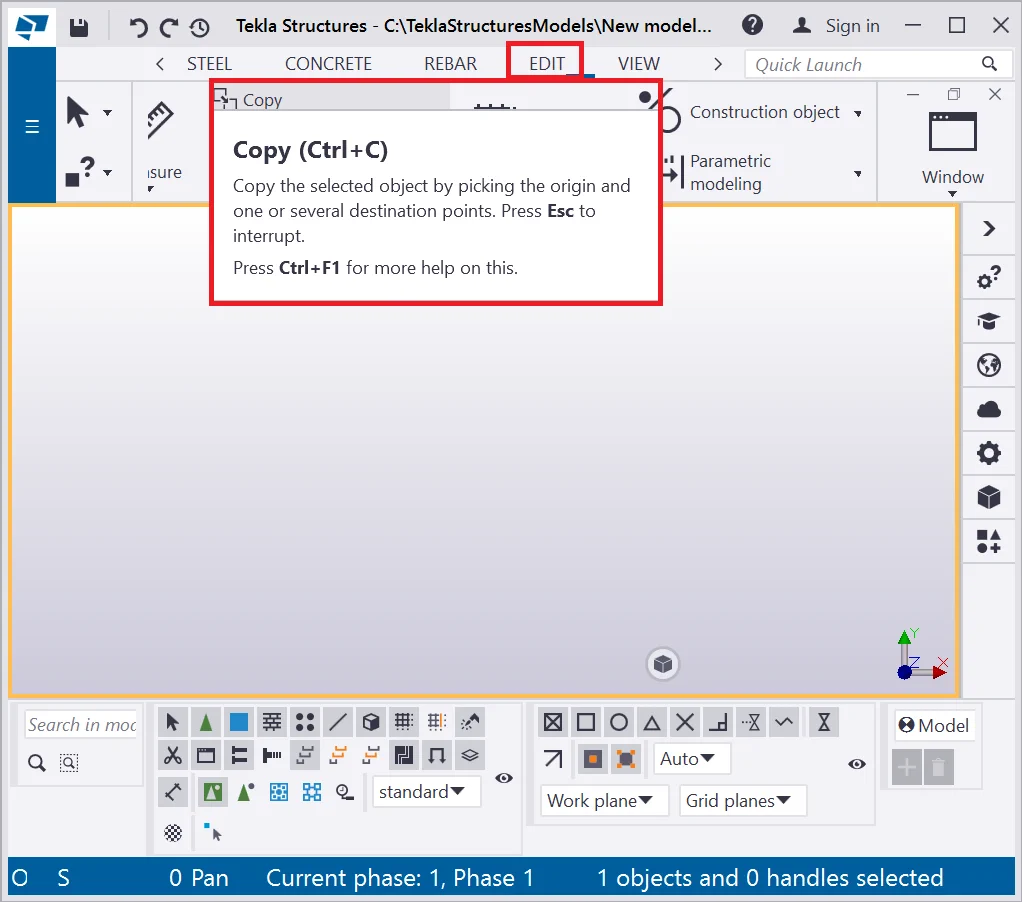
Copying objects in TS works similarly to moving objects, with the difference that the initial object does not move, just its copy is added to the plane. Also, it is possible to specify the number of copies to be inserted into the “Copy Properties” menu. Let’s investigate this tool in detail and track the difference between it and the “Move” tool.

It is the most frequently used tool in TS based on indicating two points:
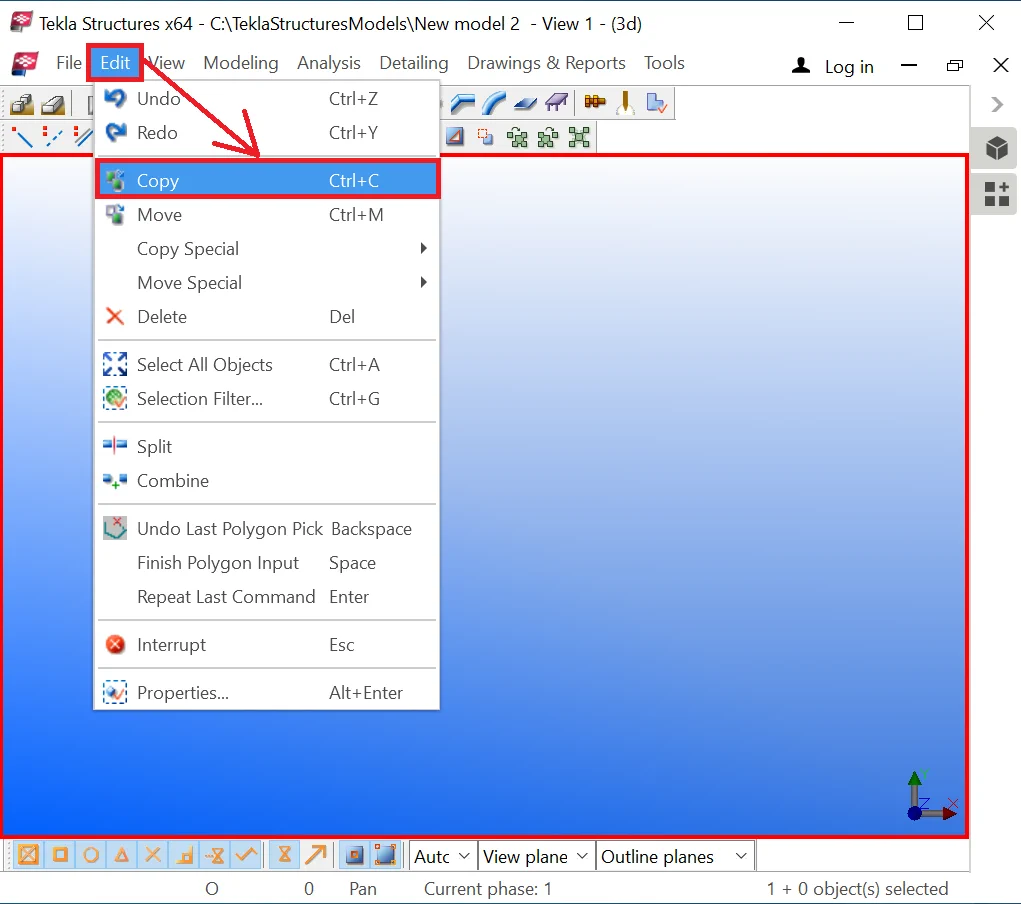
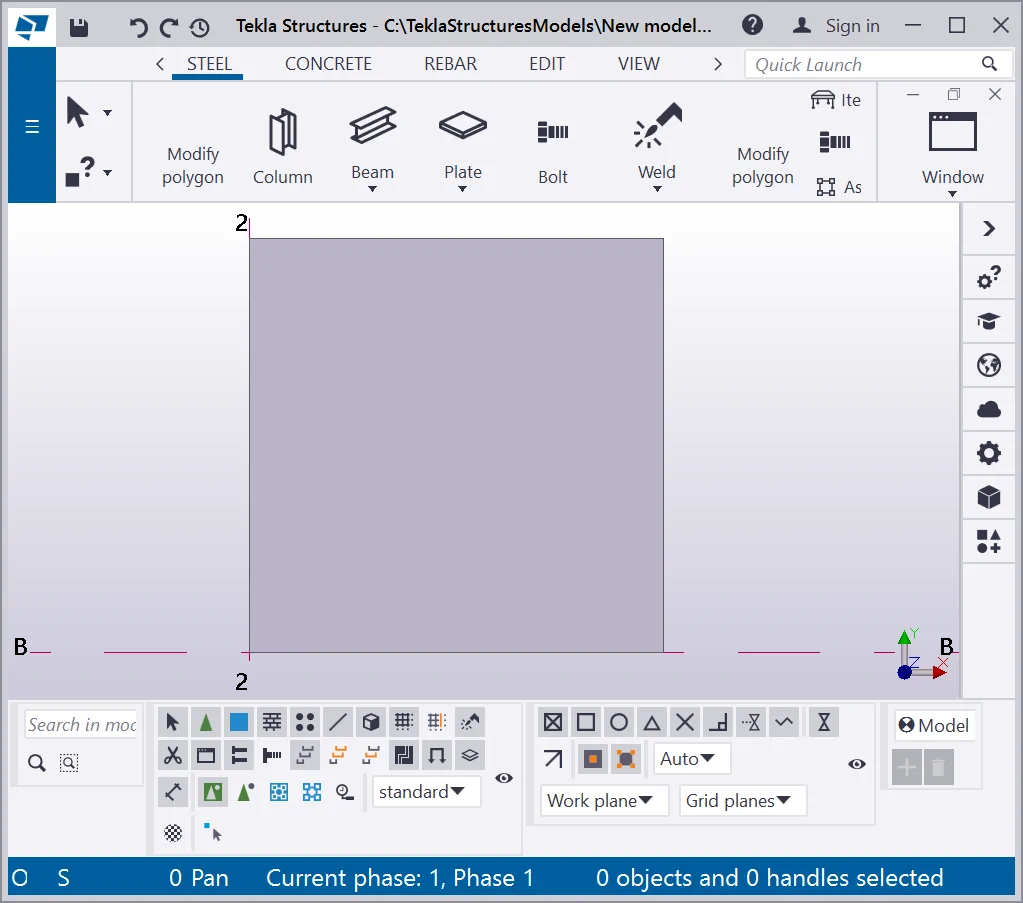
It is located at the Main menu "Edit" tab, but it is more
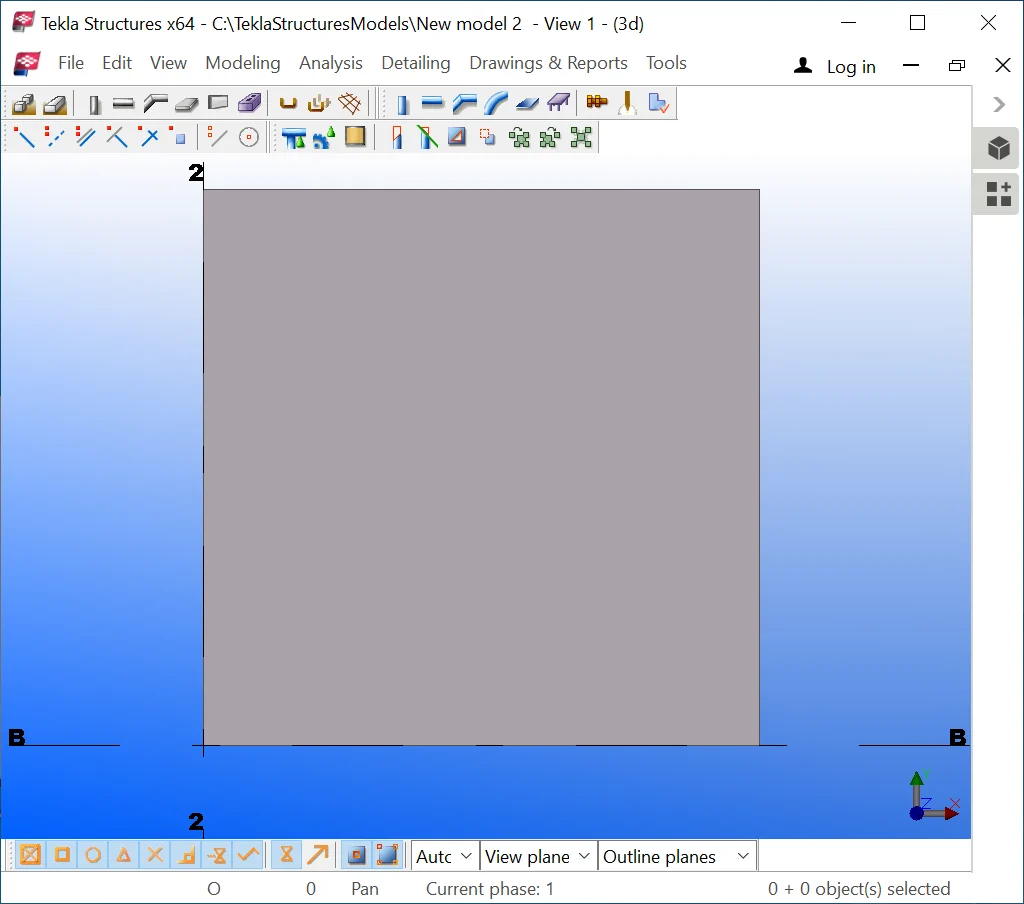
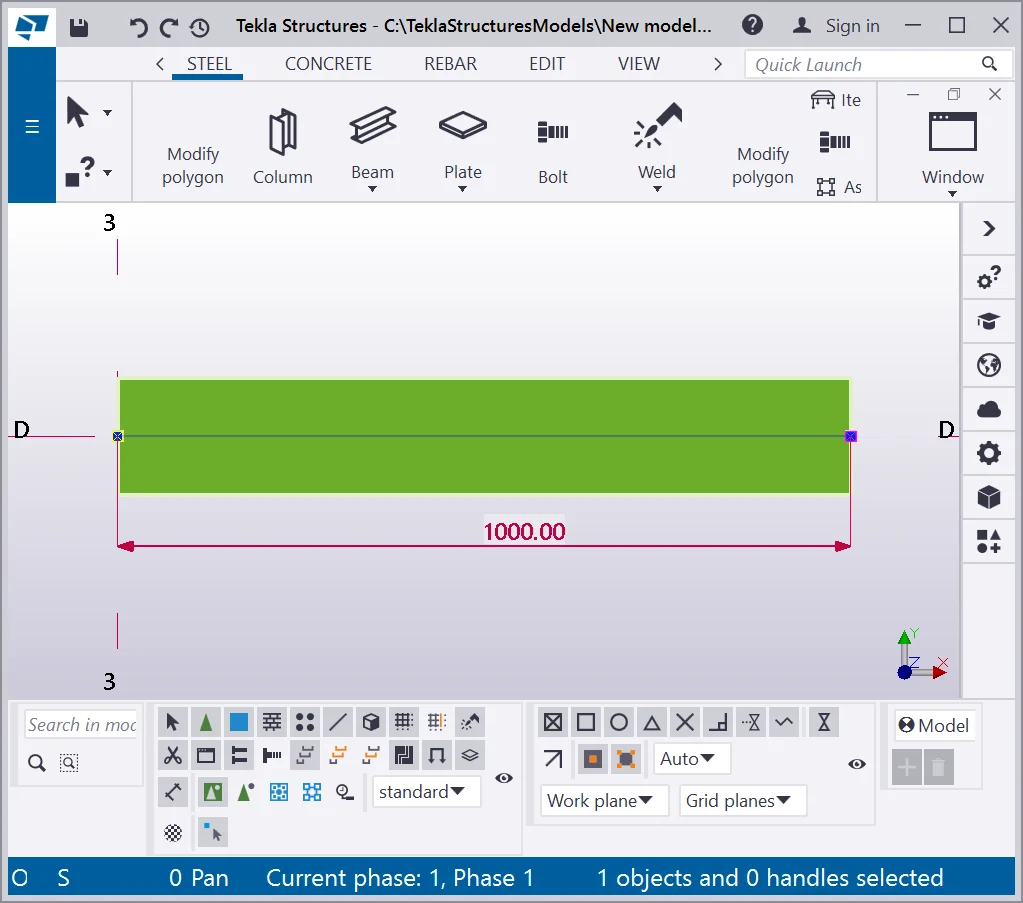
Let’s examine this tool in detail. Create a plate with dimensions
Copy the plate at 1000 mm upwards by allocating the new plate right above
The algorithm for using the “Copy” Ctrl+C tool:
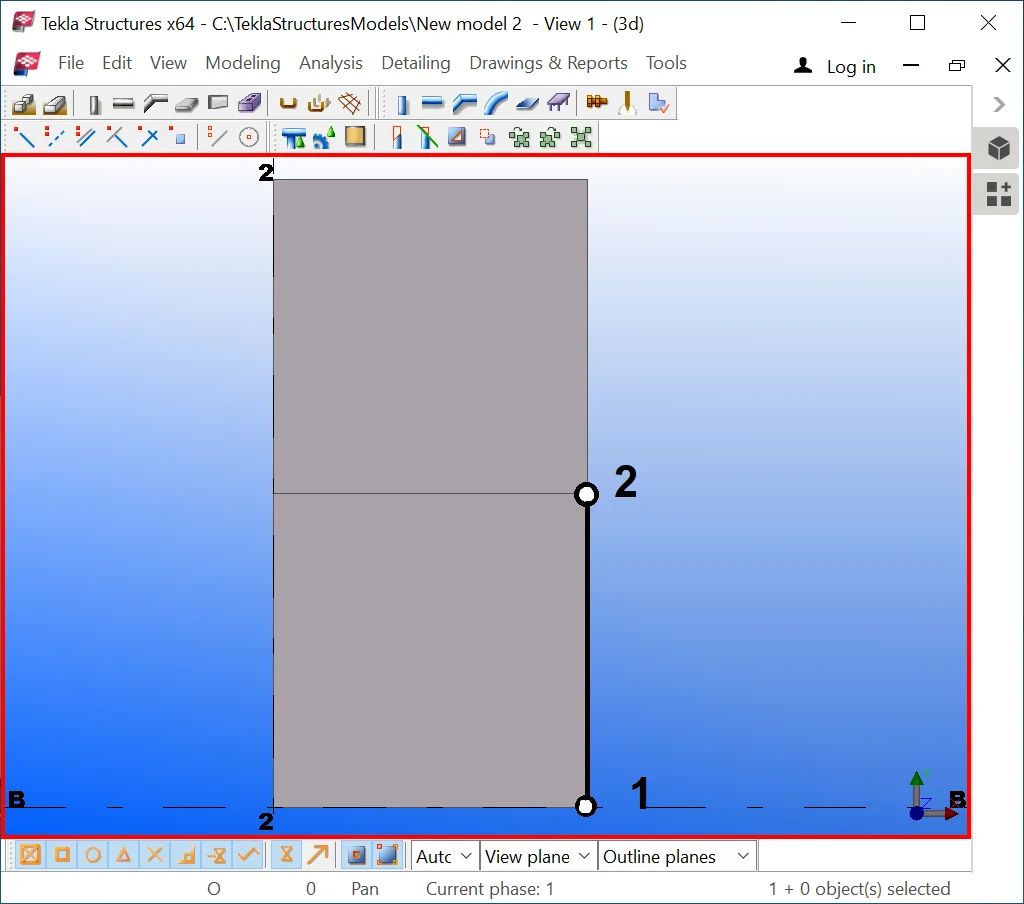
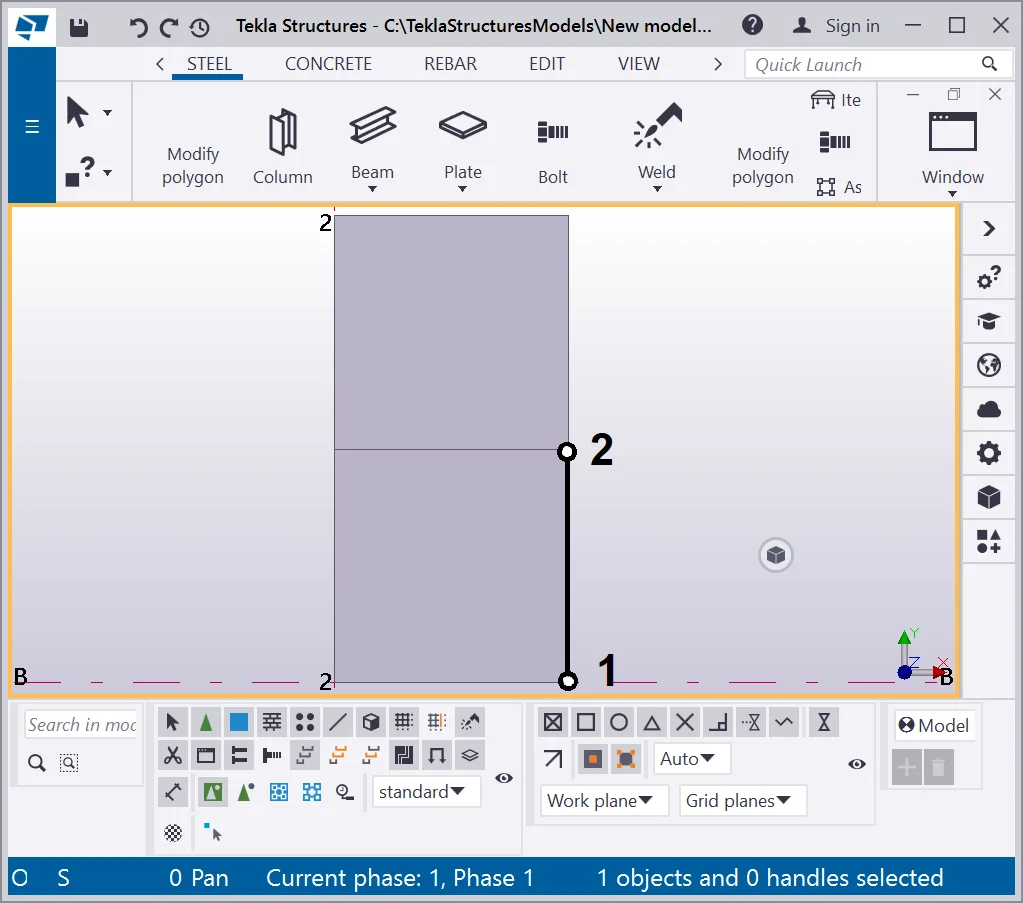
Note that it is of not high importance to select points at the object body, as the tool requires indicating two points specifying the distance between the objects and the direction for allocating the new object. Try out the above by copying the object at 2000 mm and selecting the points at the axis, not at the object’s body.
The algorithm for using the “Copy” tool by typing in the distance
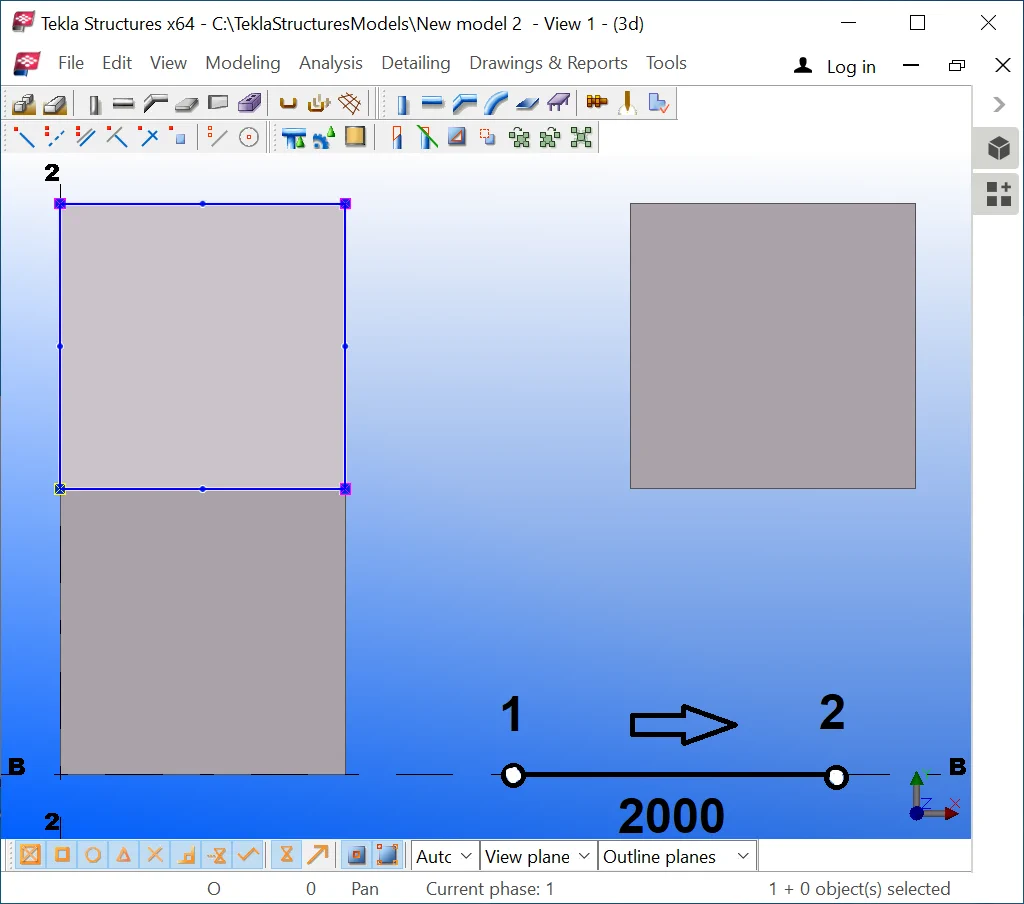
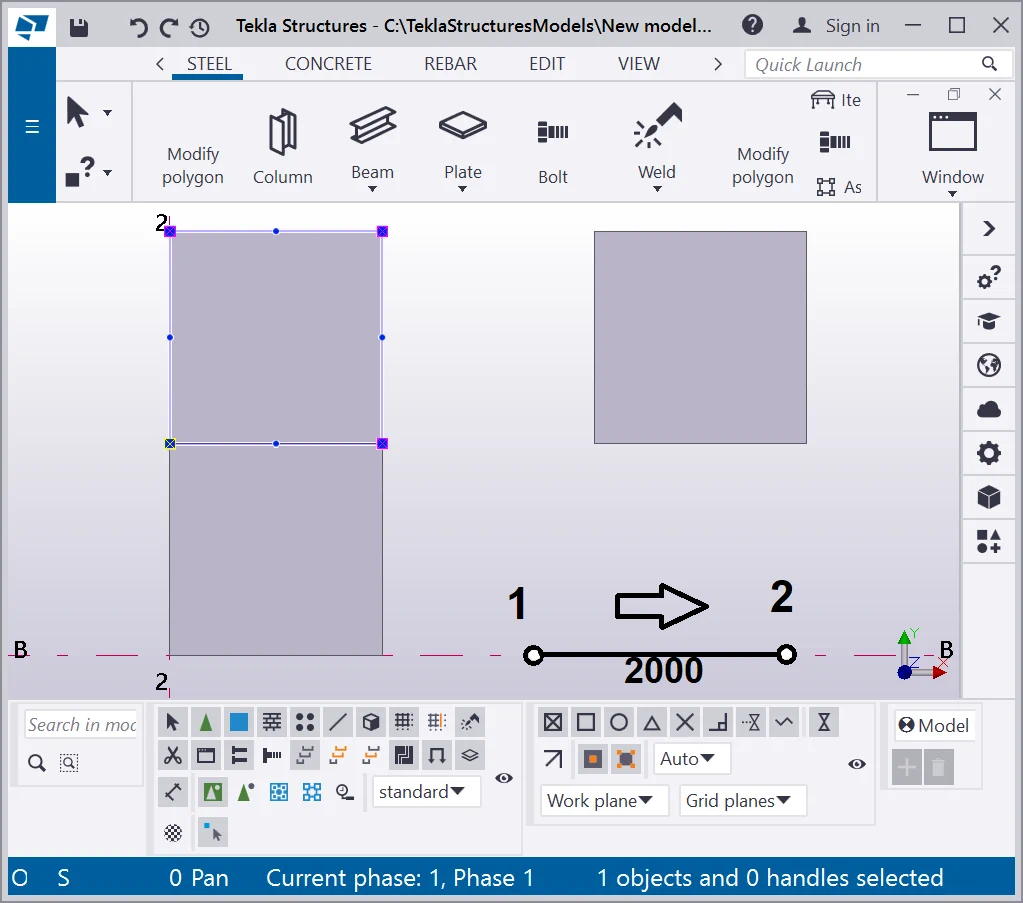
The plate was copied similarly to the first case study example.
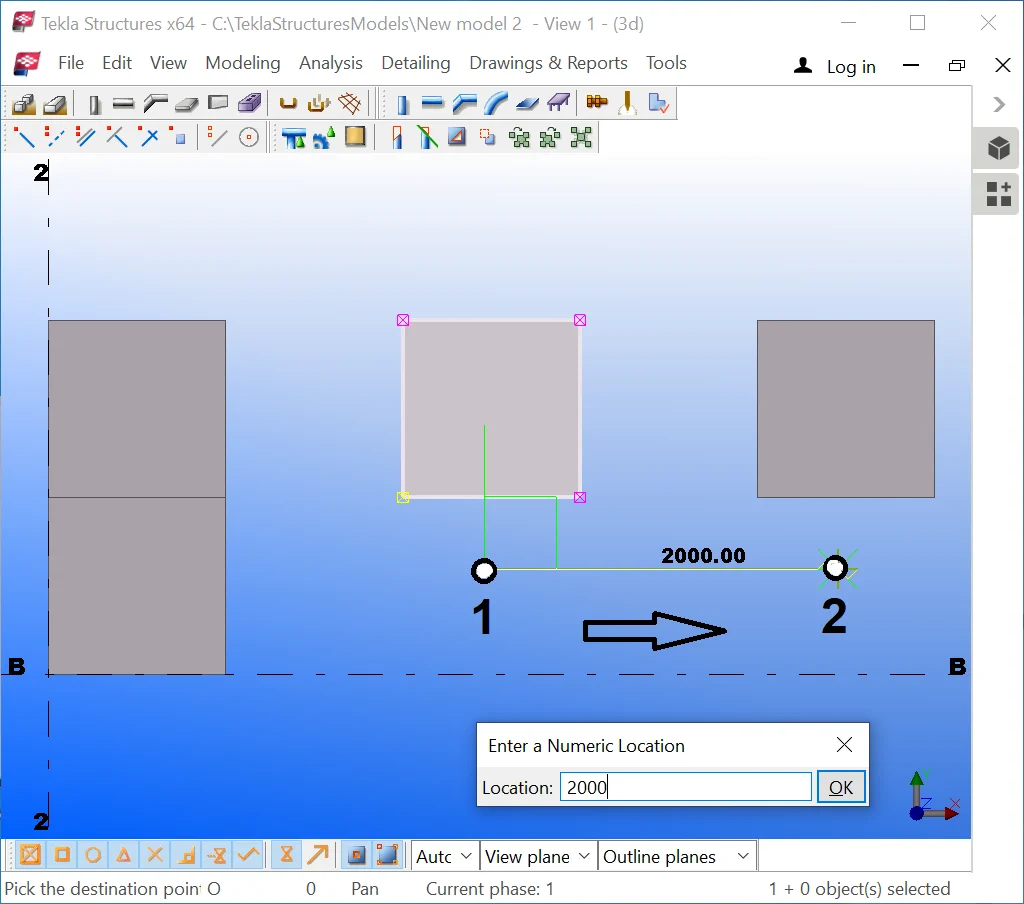
Same as moving an object, it is possible to select the points, indicating
copying direction and distance value at any place of the plane, not limiting
to the object body or any axis. Let’s try it out, but formerly make
sure that the "Snap to any position" tool is switched on: (v
21.1)
 / (v 2021)
 . Proceed on copying and refer to the below picture :

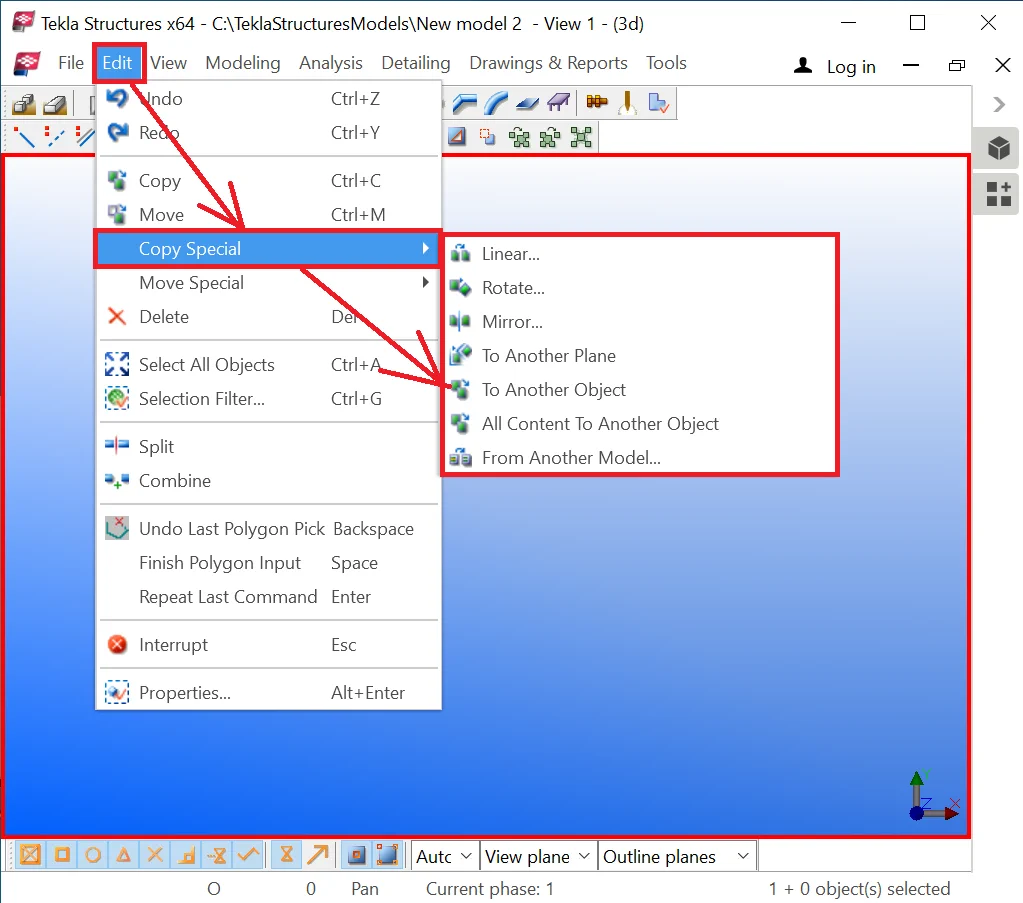
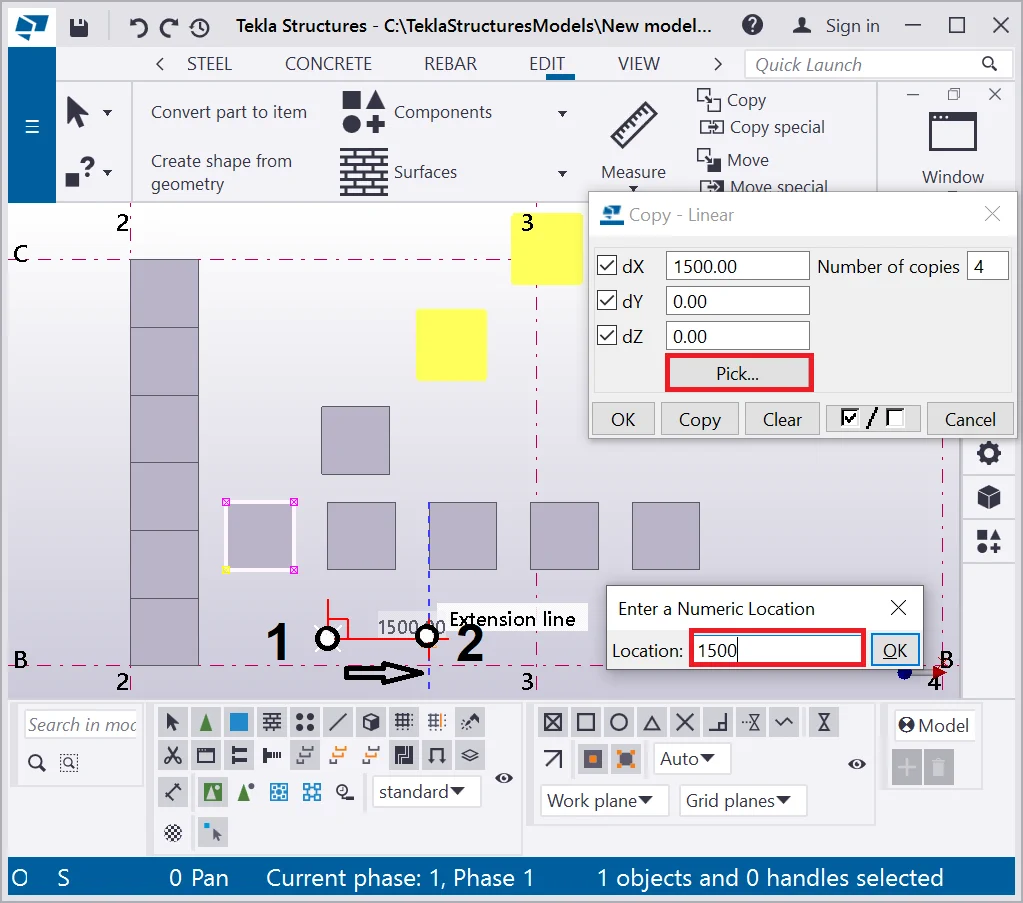
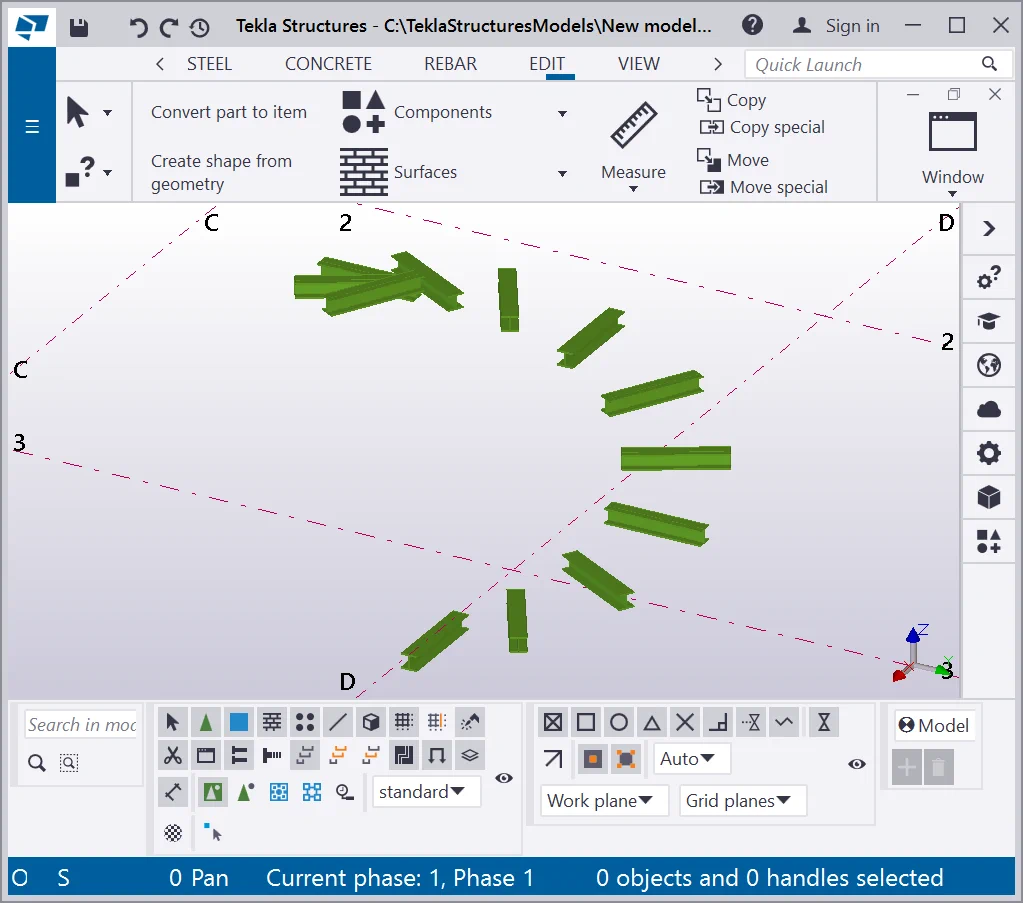
The “Copy Special - Linear” tool is similar to the respective tool of the “Move Special” tab and is allocated at the main menu “Edit” tab.

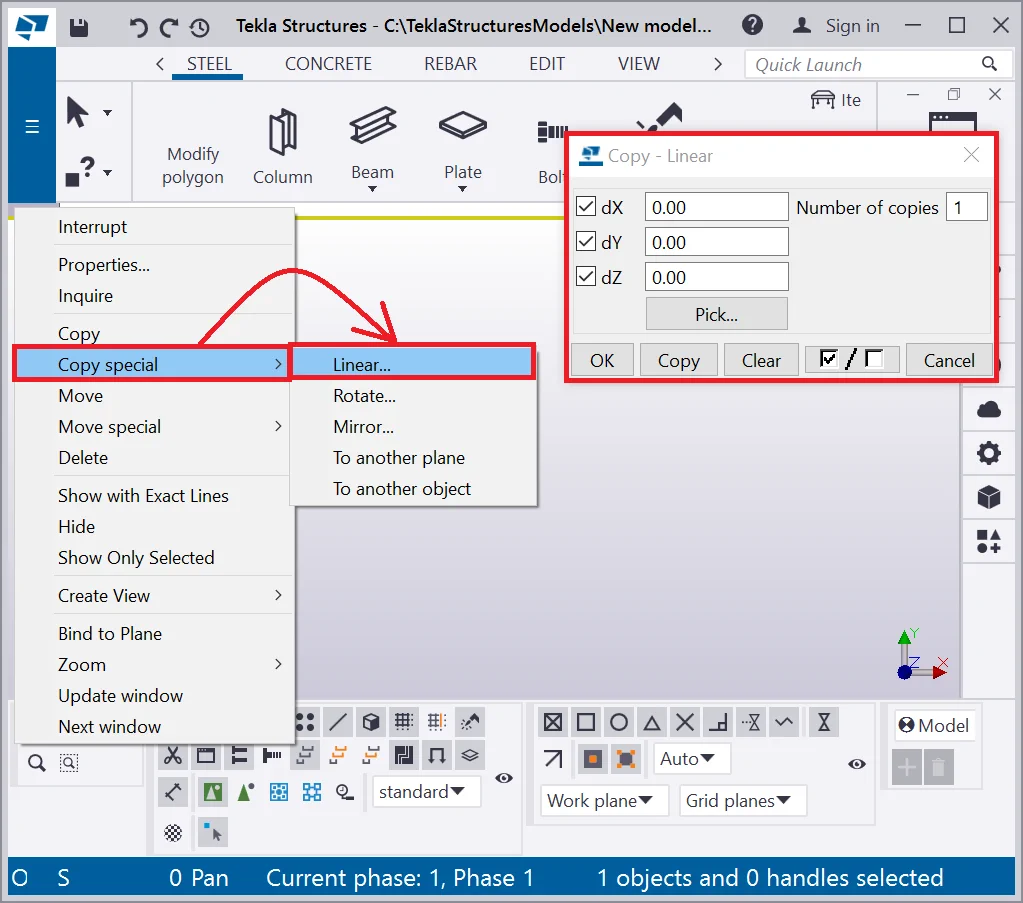
It is a very useful tool, allowing copying objects of various types at a definite distance, in various directions. The distance value can be indicated by the mouse cursor or typed in from the keyboard. Let’s examine this tool in the following examples.
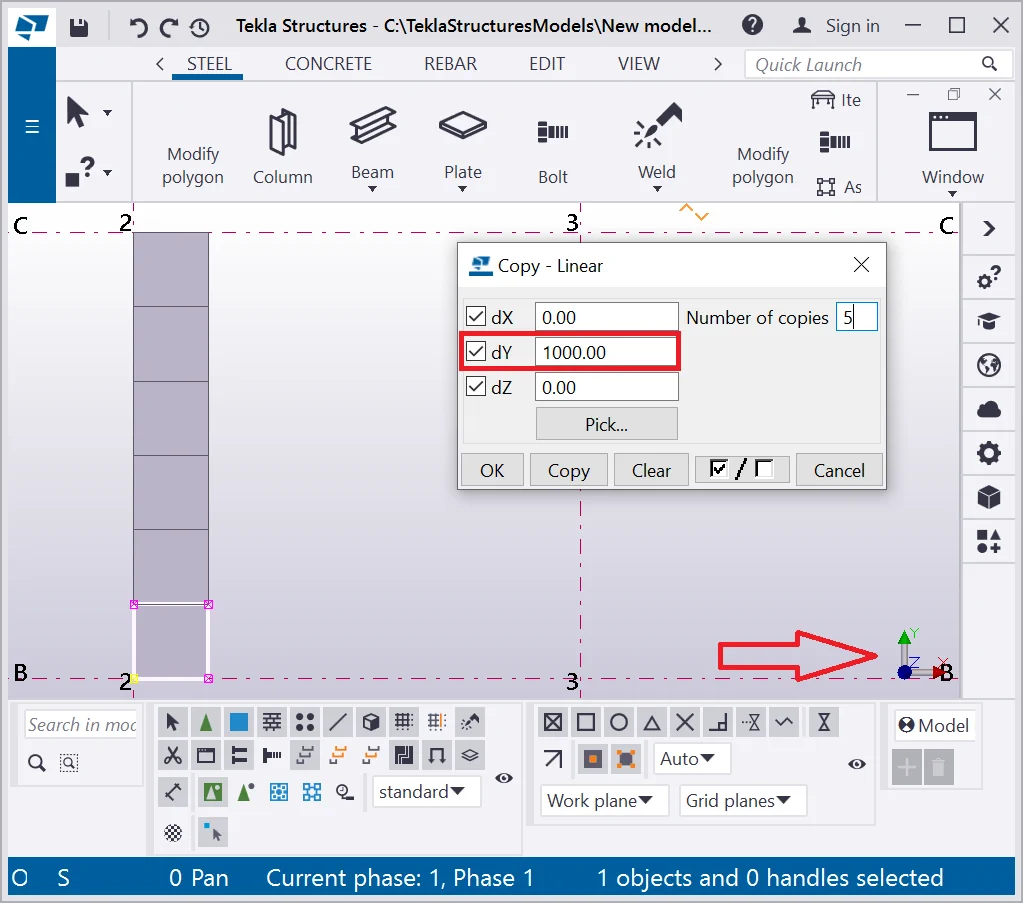
Option 1 - by indicating the coordinates by the mouse cursor (works similarly
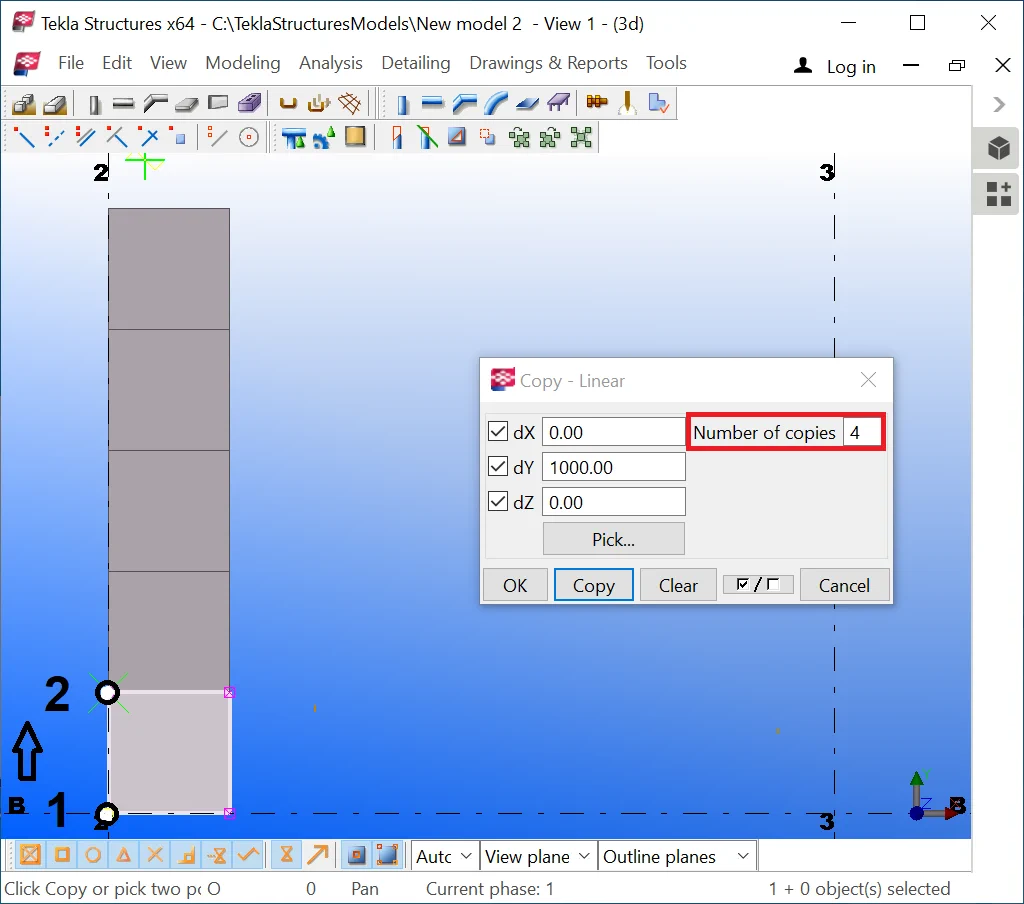
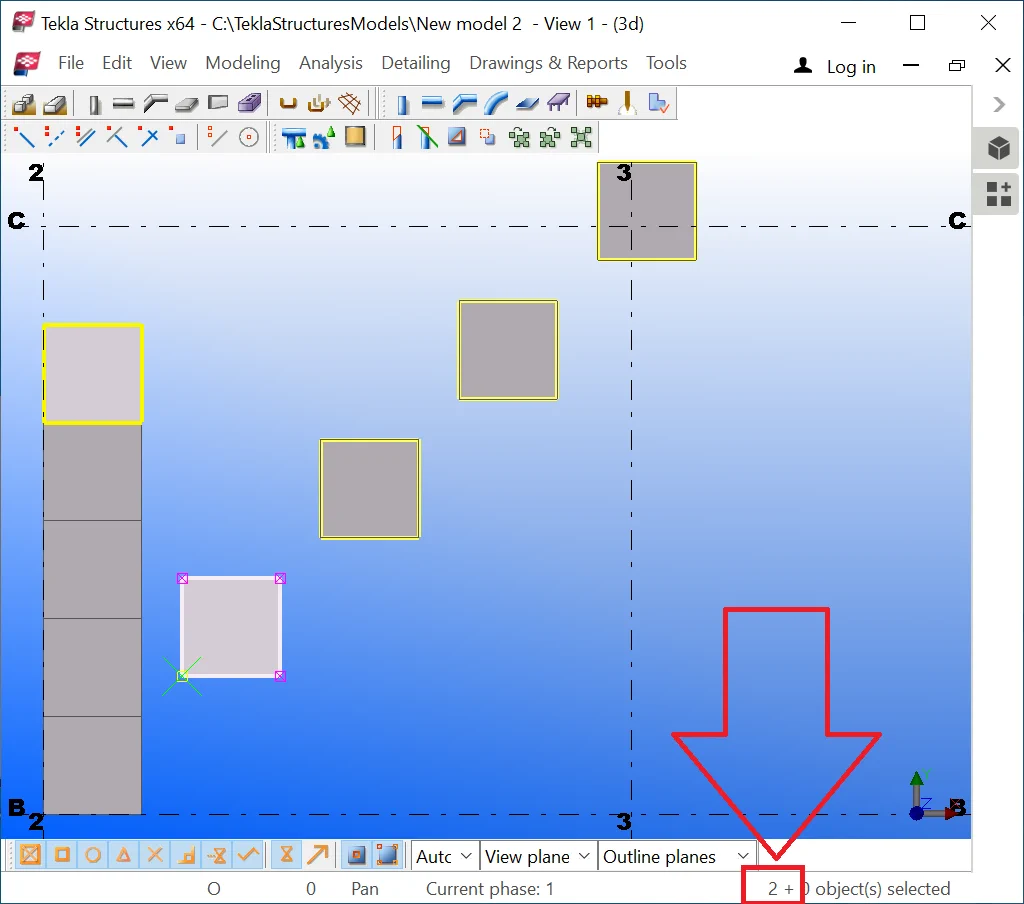
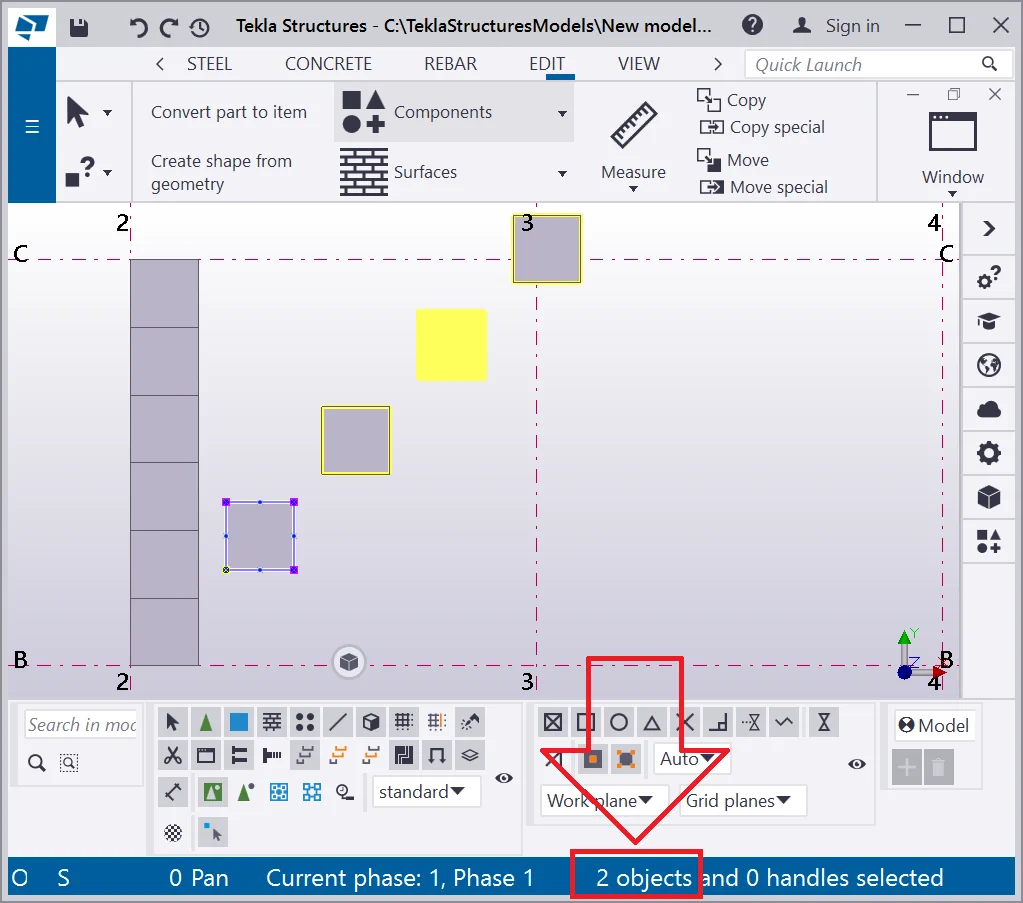
Note that the tool exercises no action until the “Copy” button is pressed. As well as this tool has an additional field, specifying the number of new objects required to be allocated in the selected direction. As always, the right bottom corner of the view indicates the directions of the axes at the view. It is possible to copy objects in positive and negative directions along the axes. Also, take into account that by indicating the number of copies equal to 4, the final number of the similar objects at the plane will get equal to 5, as the initial object is not considered a copy.
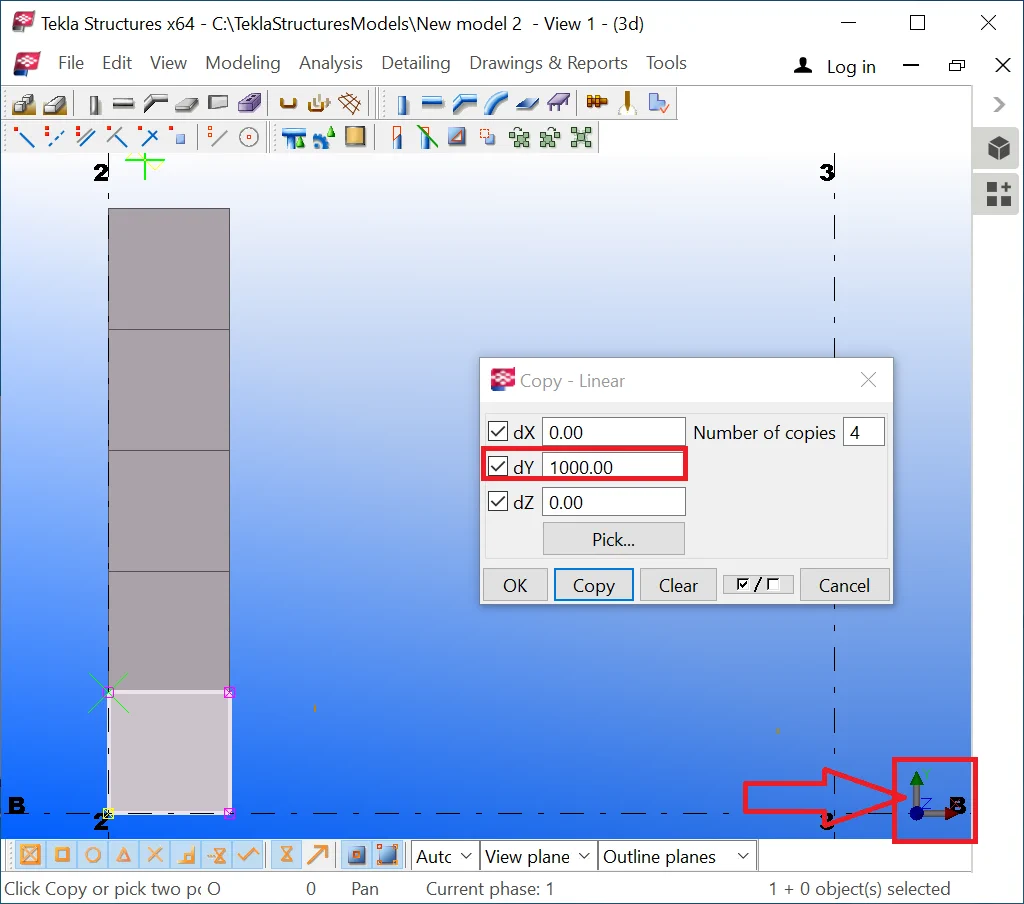
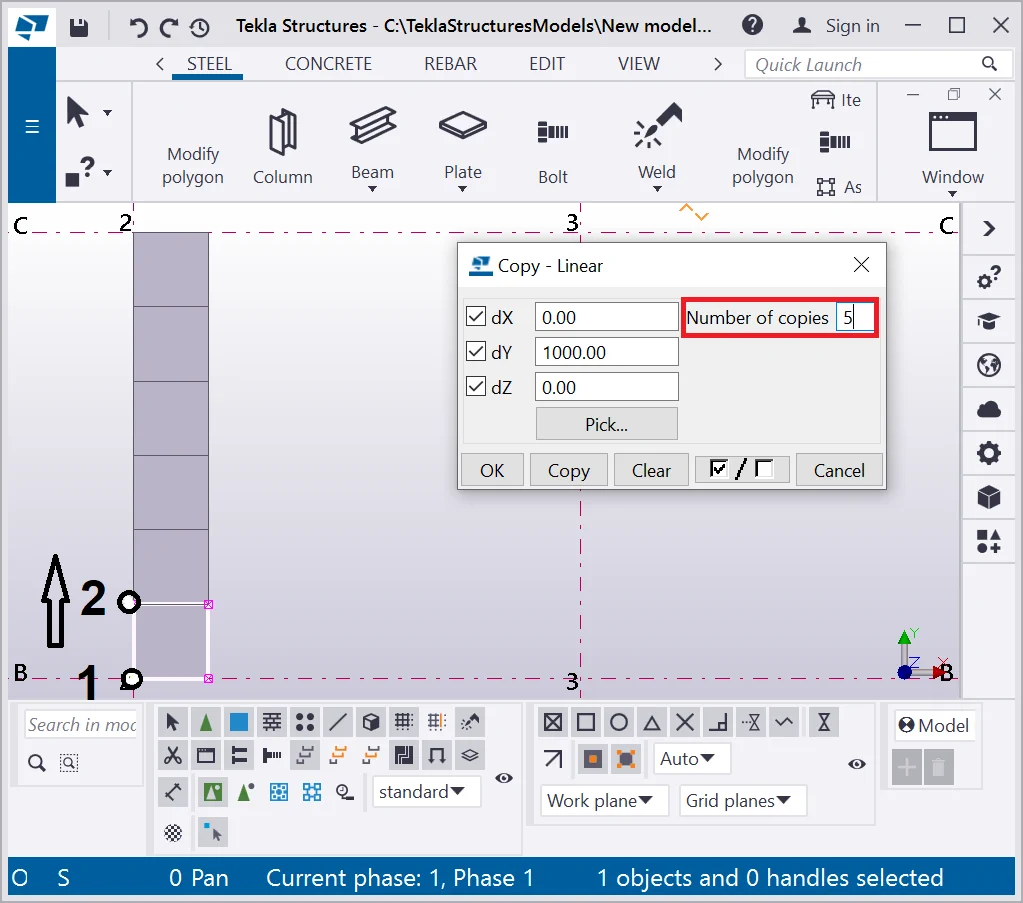
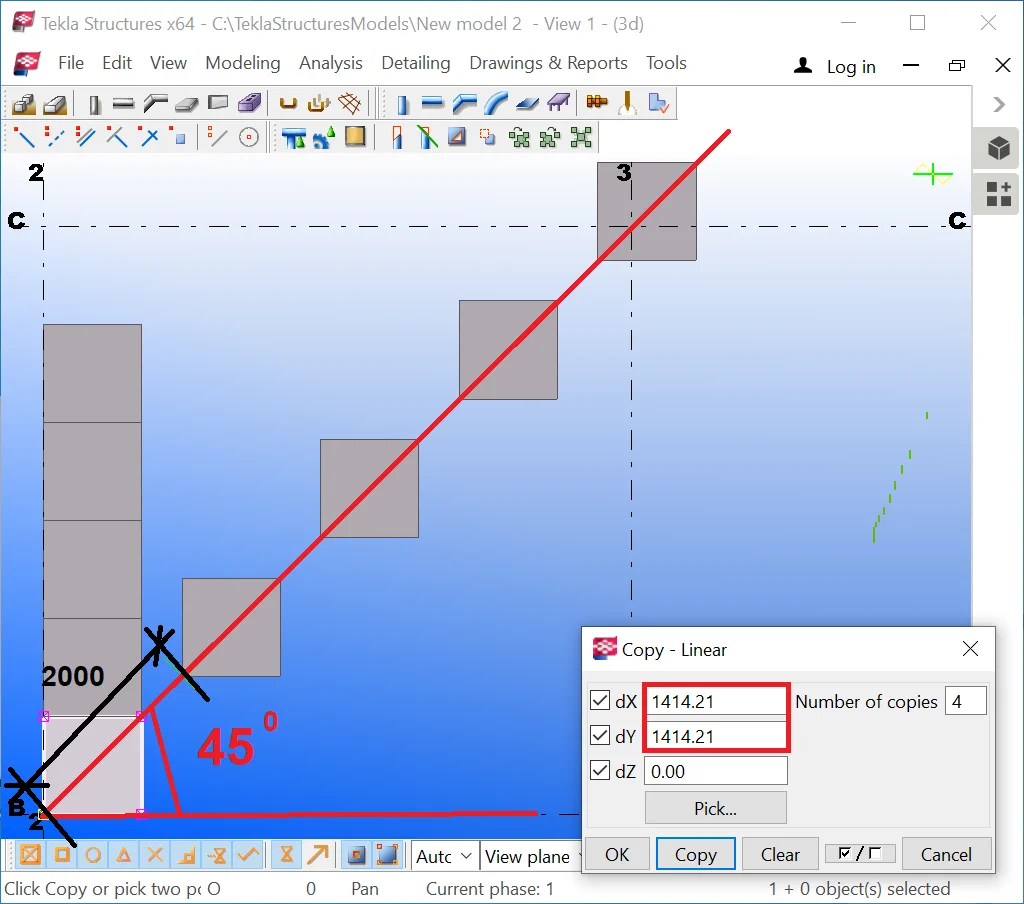
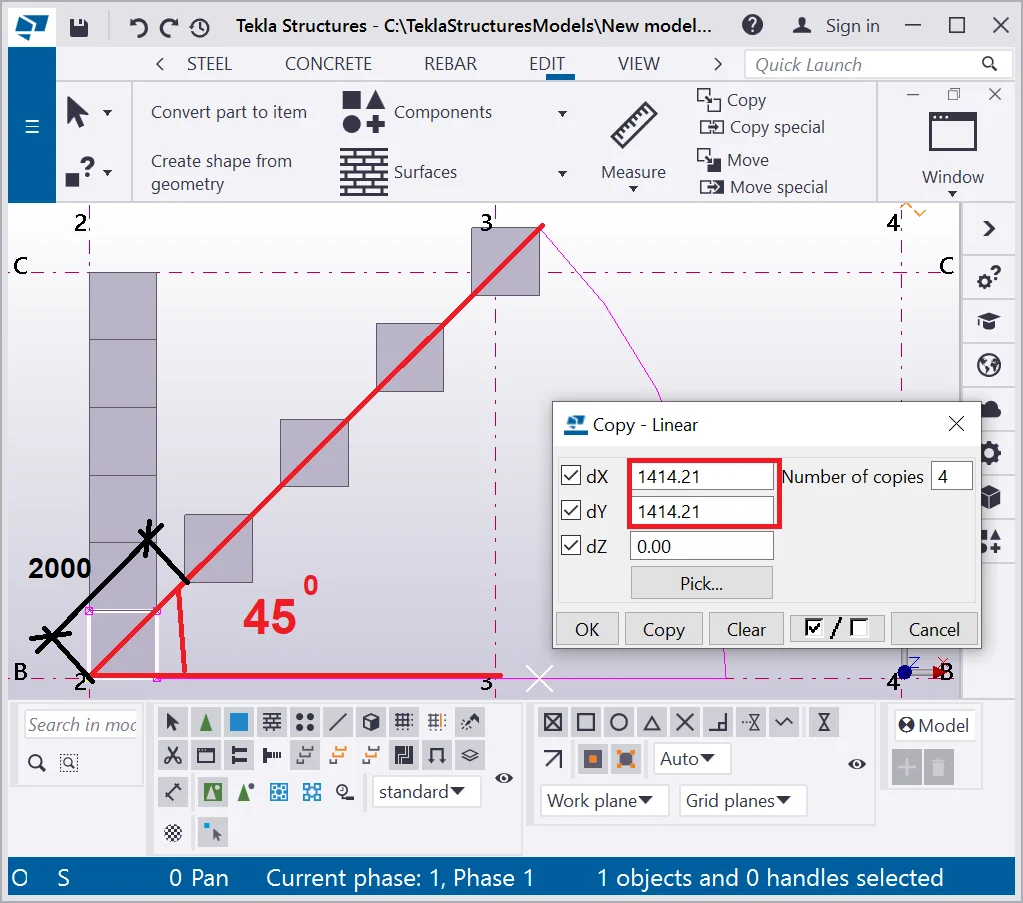
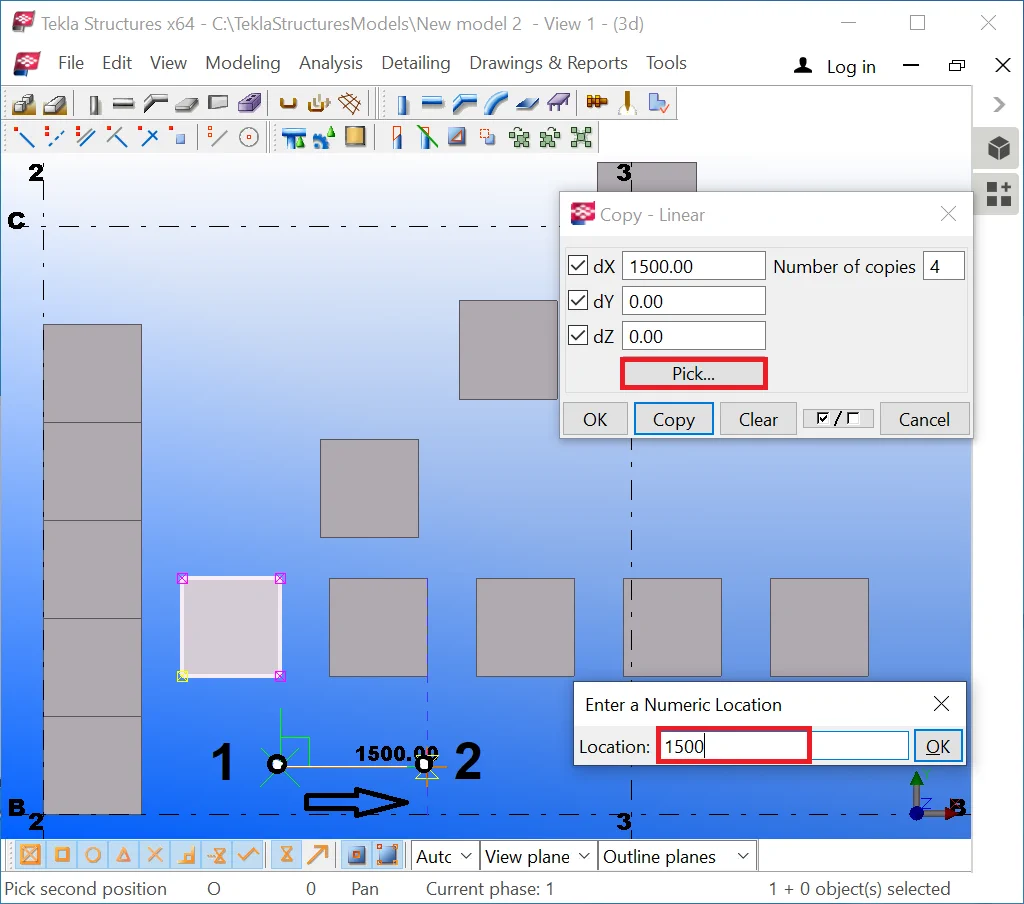
Option 2- by typing in the distance value from the keyboard.


The TS automatically calculates new coordinates taking into account the
Do not close the “Copy Special - Linear" window and repeatedly
An alert message will pop up as Так Tekla Structures
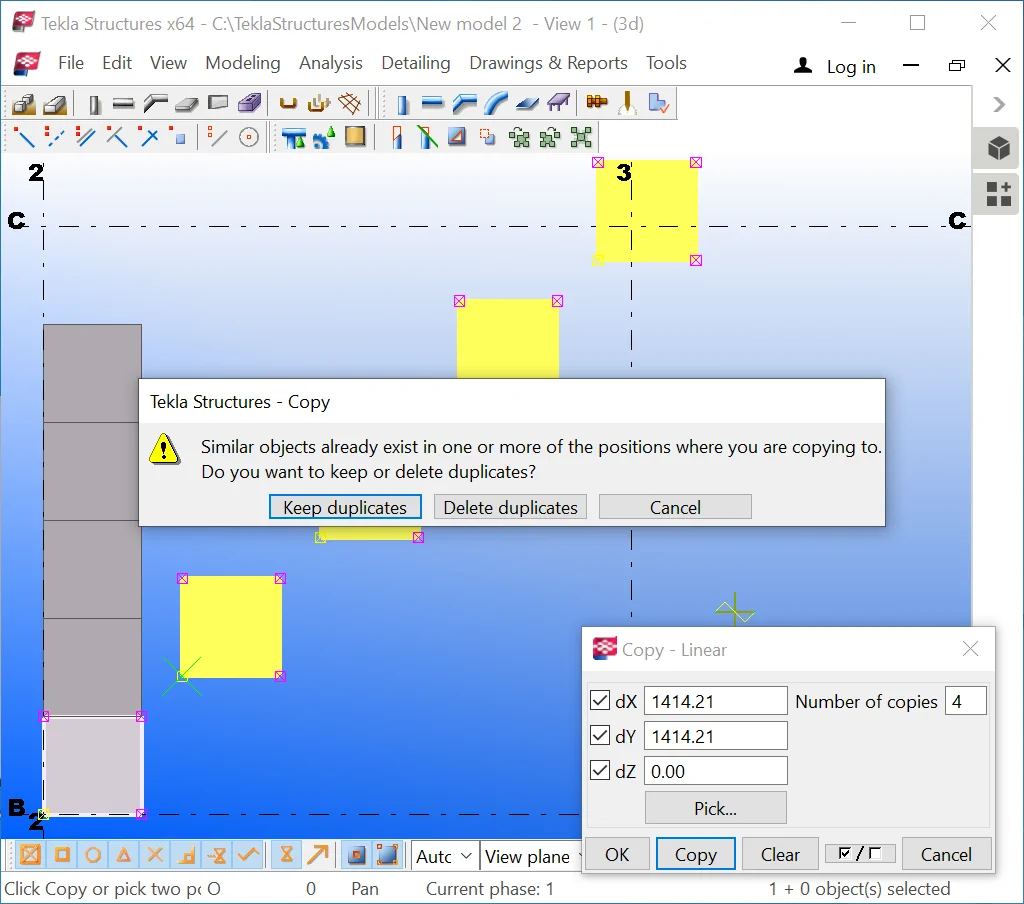
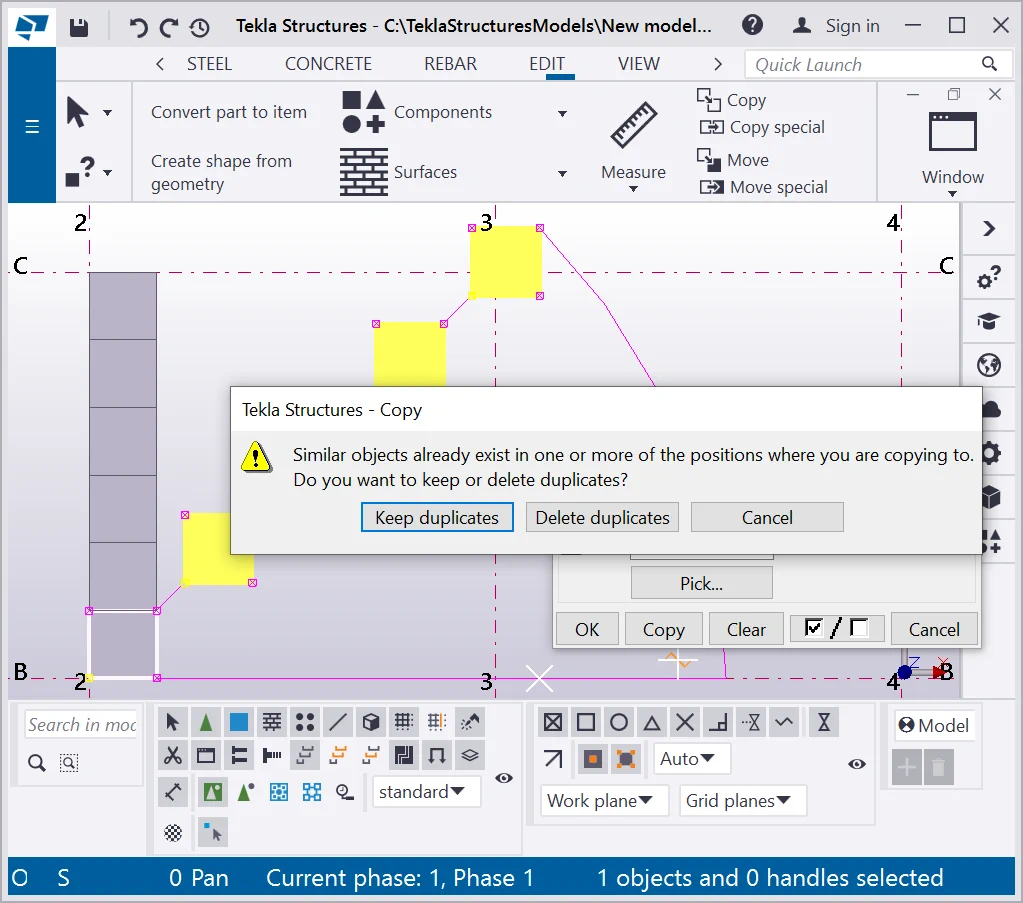
Press the “Keep duplicates” button to see how TS reflects
Creating duplicates is an error, as the materials list will contain the unwanted duplicates’ weight as well, thus the total values of materials will be doubled. Pay attention to the above and avoid committing such mistakes.
The “Pick” button in the “Copy-Linear” window allows selecting a new copying direction by indicating 2 points, afterwards, it will be possible to execute copying into new coordinates.
Try out using this button.
Exercise copying other object types at an arbitrary distance with an optional
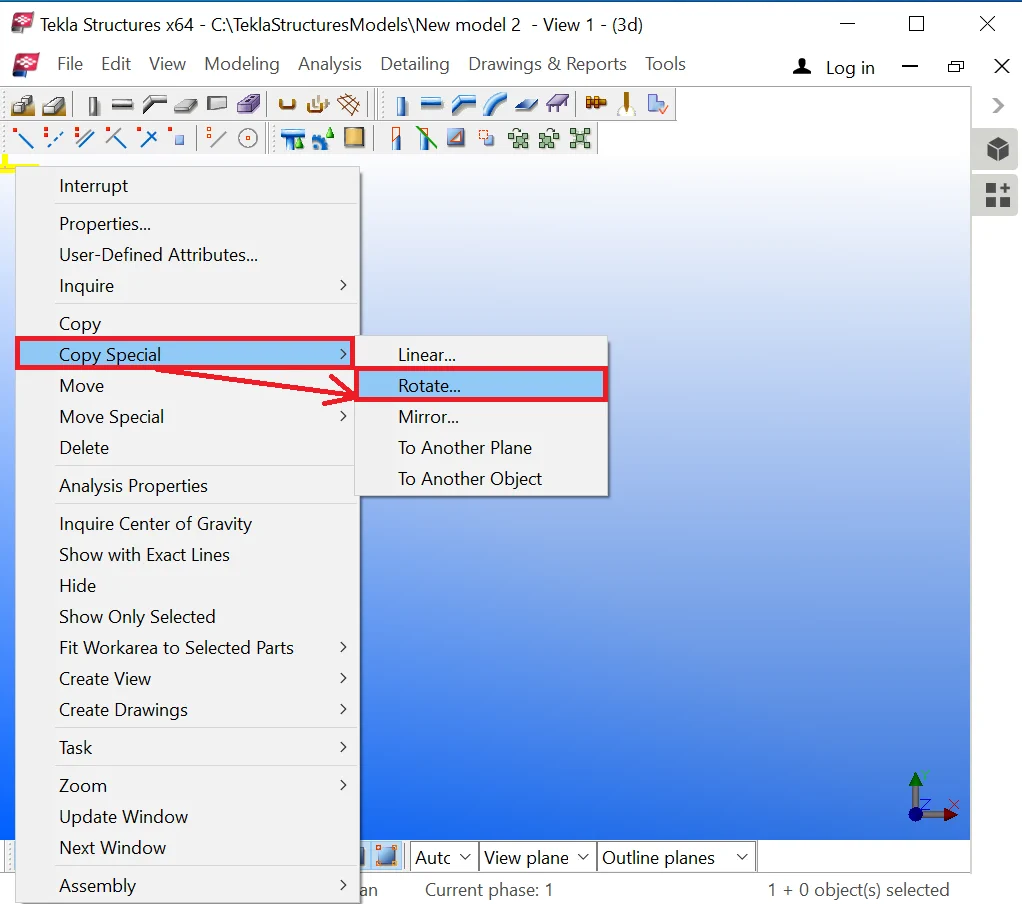
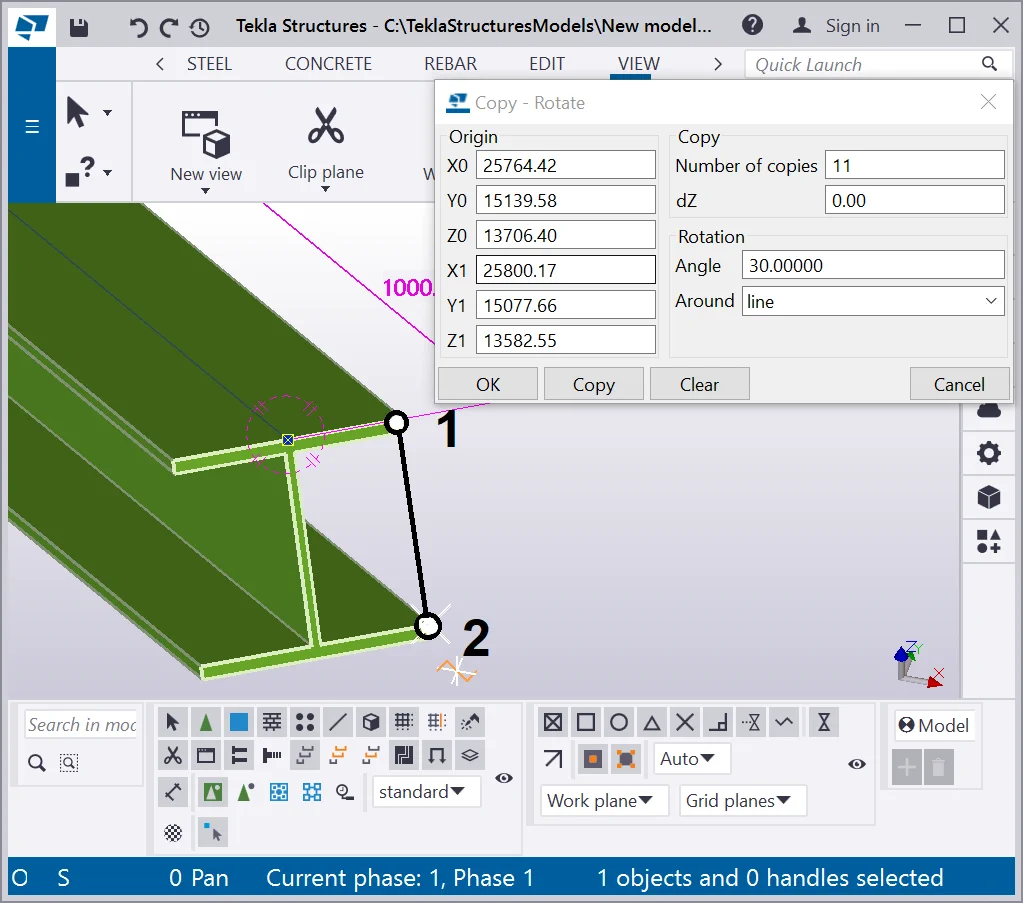
The tool allows creating new objects taking account of the rotation angle
Option 1 - “Copy Special- Rotate” around a specified point (around the Z-axis).
Option 2 - “Copy Special- Rotate” around an arbitrary axis determined by two points.

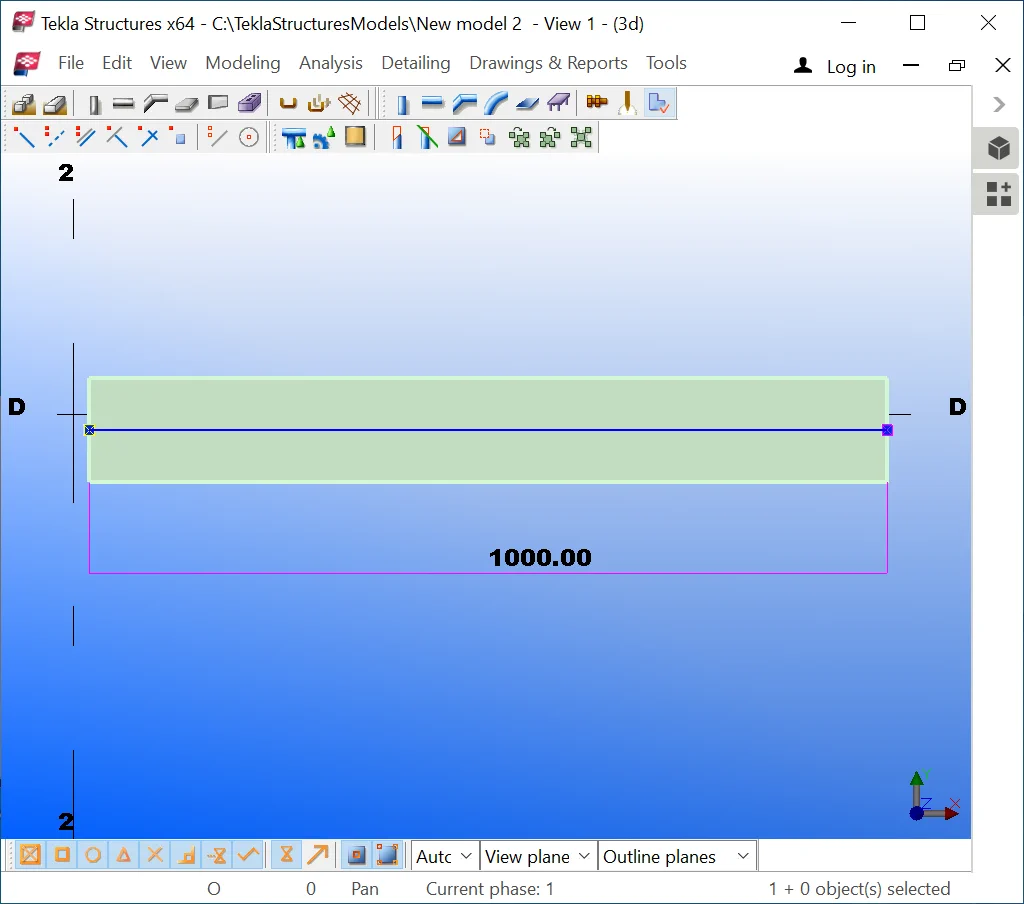
Let’s exercise using this tool by creating a beam of 1000 mm length.


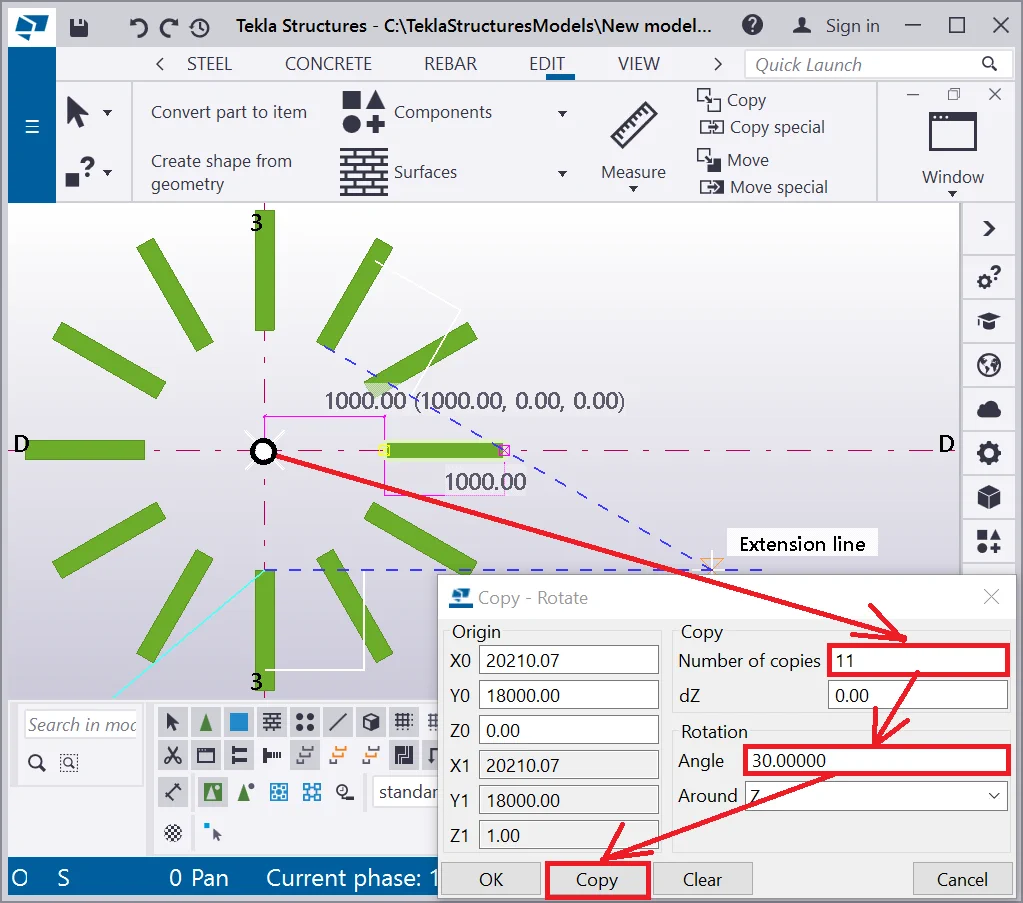
If you fail on precisely indicating the rotation center, then close the “Copy Special - Rotate” dialog window and repeat the algorithm from the start. Note that the current value of the “Around” field is “Z” thus the very imaginary rotation axis is parallel to the Z-axis.
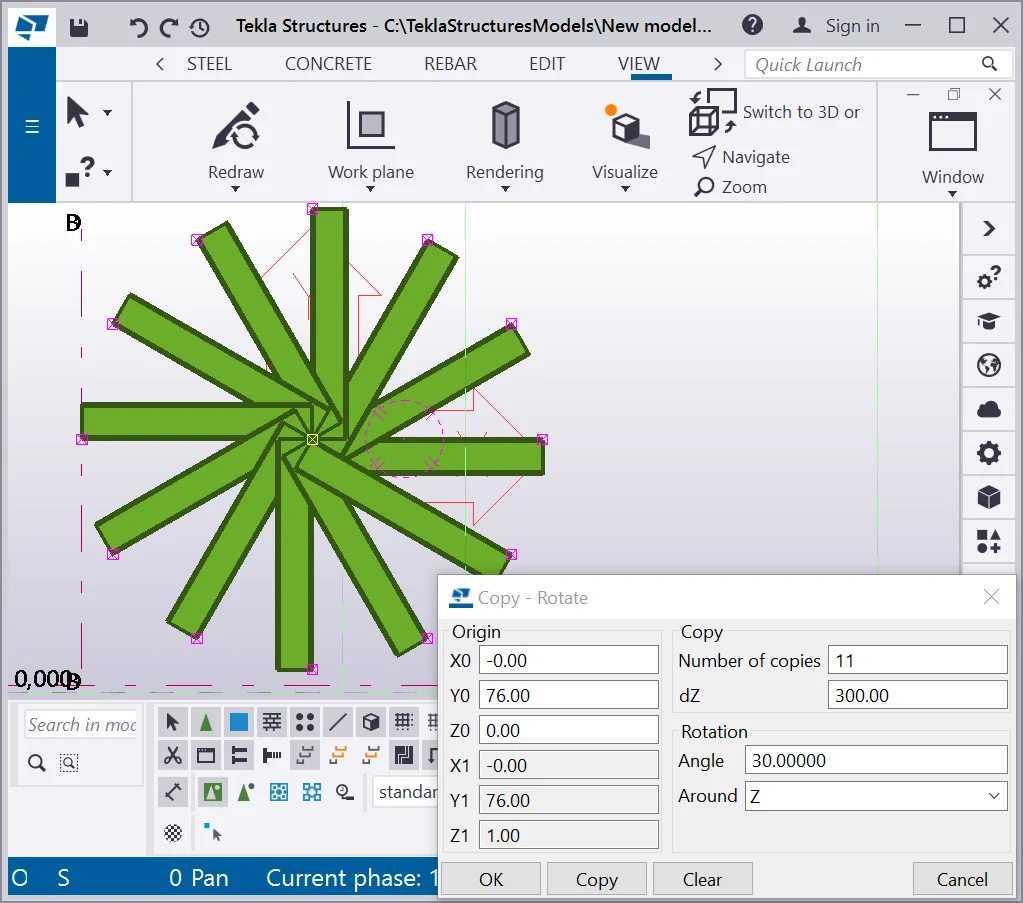
Note that there also is a new “dZ” field in the “Copy Special-Rotate” dialog window. This field sets the offset value for each consecutively created copy of the object by the Z-axis.
Specify the dZ value at 300 mm and repeatedly proceed on copying the beam.
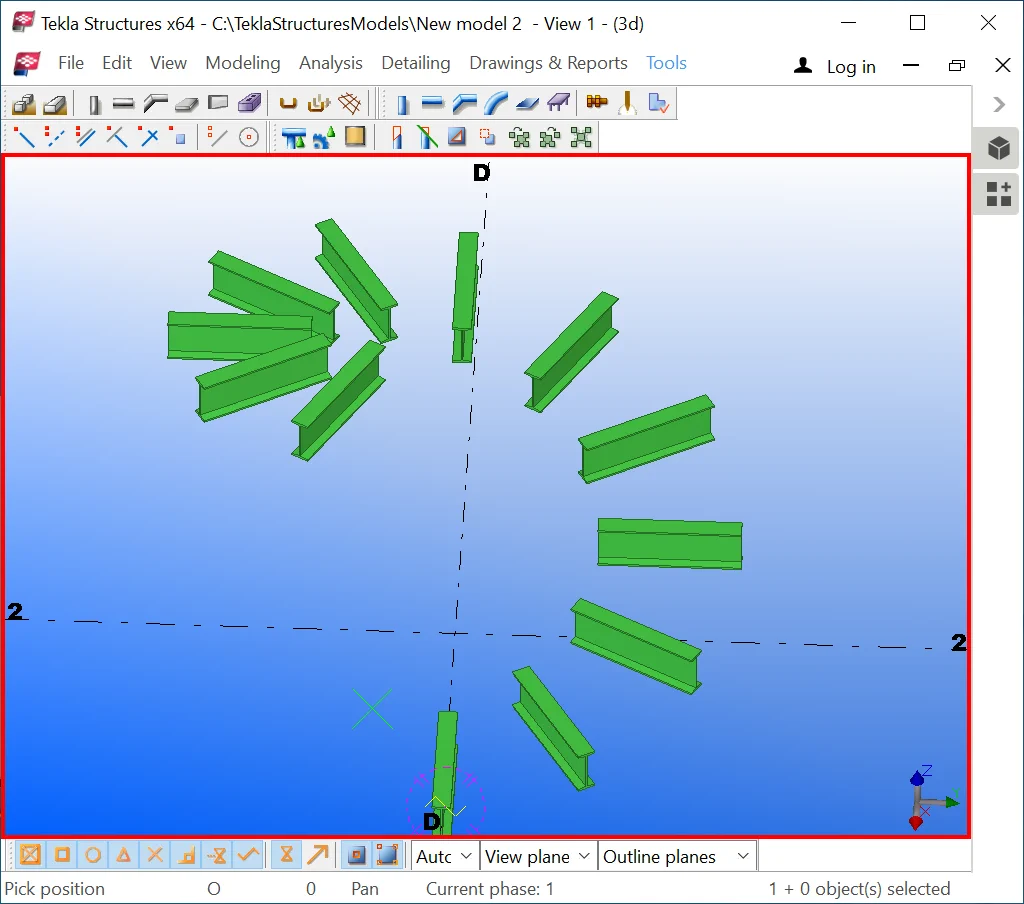
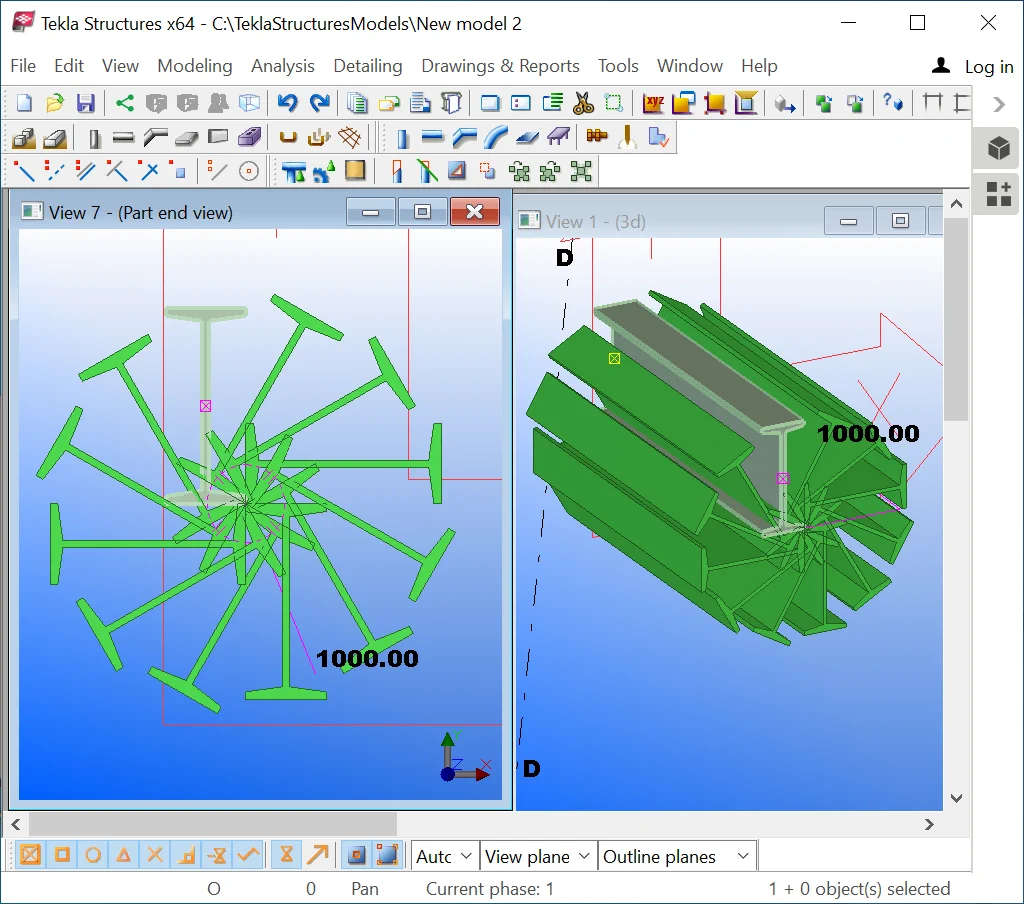
Rotate the view to investigate the result. Thus we can see that the group of objects has a spiral trajectory, each copy allocated one above another. This tool is useful for creating circular stairs and many other structures.
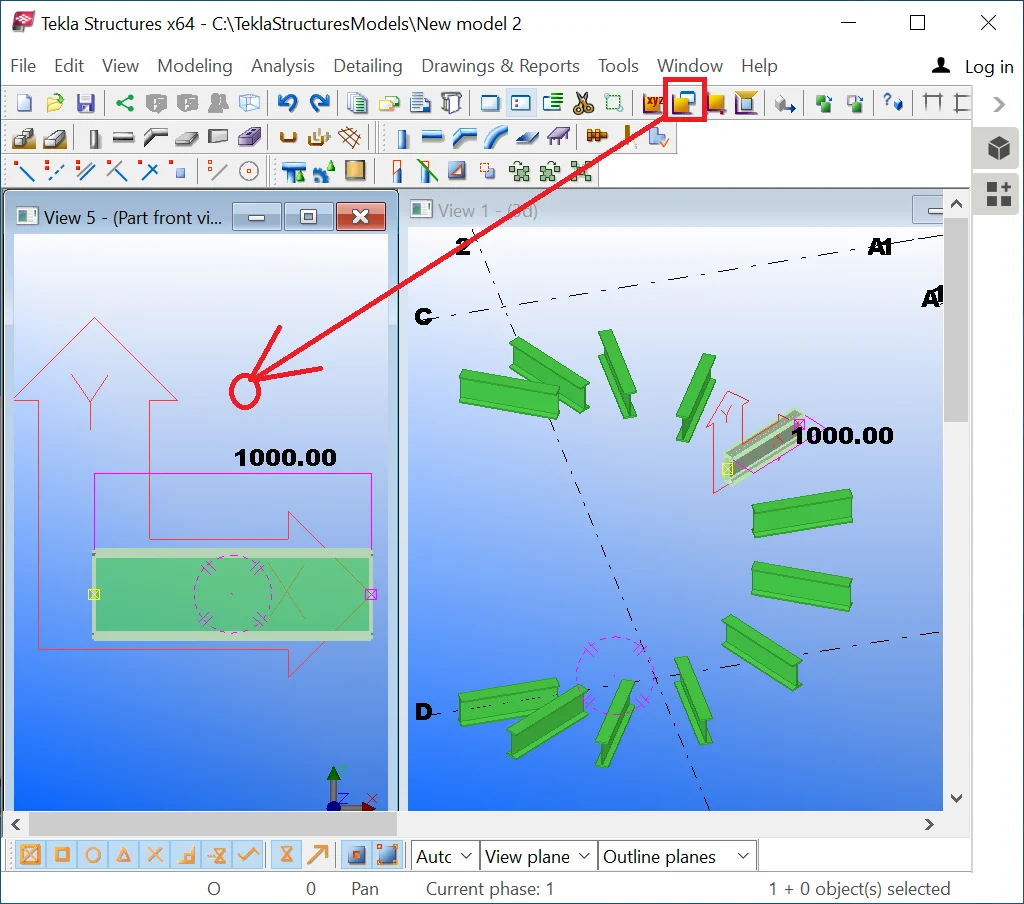
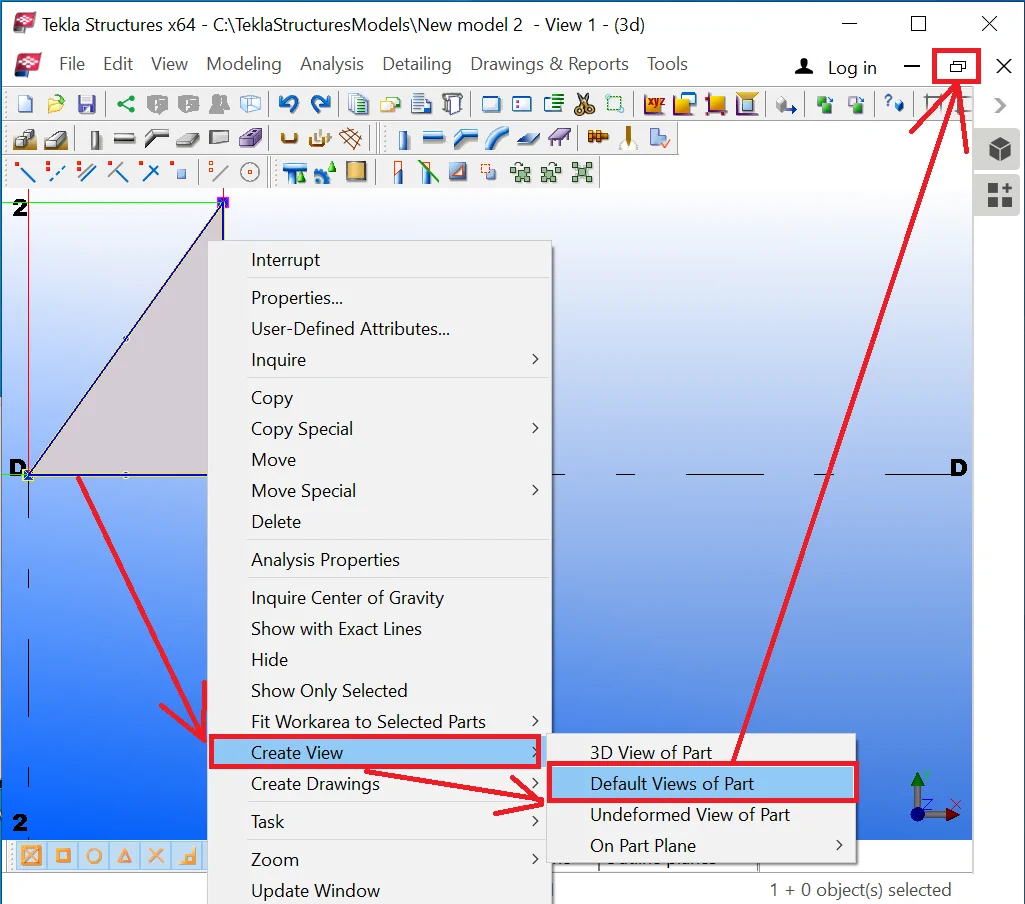
Let’s rotate the beam in another plane by creating all the beam’s
Thus select the beam, and in the right-click menu, go to the “Create
Minimize the current view and investigate the newly created ones.


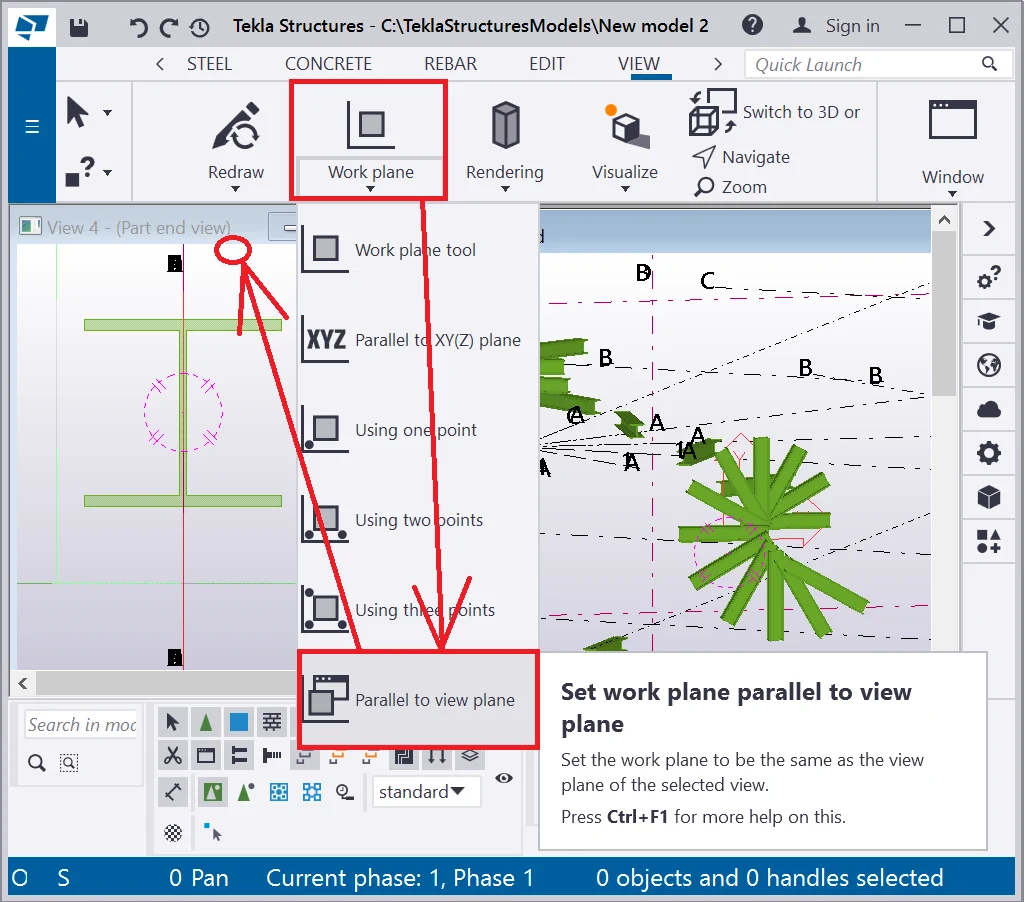
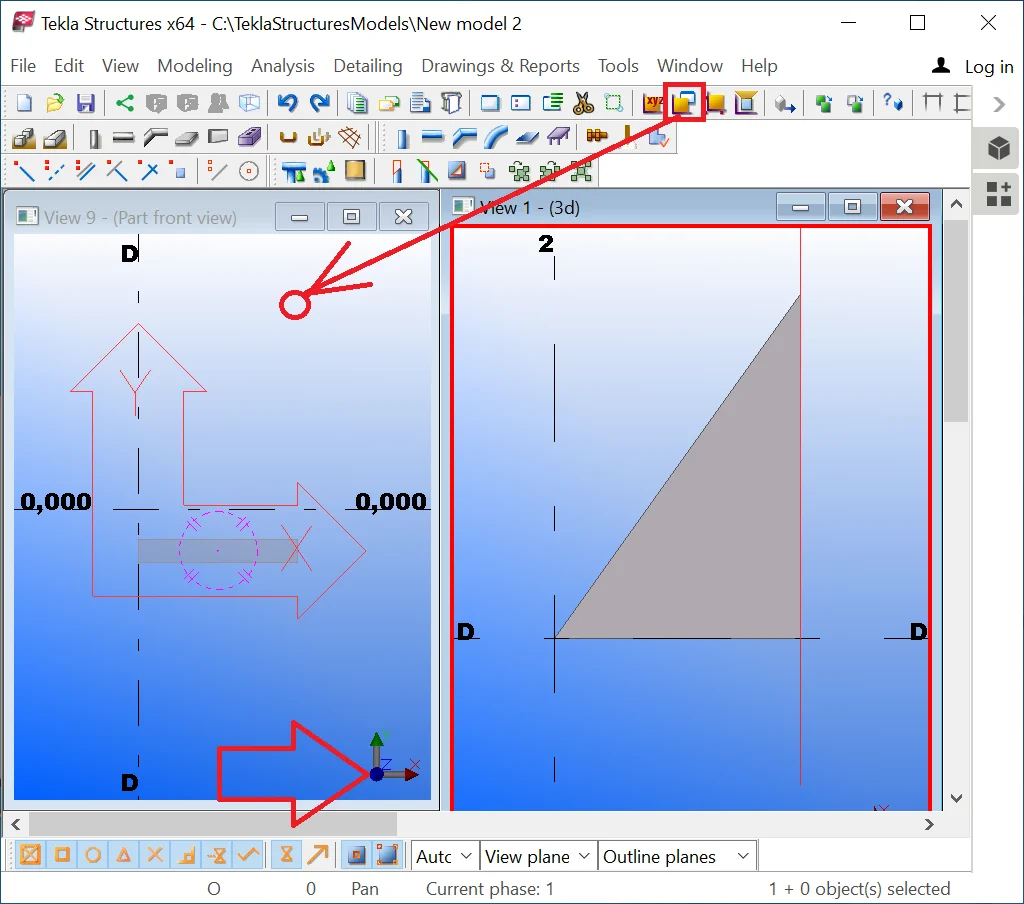
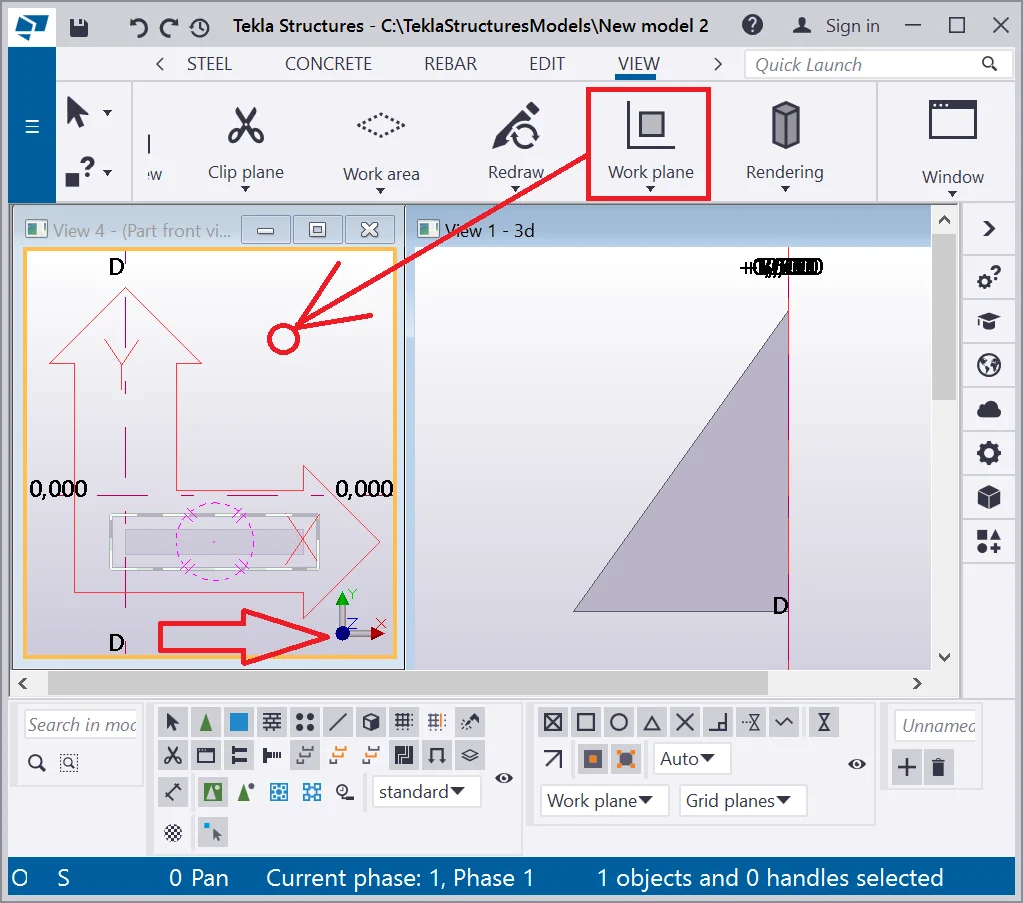
Four more beam view windows appeared. Go to the “Part Front view” window. At the right bottom corner of the view, make sure the Z-axis direction does not coincide with the eye gaze direction.
Reset the axis direction by using the ‘Work plane tool”.
The arrow marking that appeared indicates the updated view plane, where

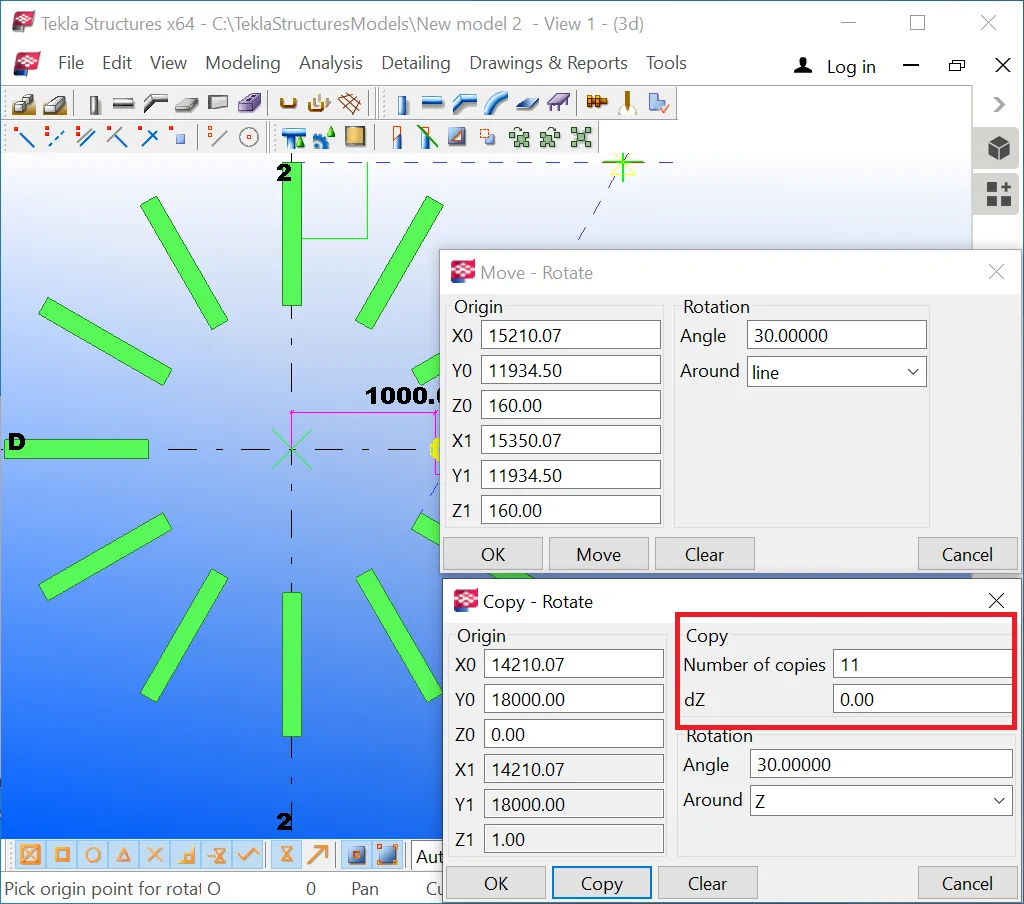
Now, enable the “Copy Special - Rotate” tool and indicate the new rotation center. Copying will be done around the Z-axis with a modified direction.
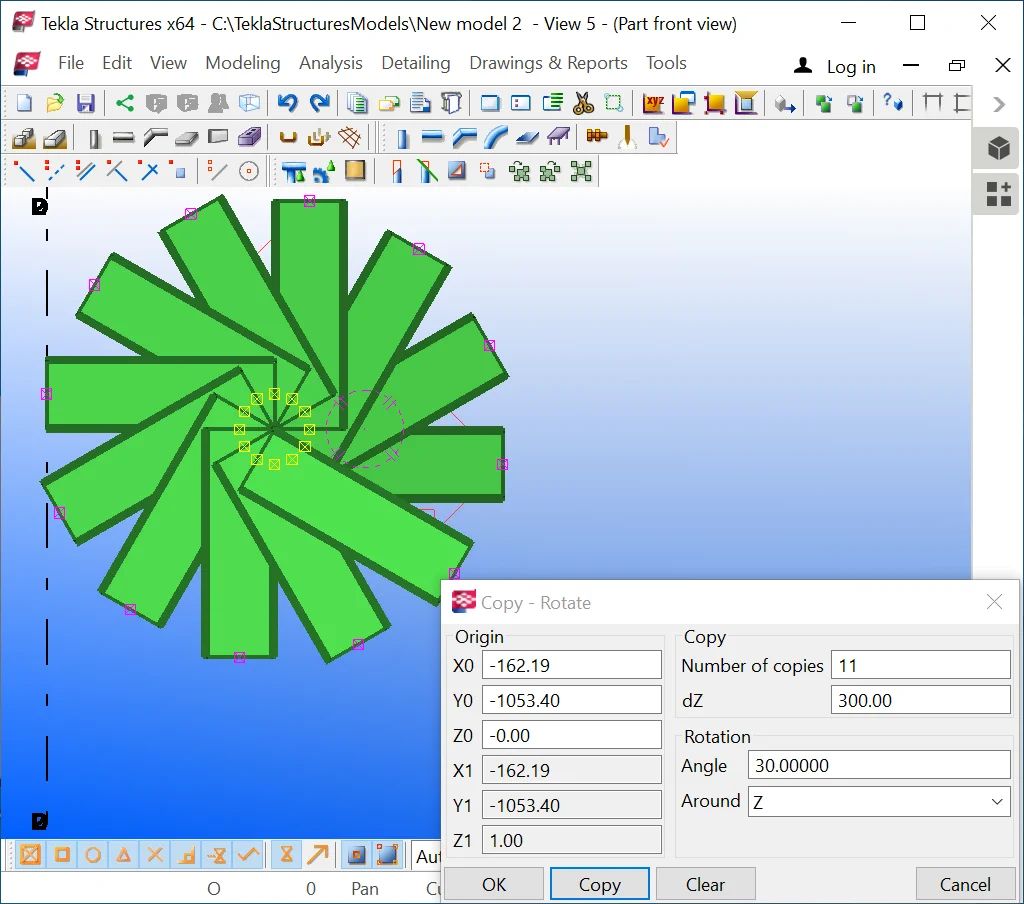
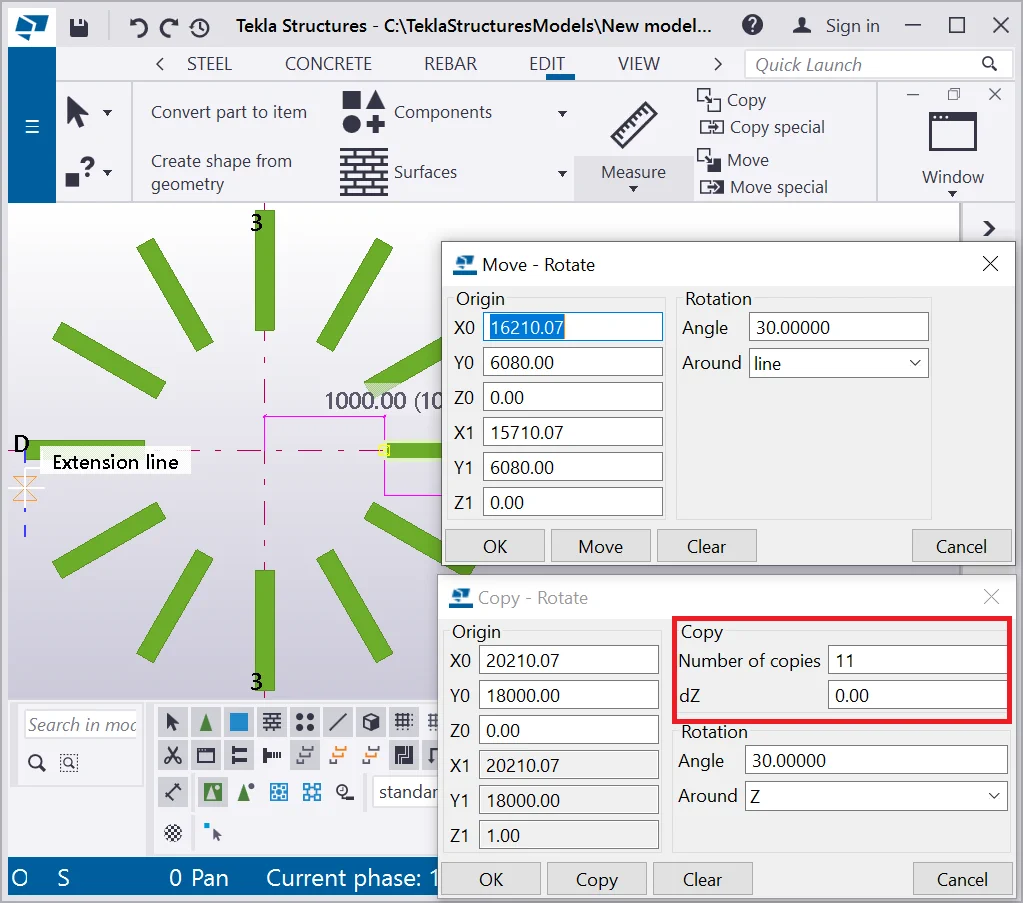
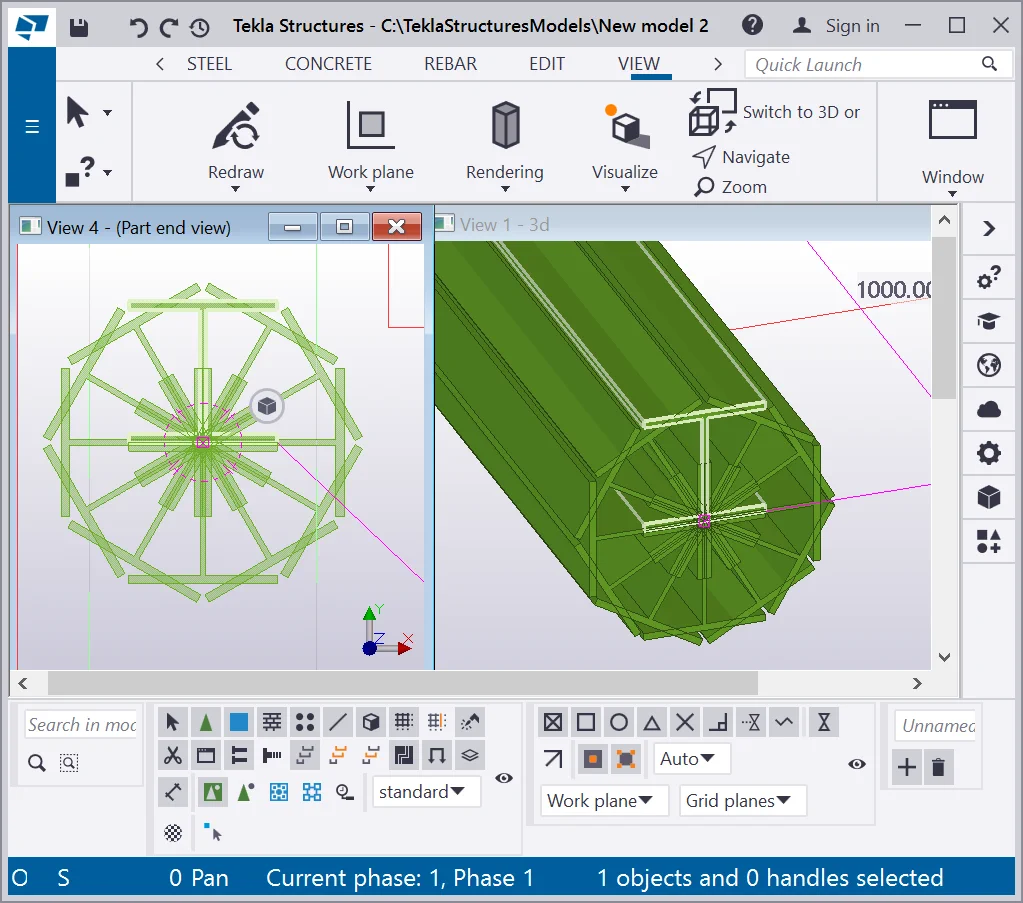
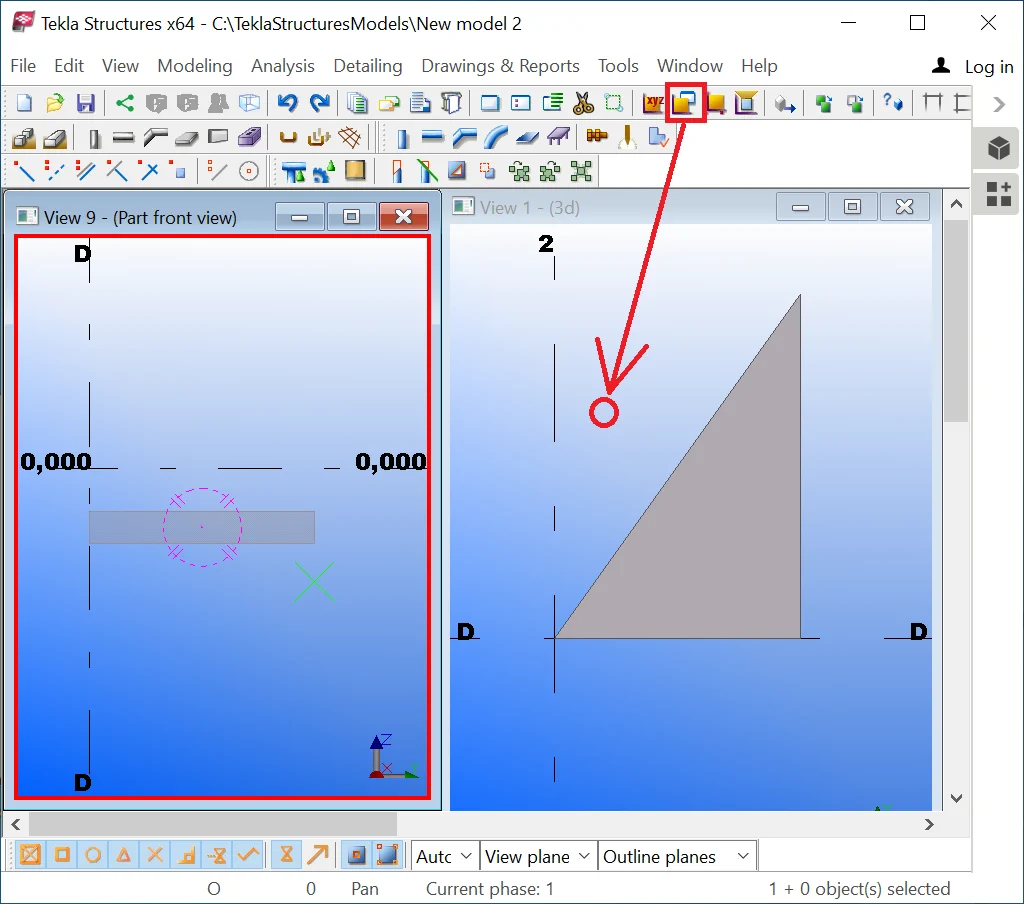
Switch to another view (“Part end view”) and activate the “Work plane” tool. Modify the Z-axis direction to be perpendicular to the eye gaze direction.
Re-Enable the “Copy Special - Rotate” tool and indicate

Re-enable the “Copy Special- Rotate” tool and set up the dZ
Restore the initial Z-axis direction. Close all the views of the beam.


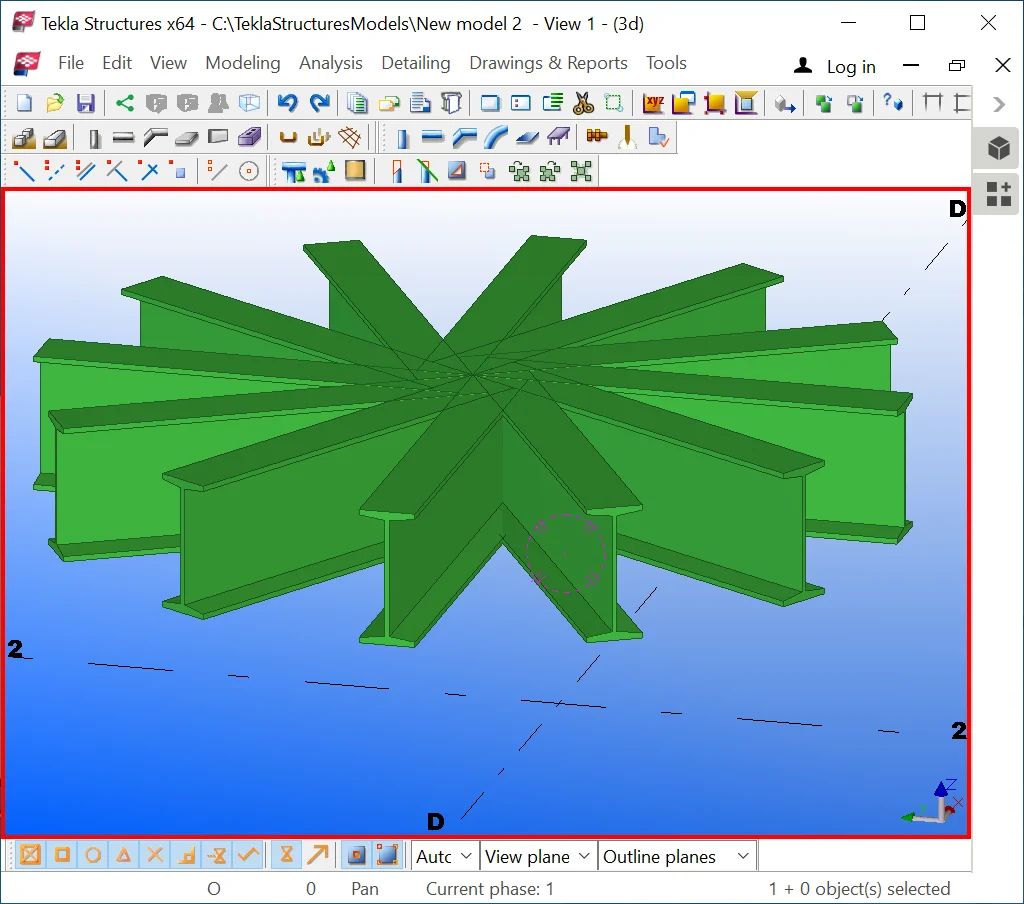
Let’s test the second option for executing the “Copy Special - Rotate” operation indicating the rotation axis by two points. In this case, TS ignores the Z-axis and uses the one, passing through the points indicated.
The algorithm for executing the “Copy Special - Rotate” operation
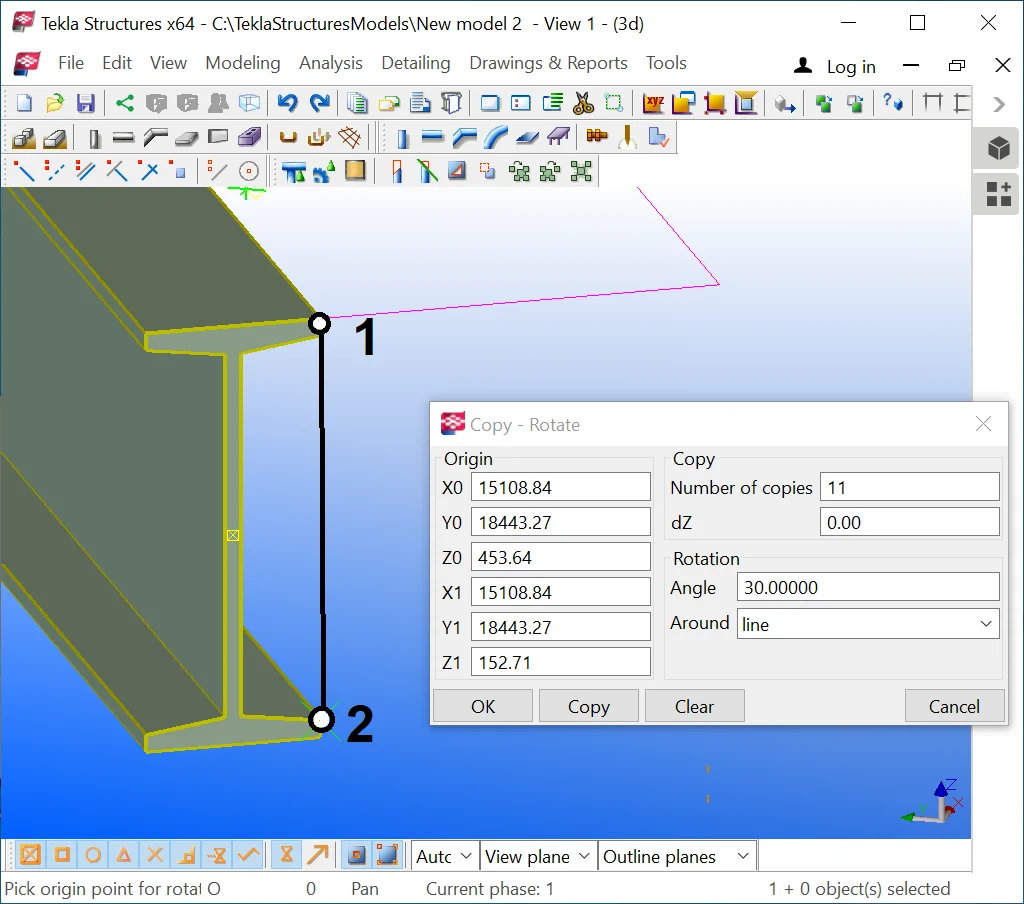
Compare your results to those presented below:

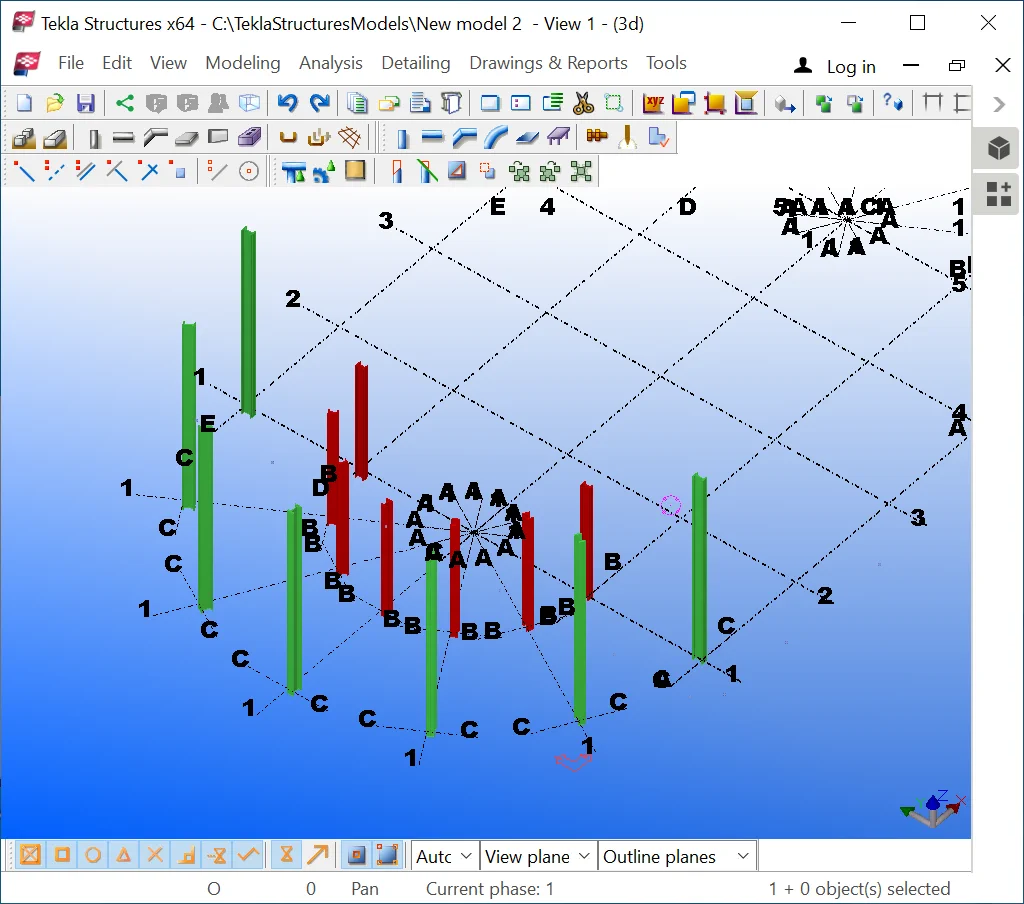
Exercise by your own copying the columns below in a full circle, by picking

We will try out the “Copy Special - Mirror” tool for
Copying an object by mirroring creates a new object type which is not possible to be generated by using any other "Copy Special" tool. Same as for the “Move Special - Mirror”, the handed object is not similar to the initial one, as the right hand is not the same with the left hand.
To get a handed copy of an object it is important to indicate the symmetry axis. The operations sequence is the same as in the case of “Move Special - Mirror” tool.

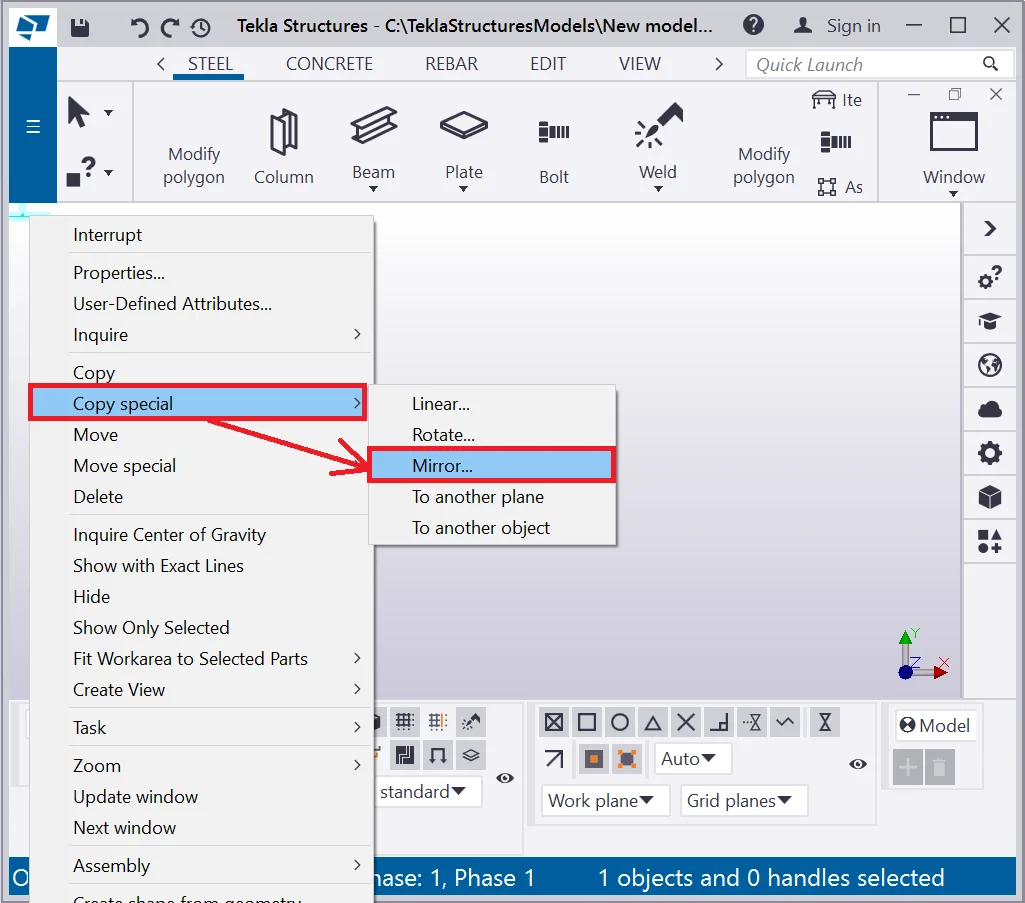

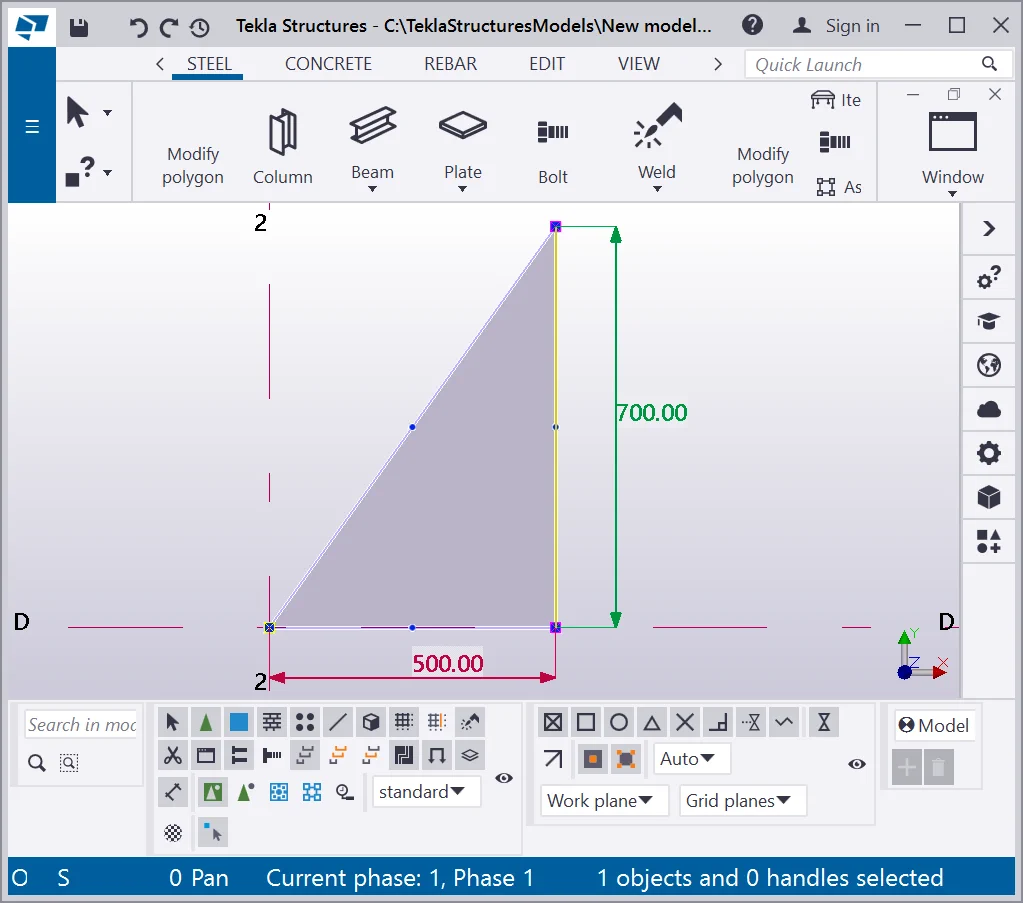
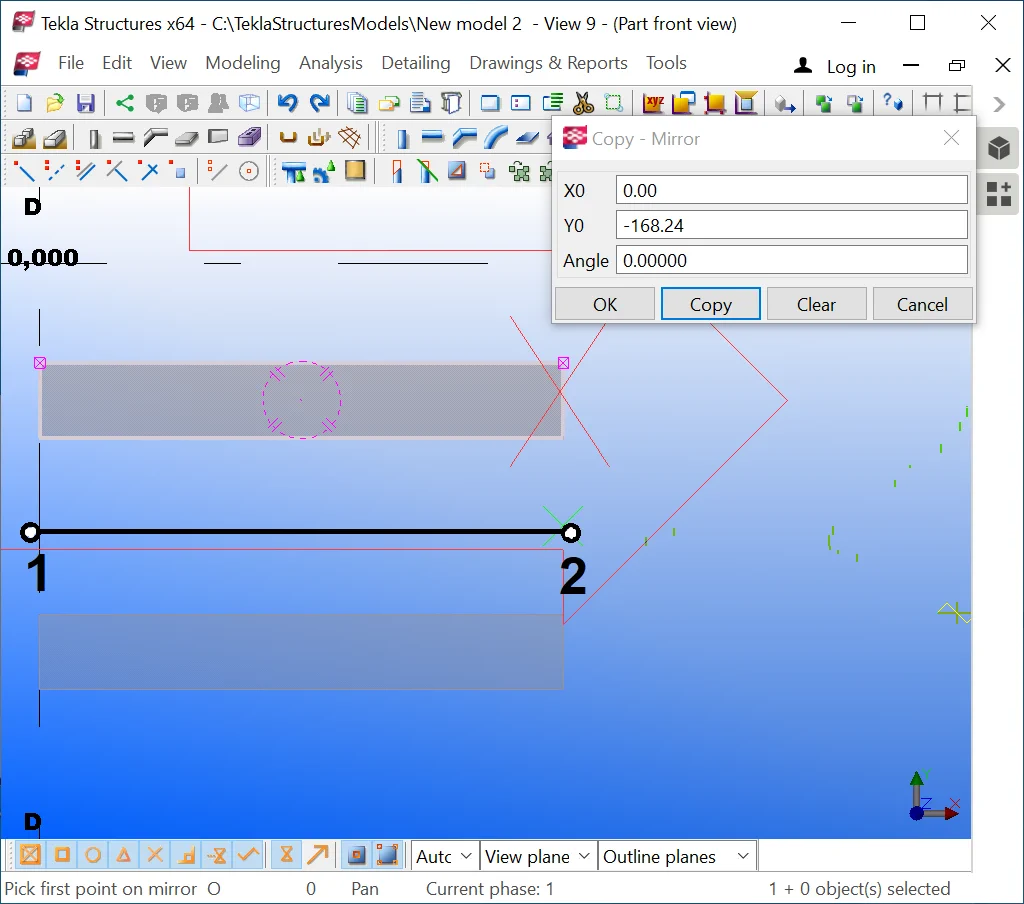
The algorithm for executing “Copy Special - Mirror” is as

As a result, we get a handed copy of the plate.
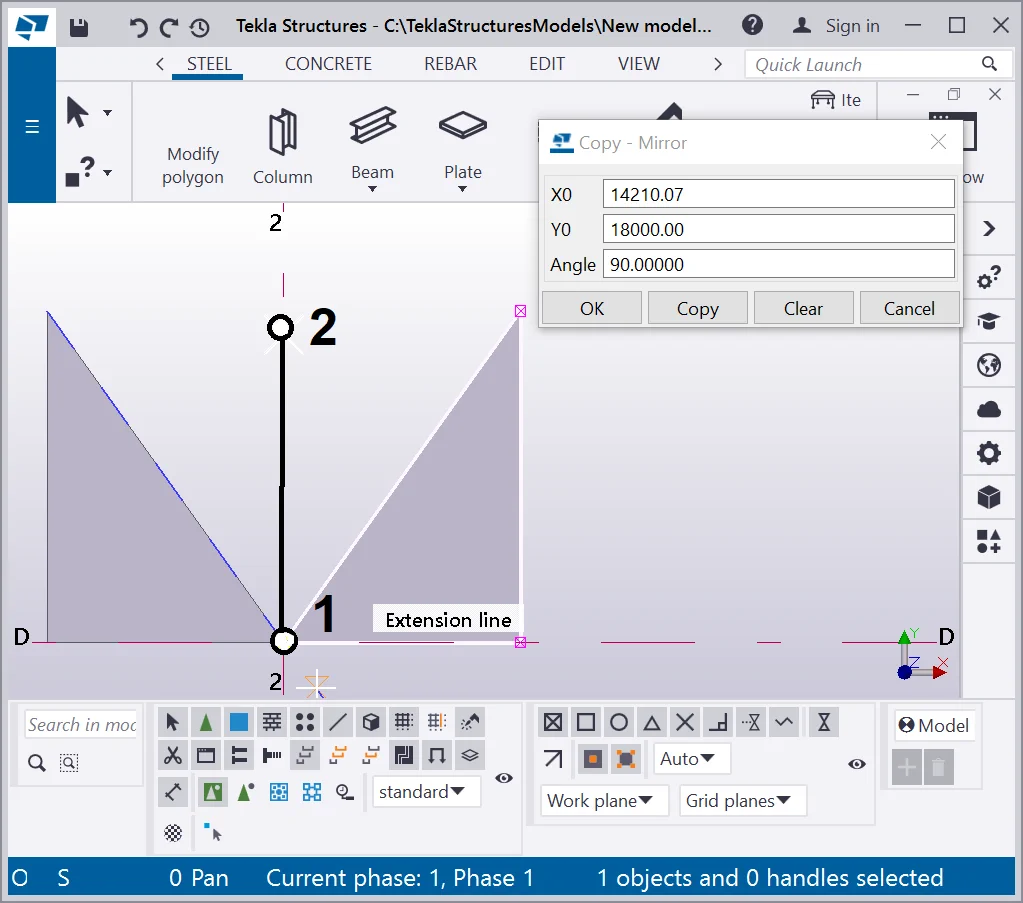
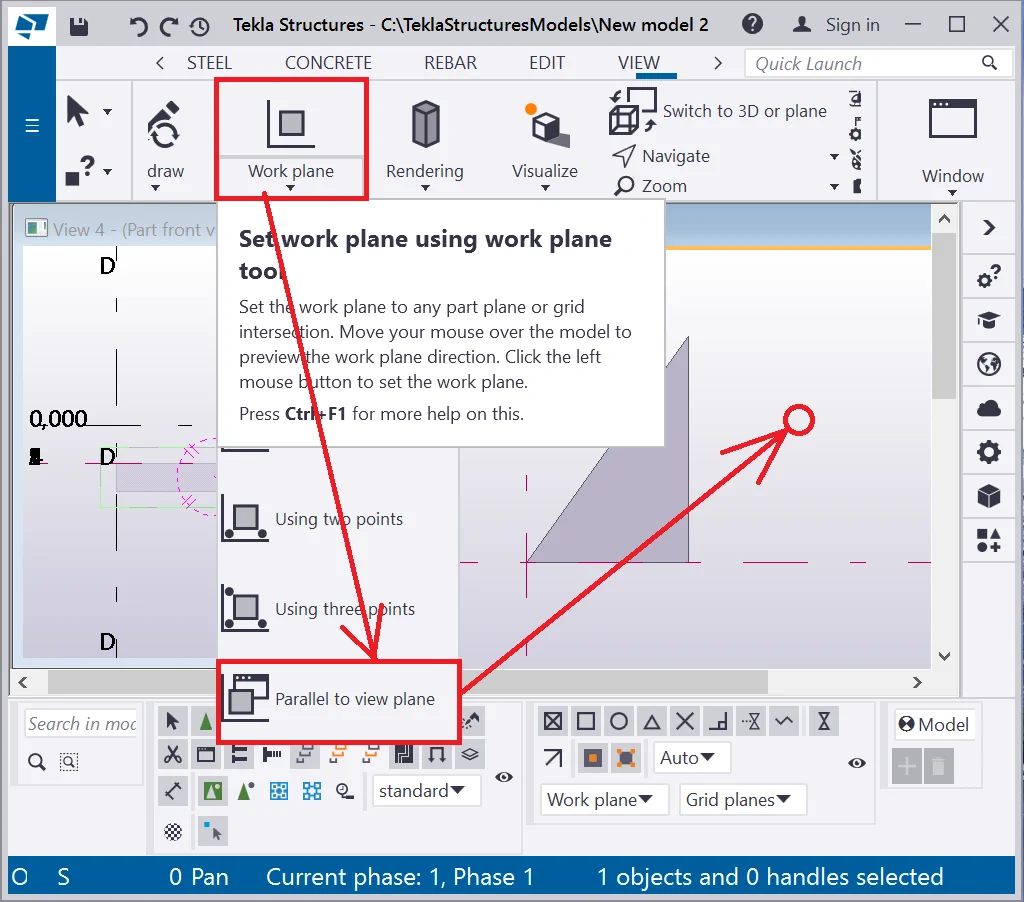
It is important to mention that the Z-axis has to be perpendicular to the eye gaze direction. Thus every time you can recourse to the “Work plane” tool and set the work view “Parallel to view plane”.
Select the plate, make a right-click on it and proceed on “Create View”/ “Default view of Part”. All the part views have been created.
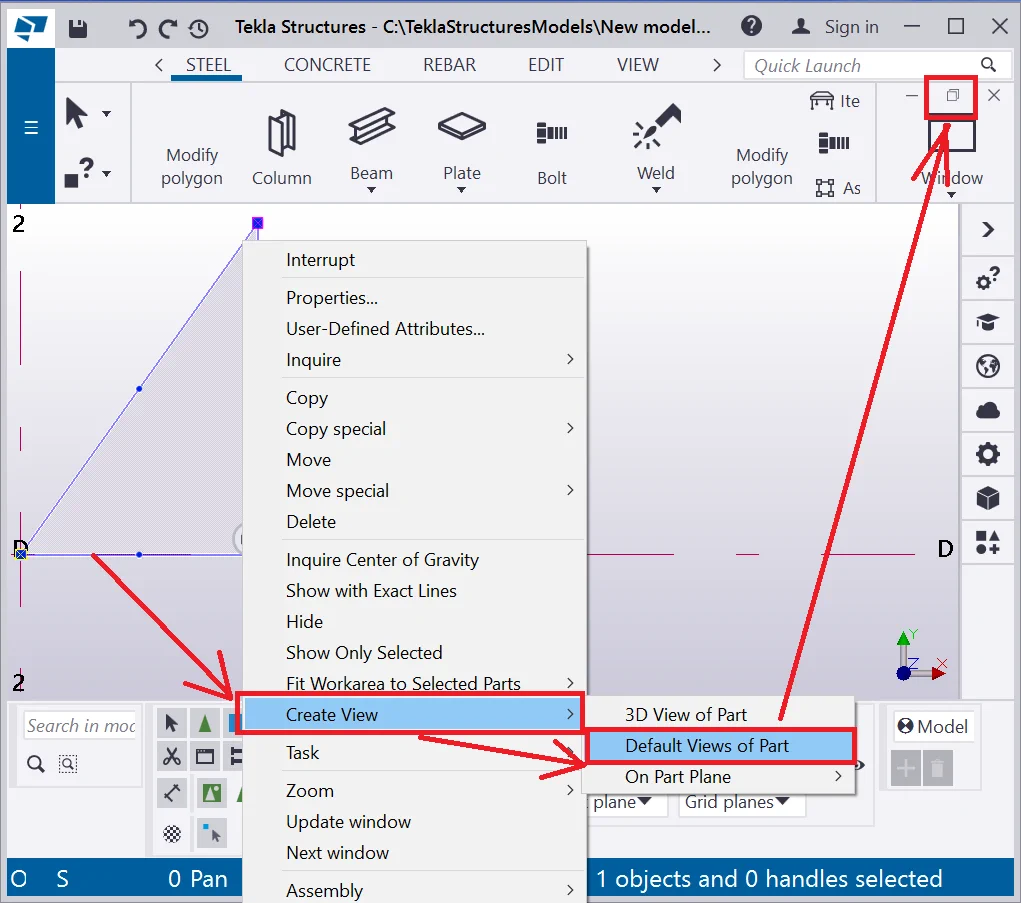
Go to the “Part front” view for further case study examination.
Make sure that the Z-axis is perpendicular to the eye gaze direction. Enable the “Copy Special - Mirror” tool and indicate the points at the view as it is shown below:

Restore the view settings.
Thus now, exercise copying the columns from the rotund building right part to the left one by indicating the symmetry axis at the middle of the building.
Do not forget to switch the view to the view plane by setting the
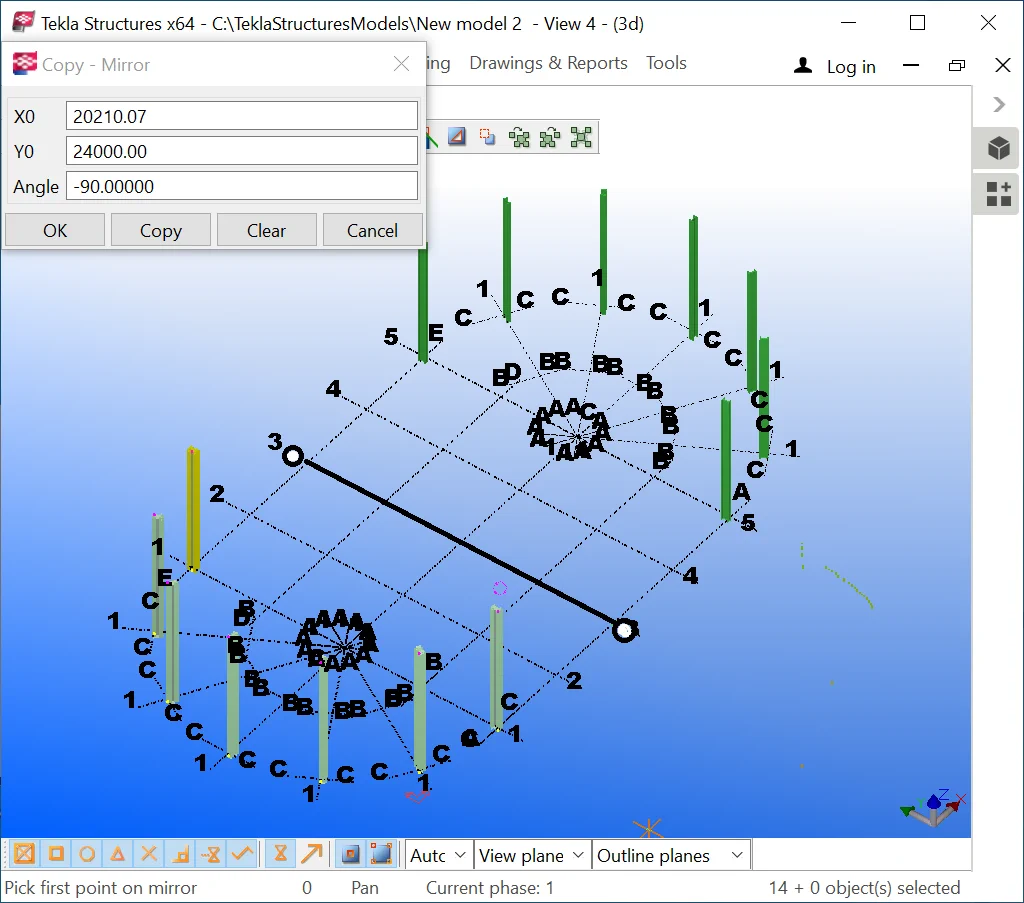
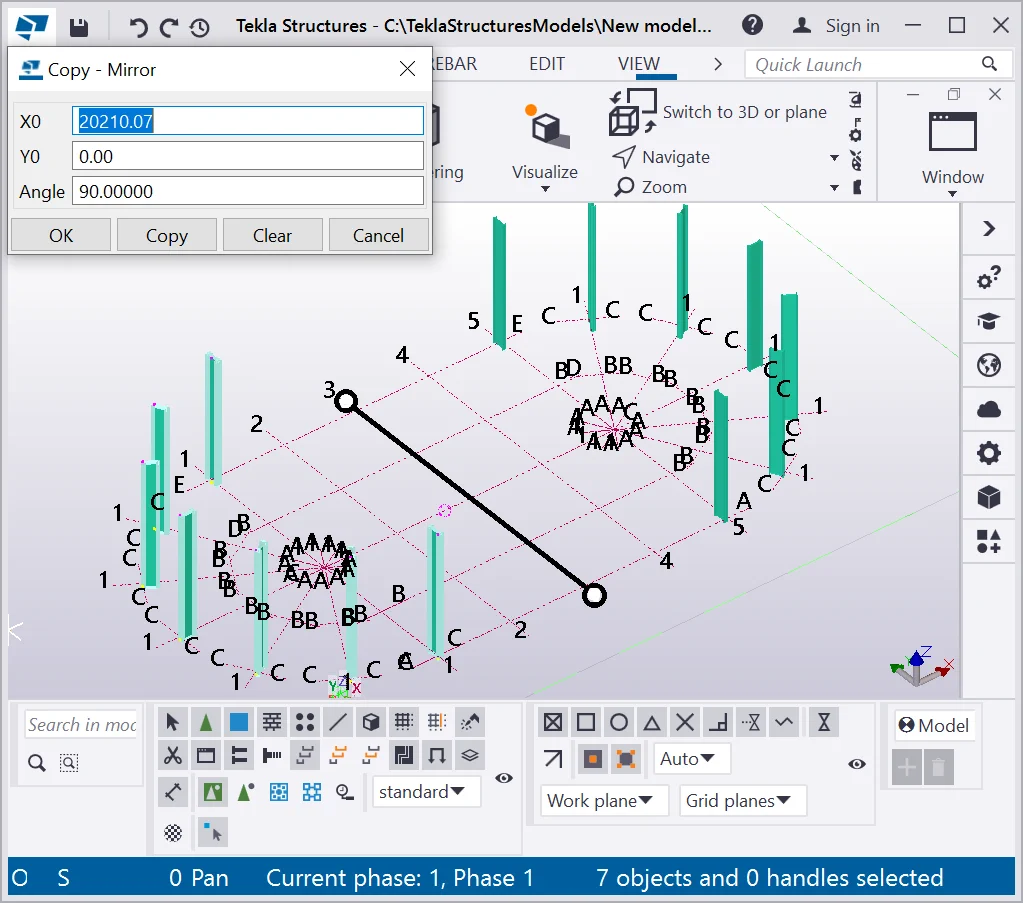
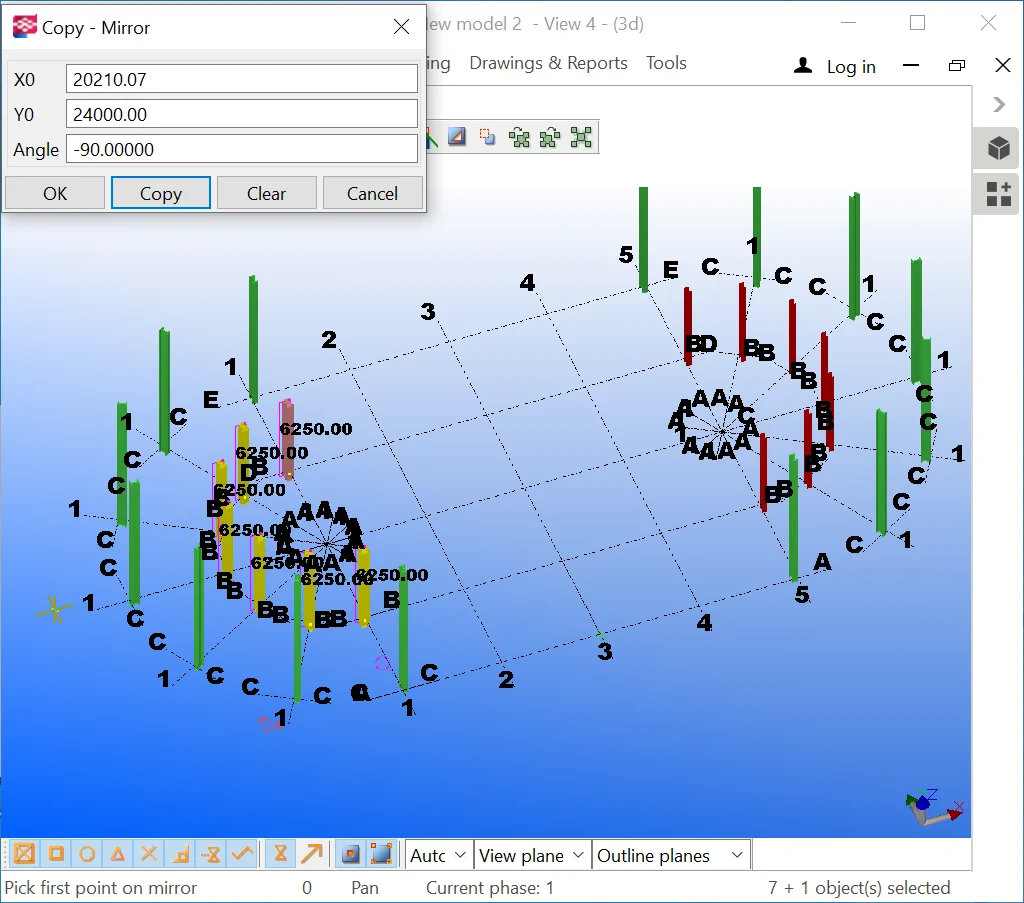
Copy Special - Mirror the second column line by yourself.

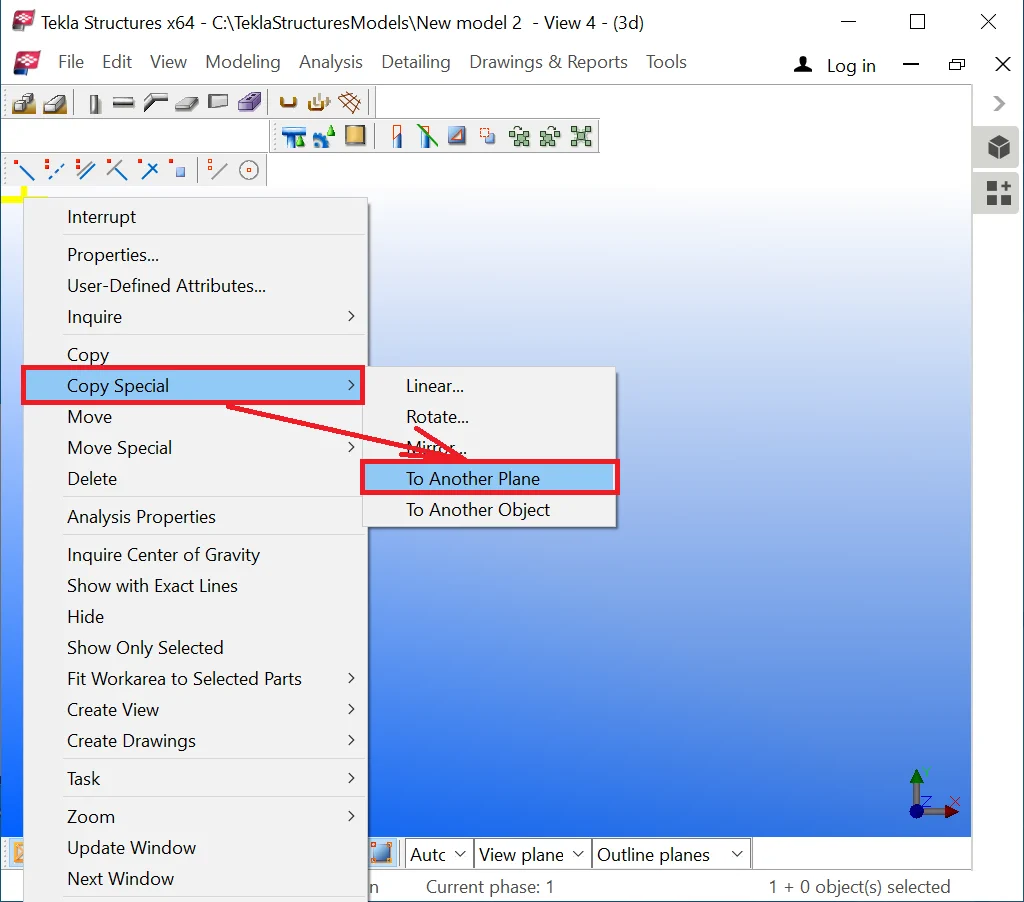
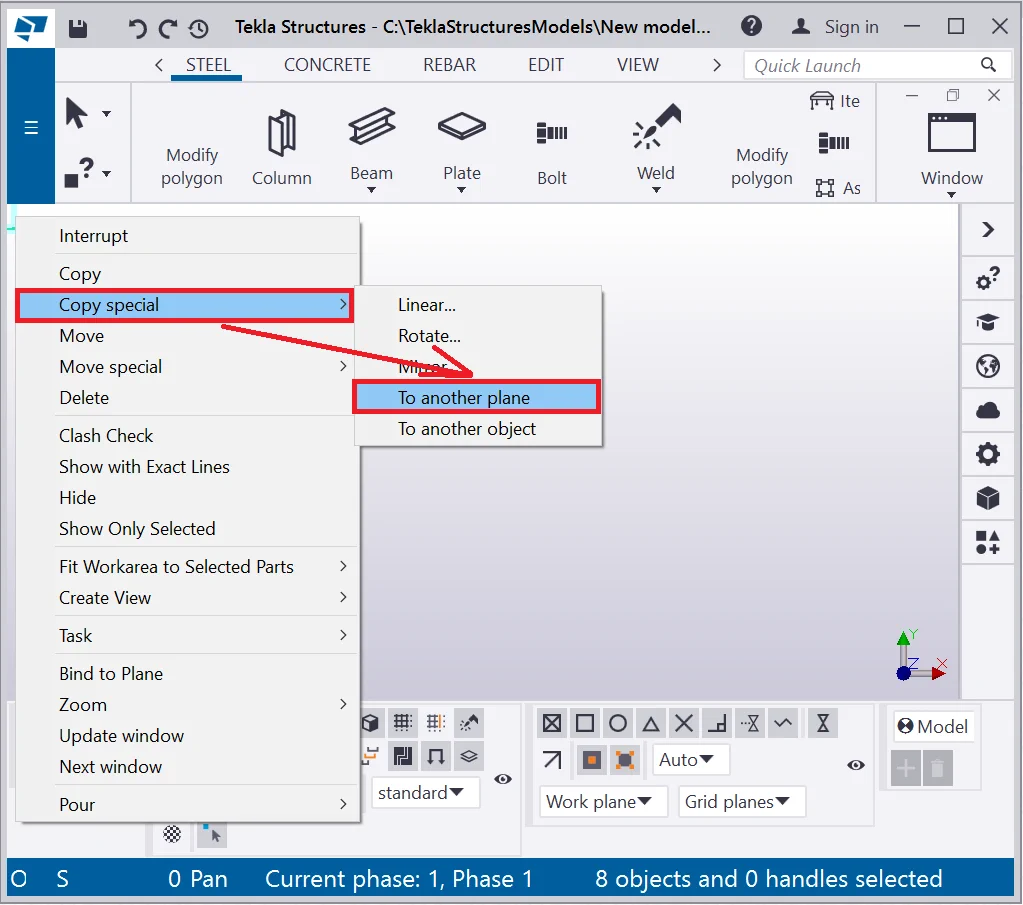
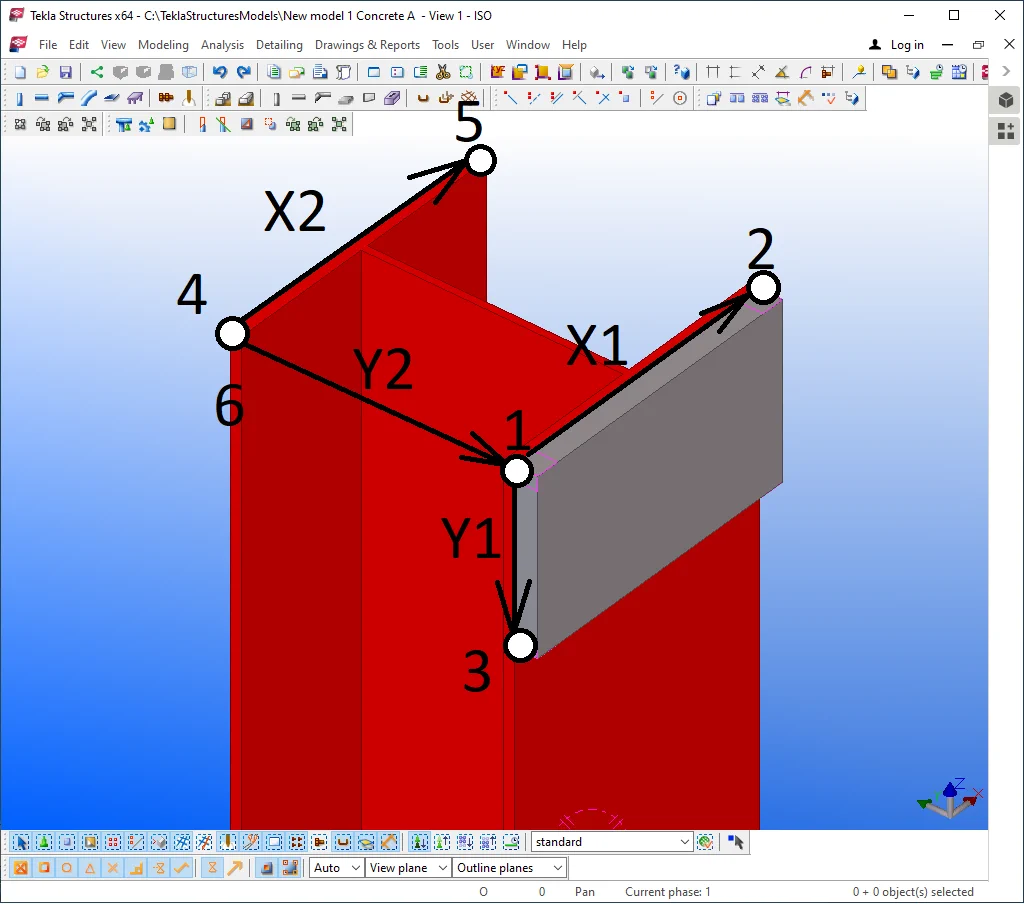
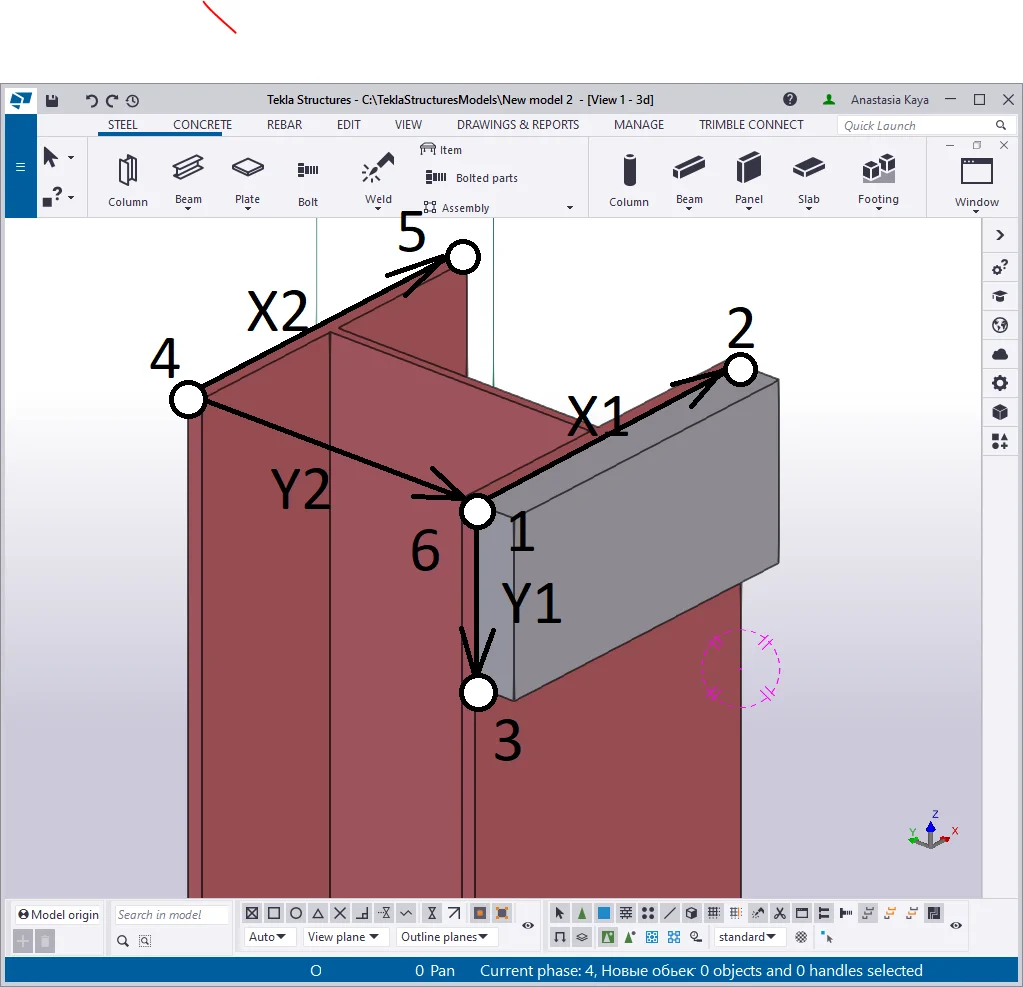
This tool executes copying objects to the new coordinates, as well as
Using this tool requires high precision and attentiveness as it presumes continuously selecting a lot of points: coordinates from where to copy an object, and the coordinates to where to copy an object.
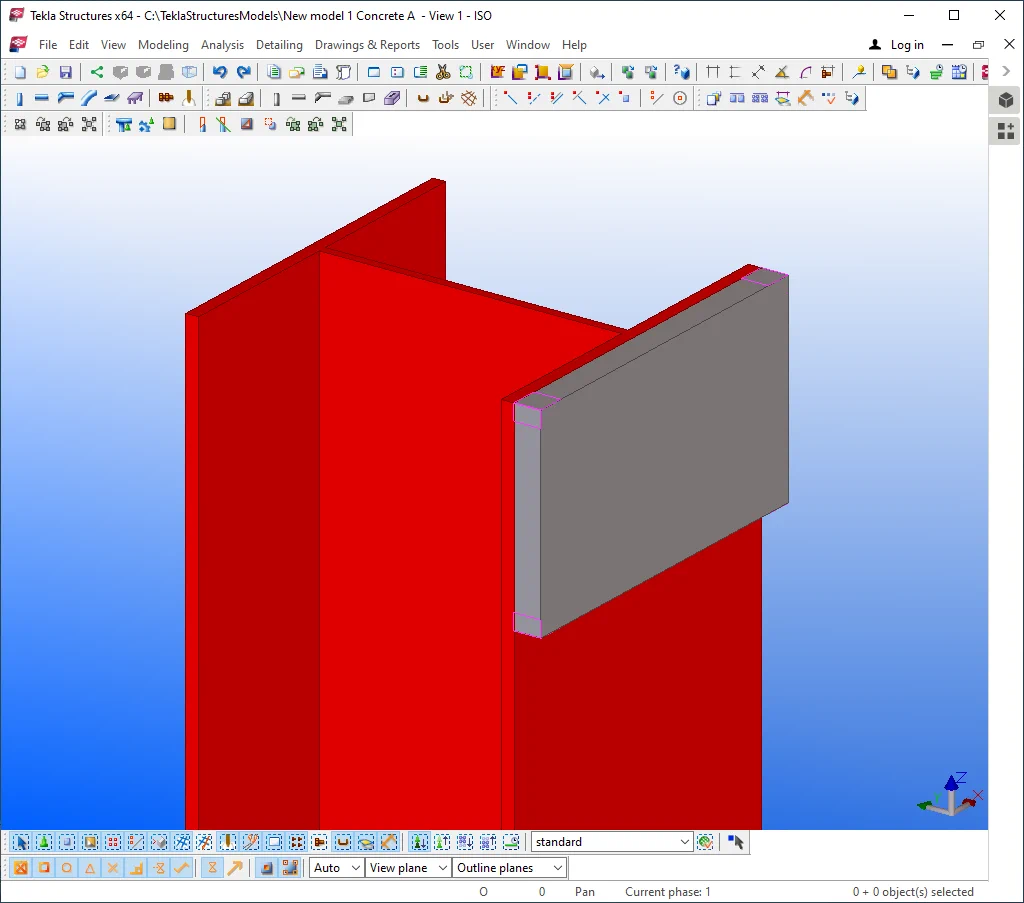
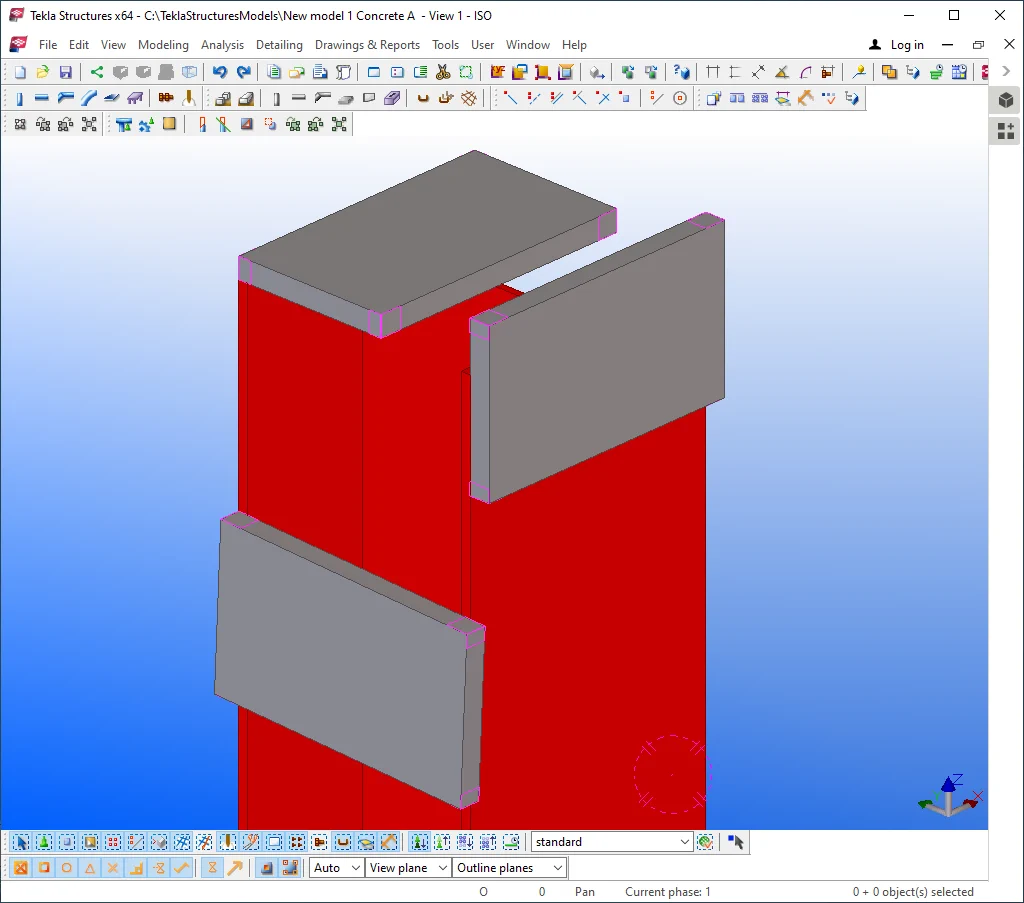
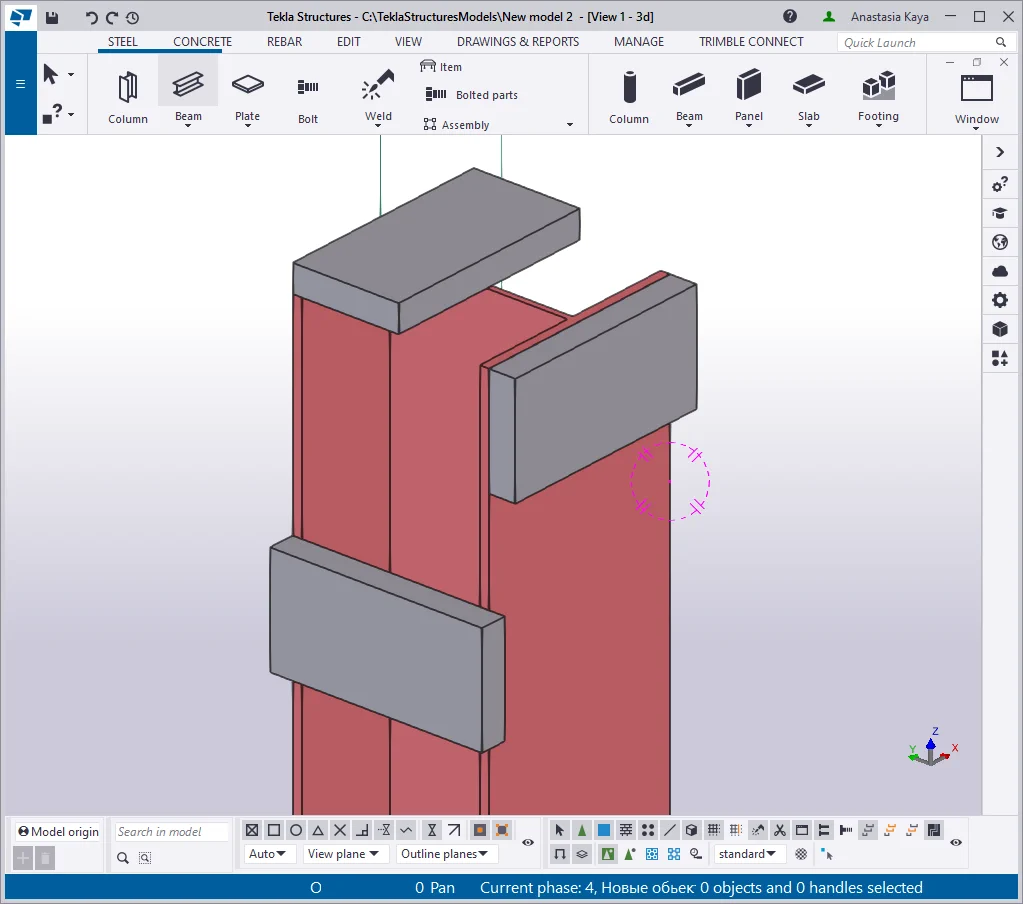
Try out using this tool by testing the following example: create a column
with a plate on its surface, as it is shown below:
The algorithm for copying an object to another plane is as follows:
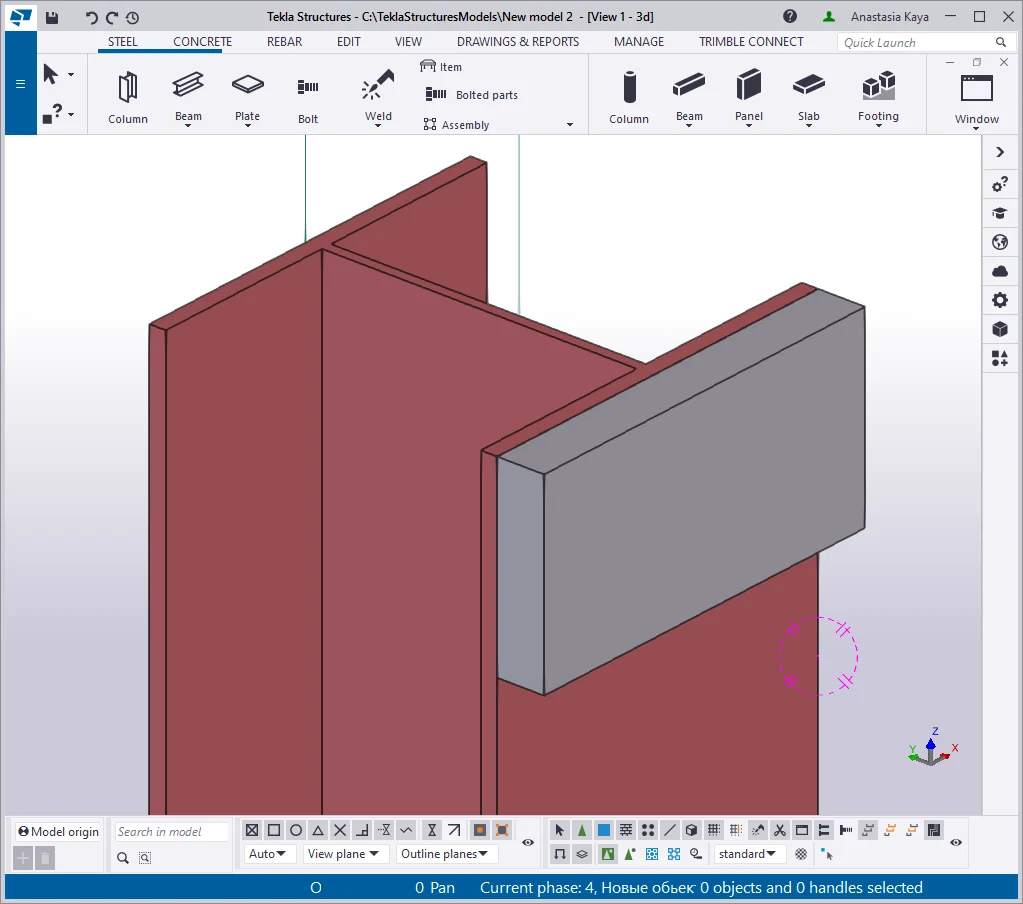
Compare your results to those presented below. Continue copying by indicating
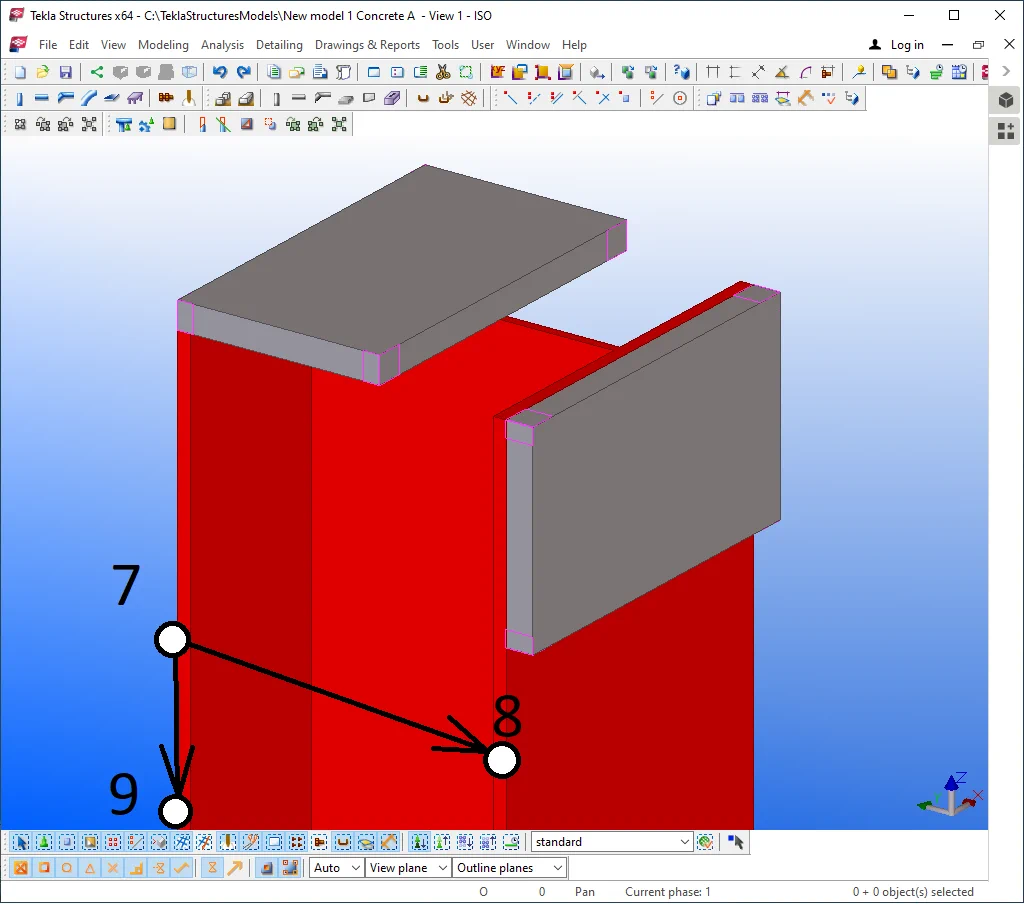
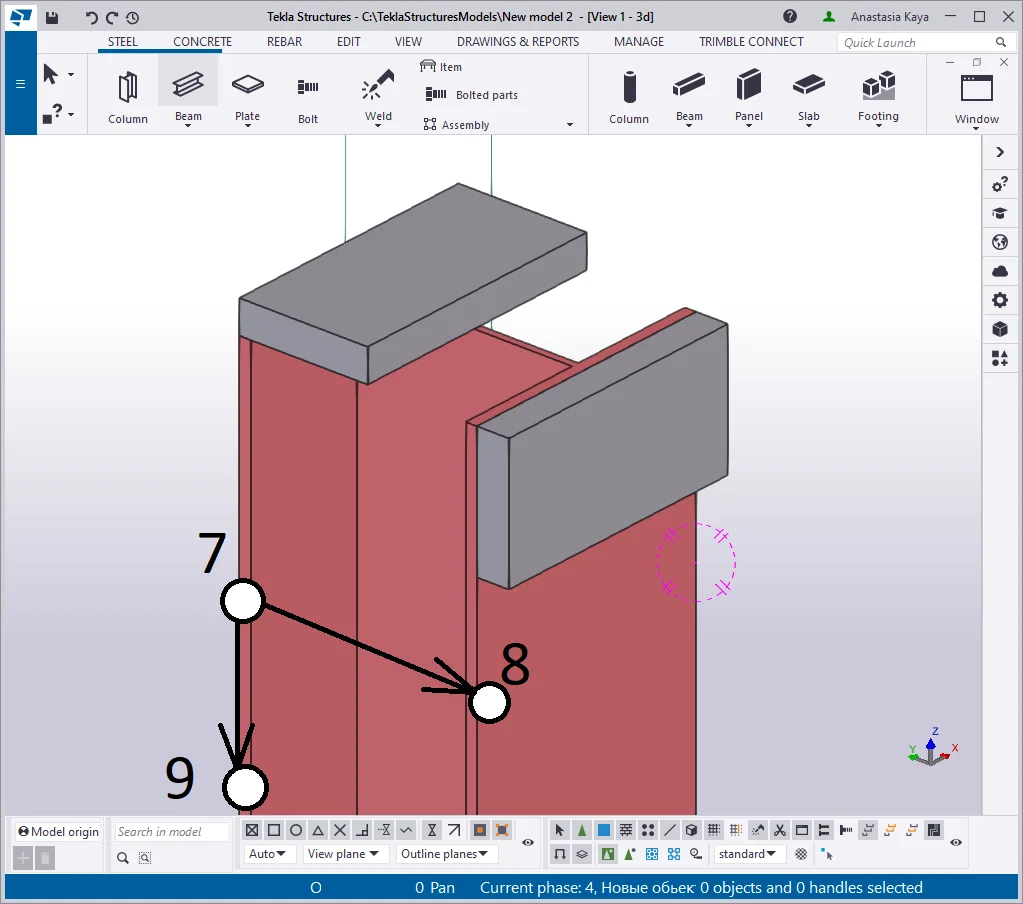
Keep on creating additional copies .
This tool allows copying an element from an object to another. In other words, an object gets copied from one local system of coordinates to another with keeping respect to the distances on all axes. Before initiating the copying procedure, select the required object.
Leave on the view only columns and delete other object types.
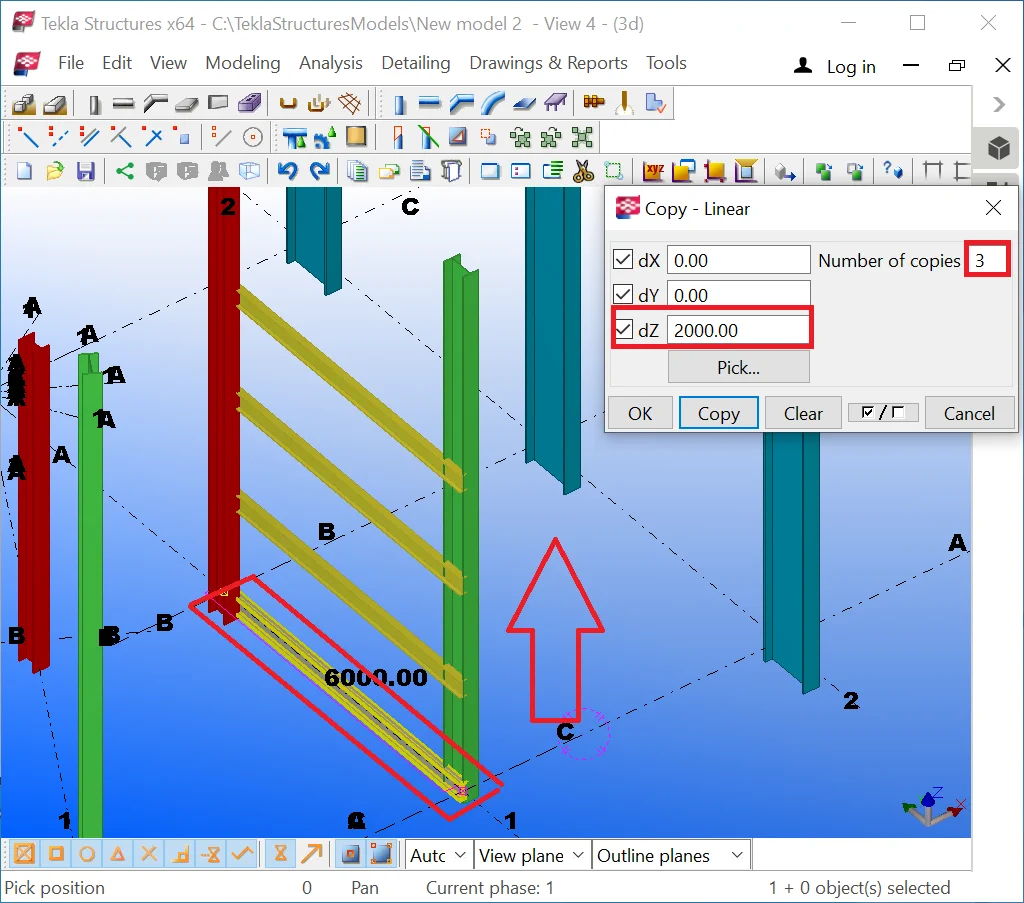
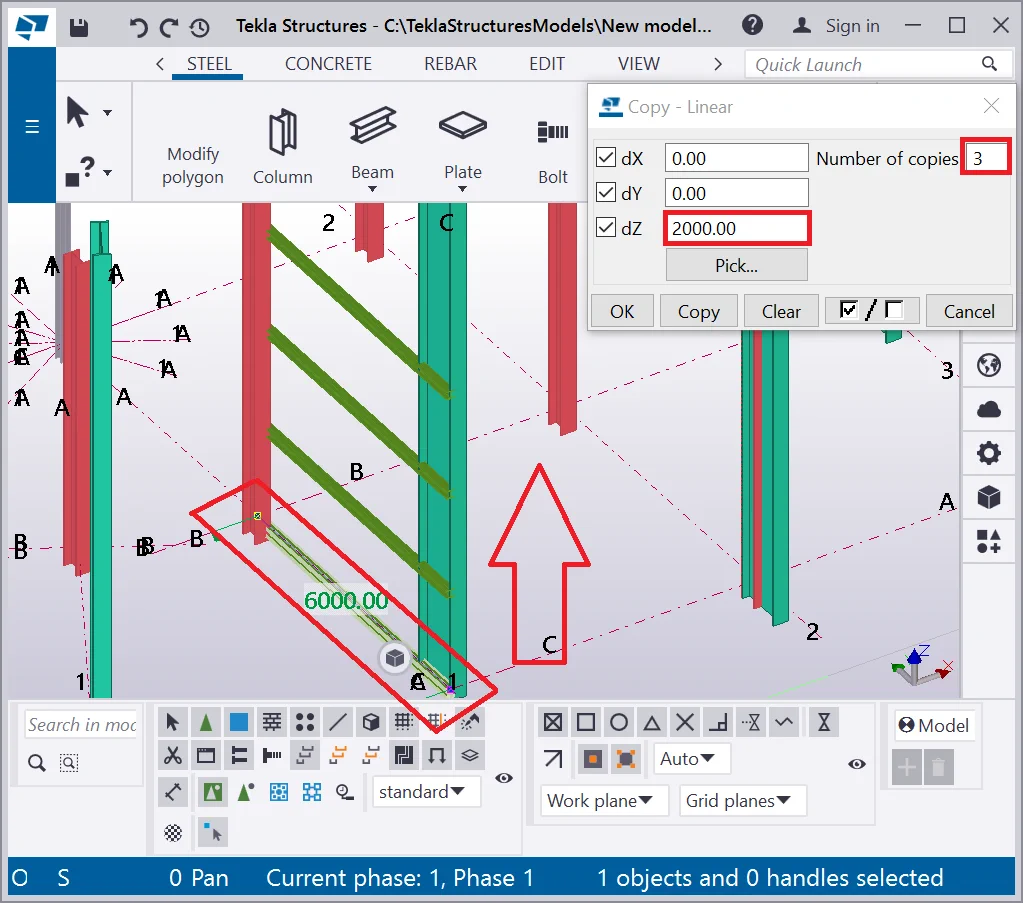
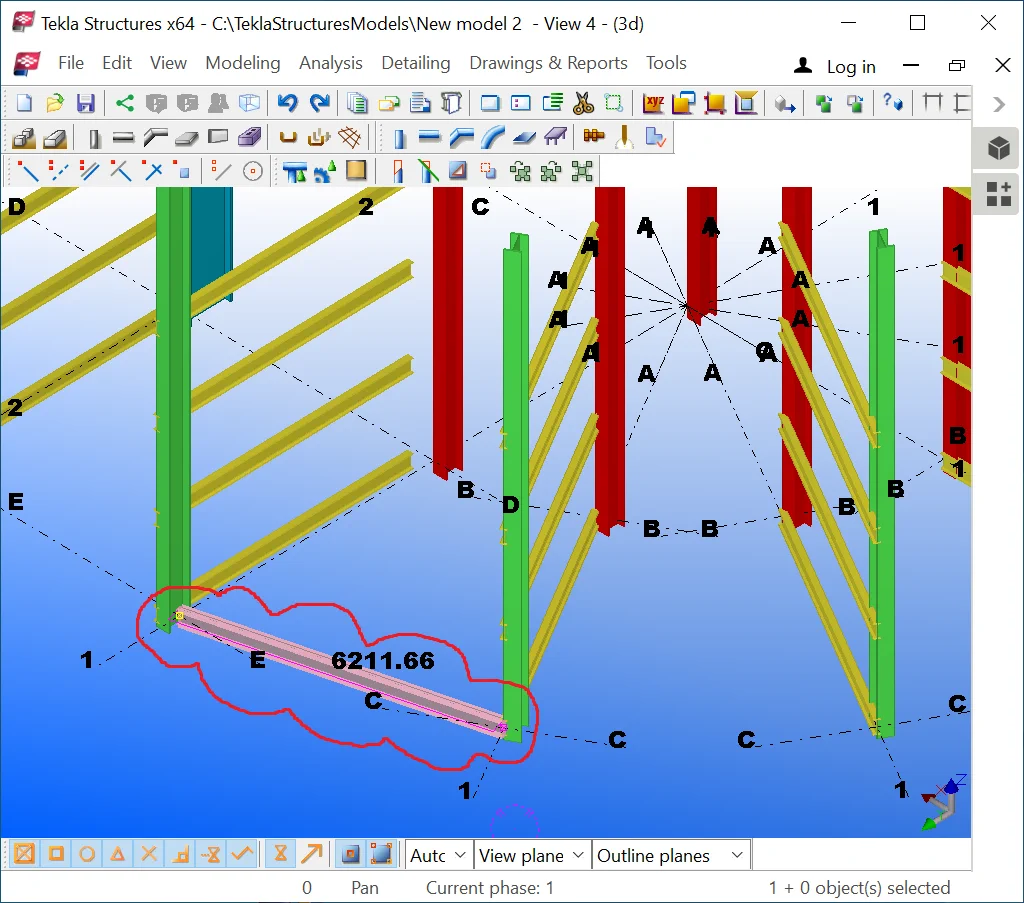
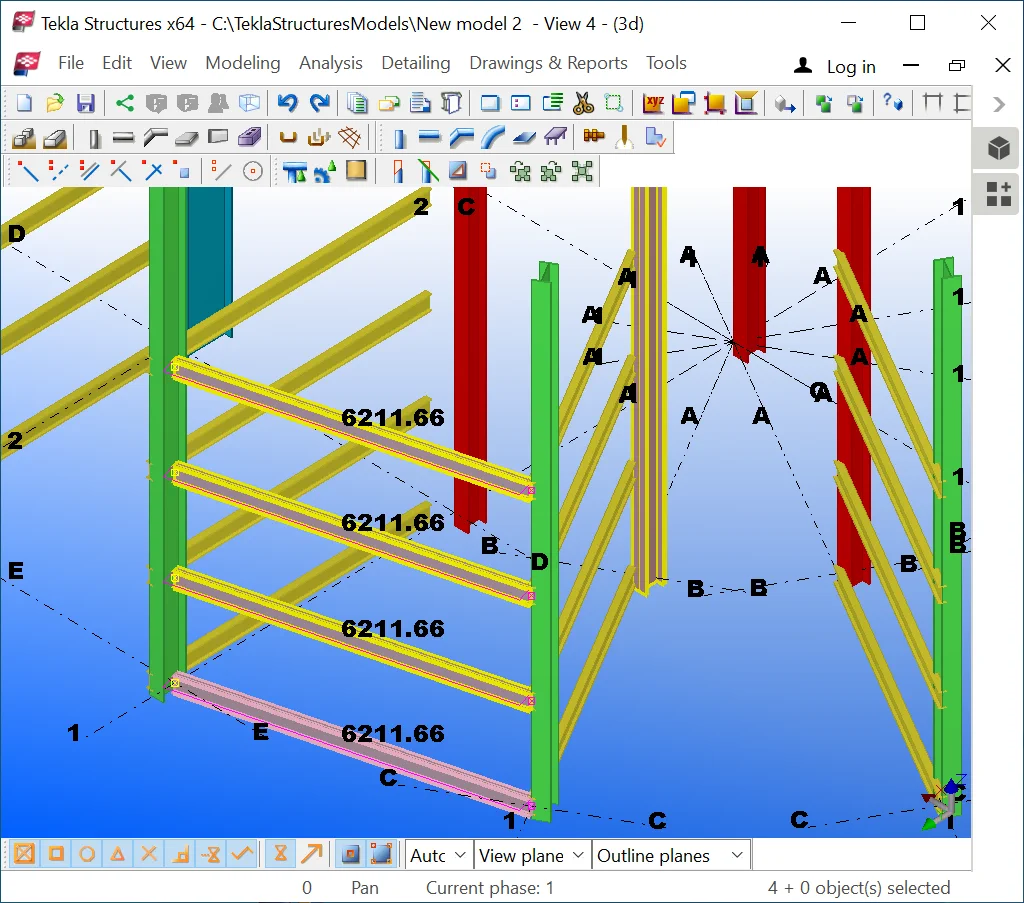
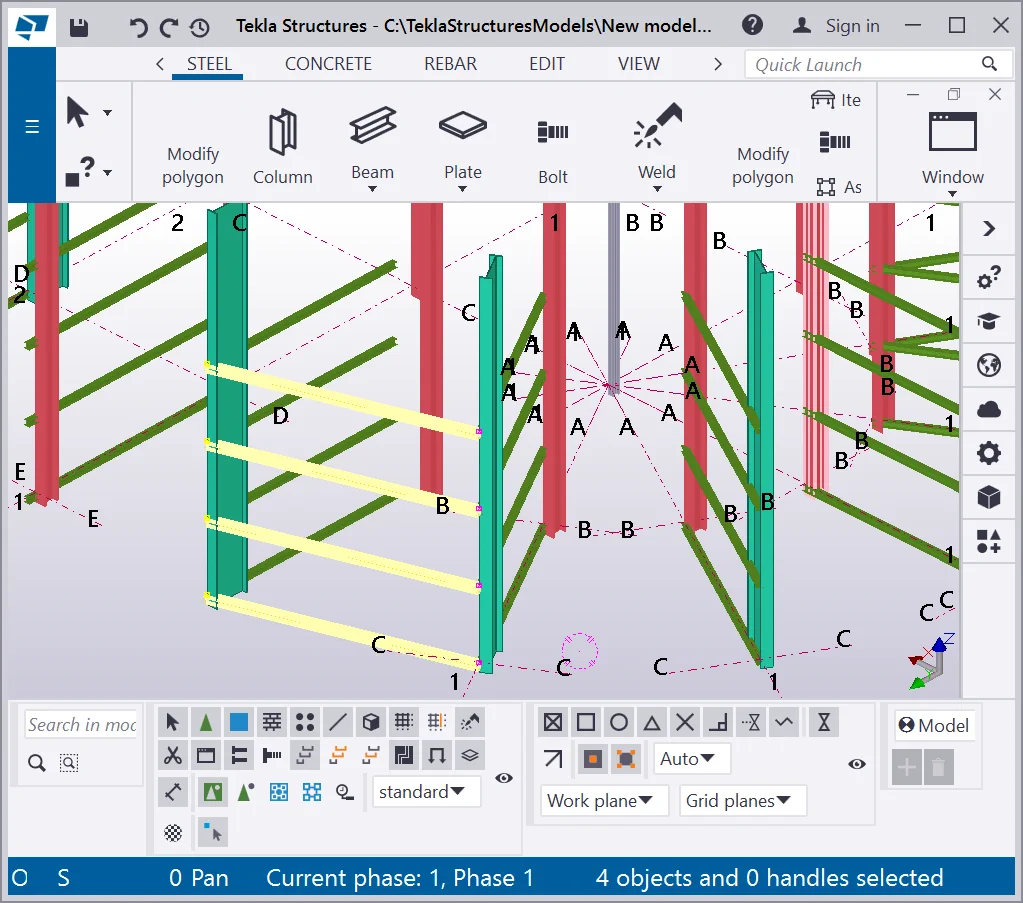
Create a beam by aligning it at the 1-axis, between the axes B and C. (Refer to the below picture). By applying the “Copy Special- Linear” tool, create three vertical equidistant (2000mm) copies of the beam.
Select all the beams and copy them from a column to another. Follow the
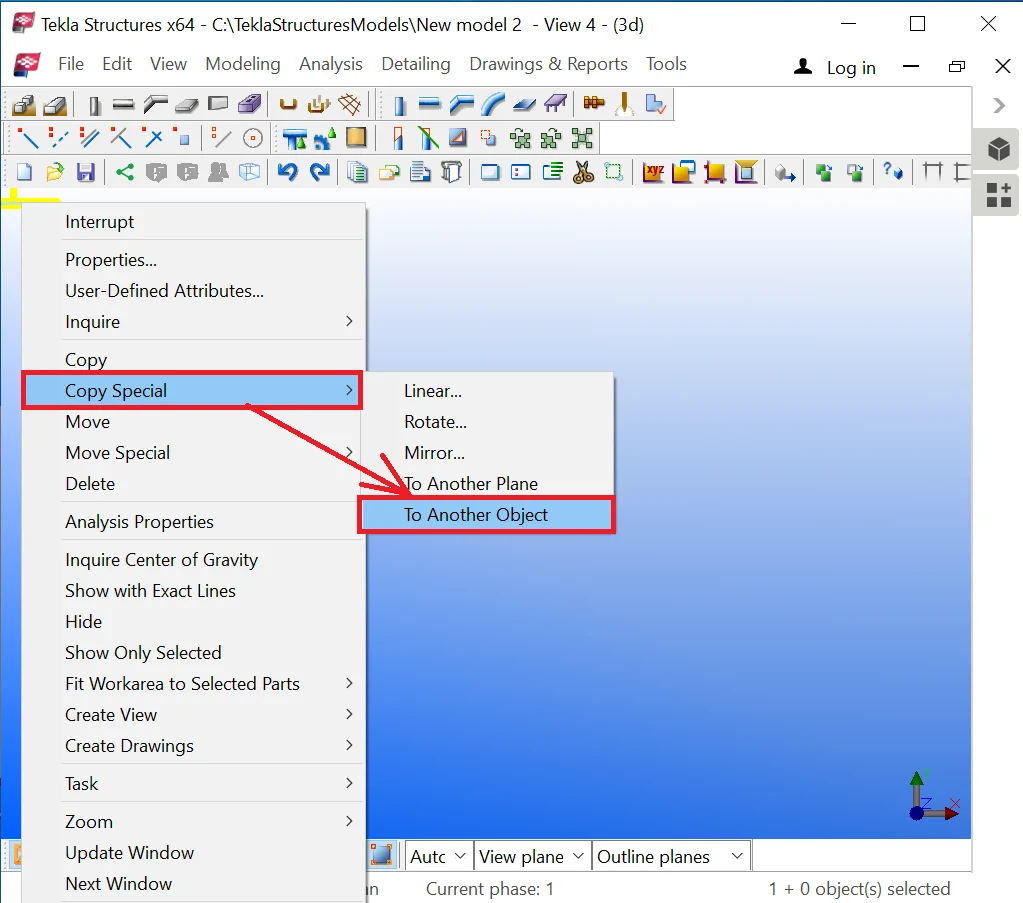
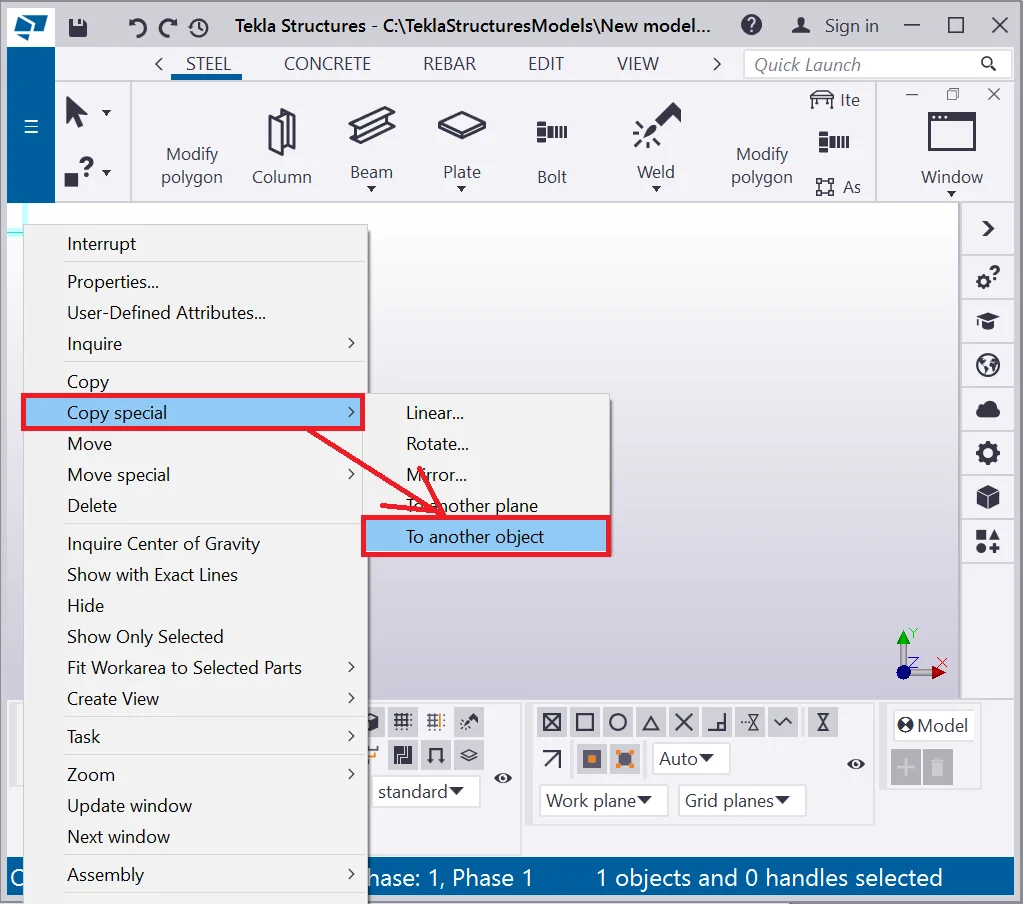
The algorithm for using the “ Copy Special- To another object” tool is as follows:

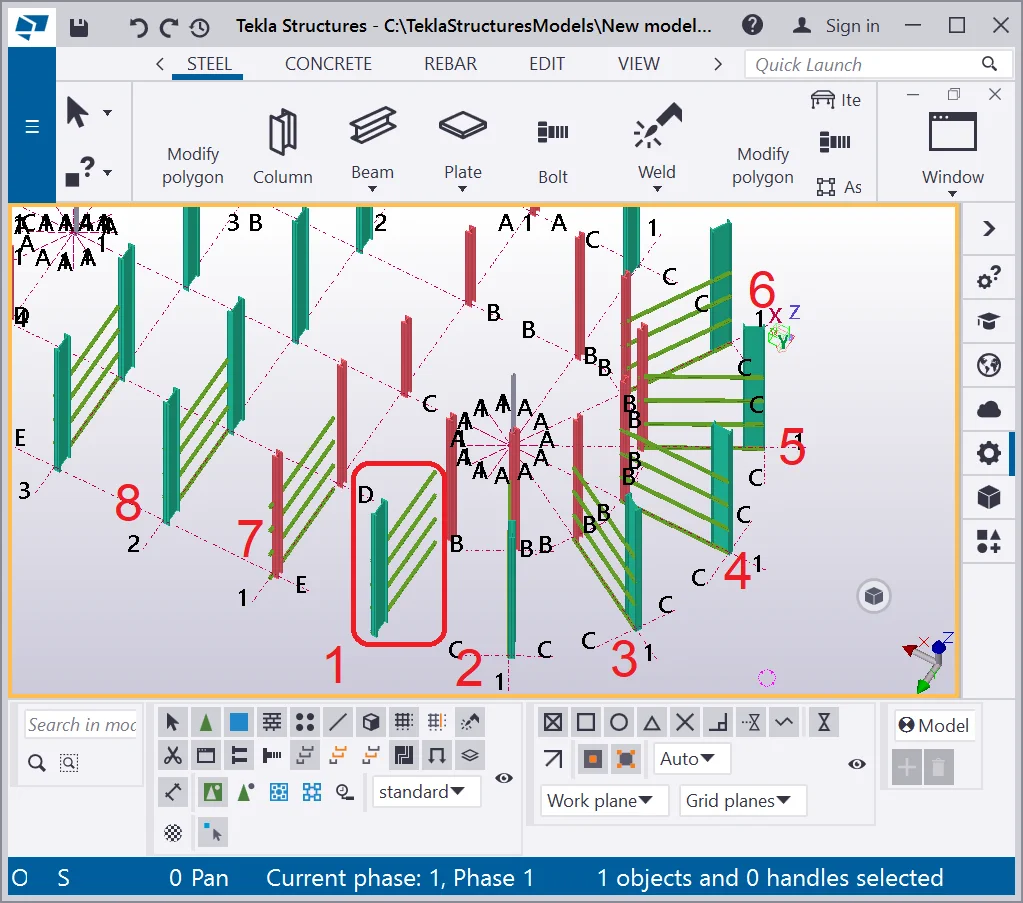
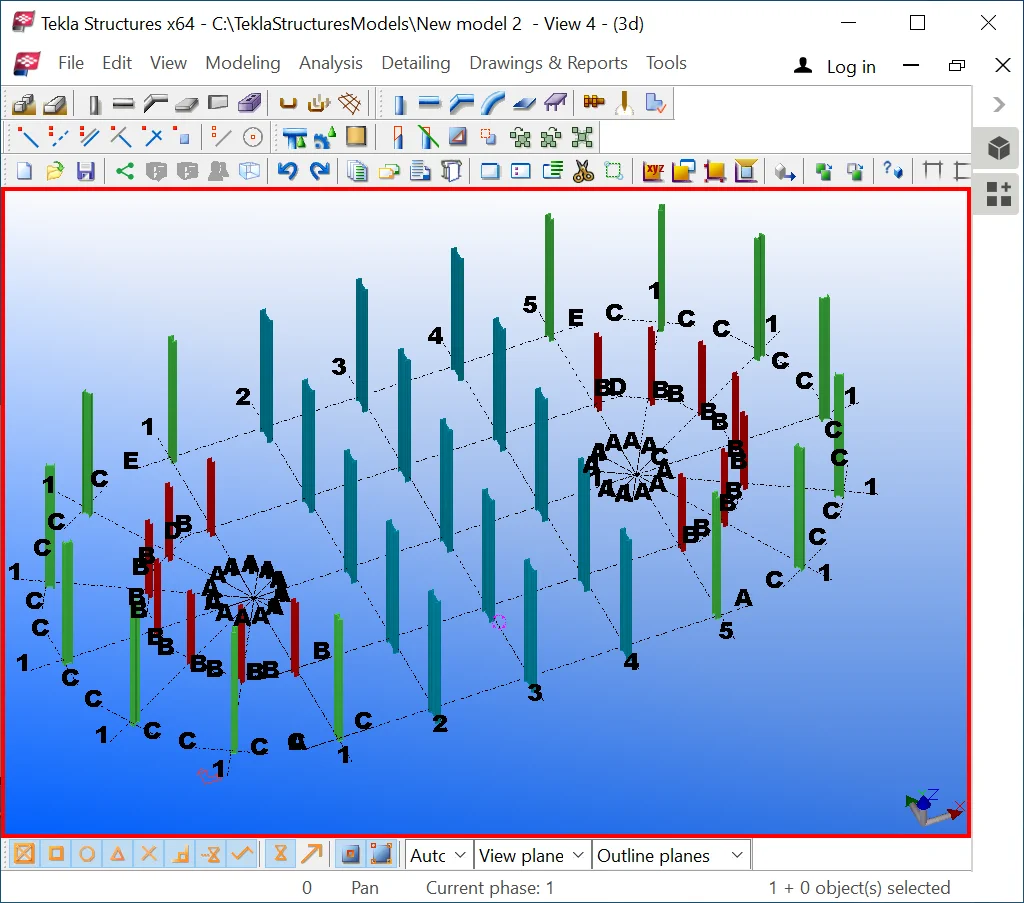
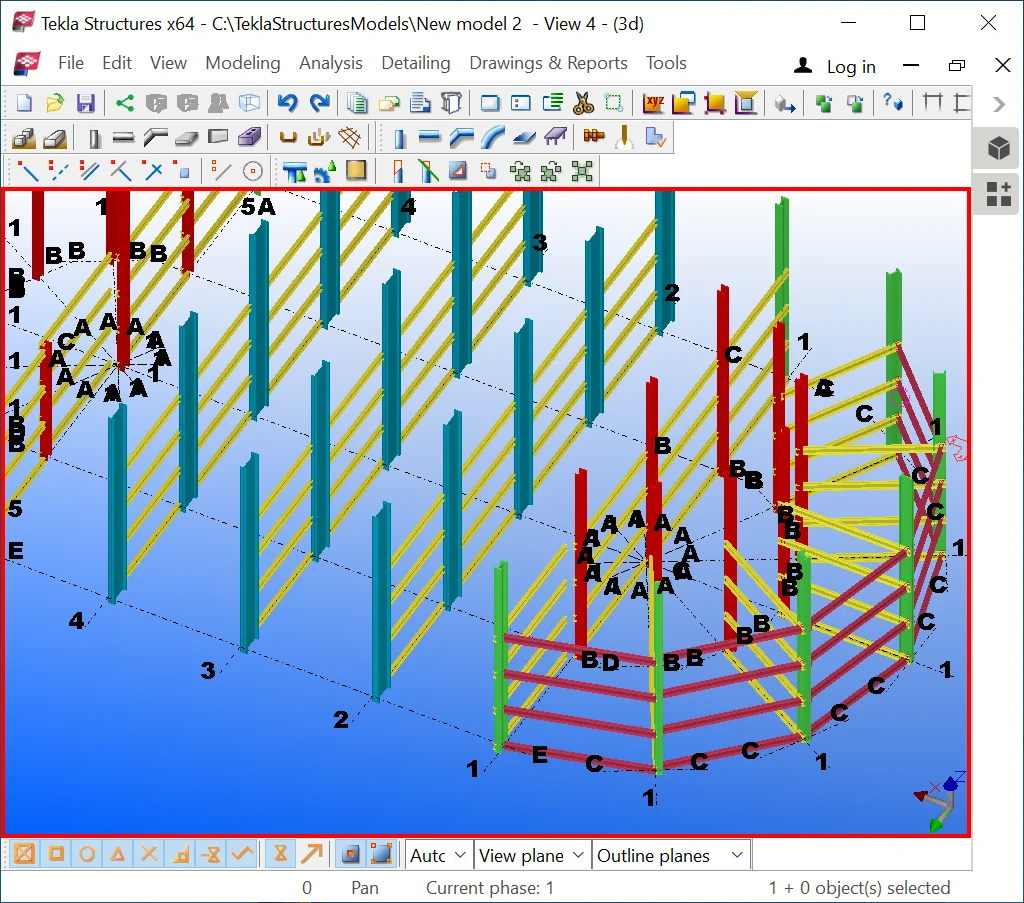
Let’s create beams along the rotund part of the building.
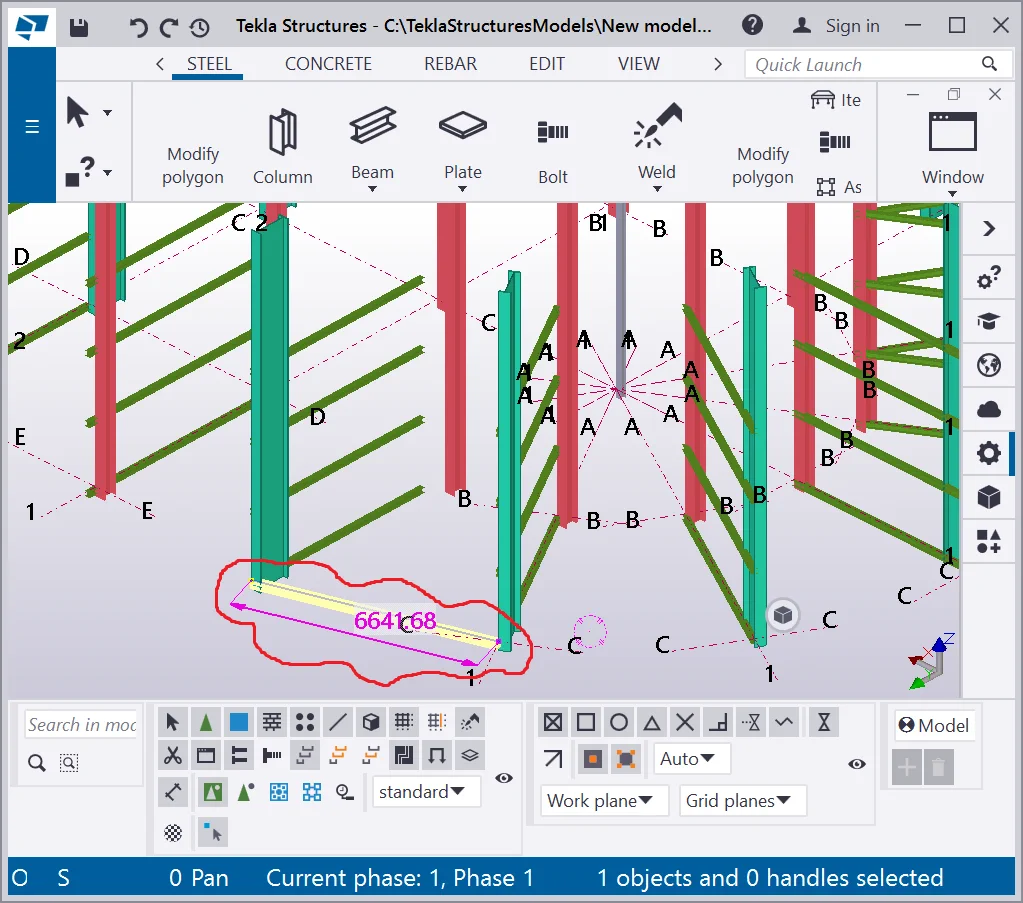
By using the “Copy Special- Linear” tool, create three vertical
Select all the beams created, enable the “Copy Special - To another object” tool, and copy them to other columns located at the rotund part of the building.


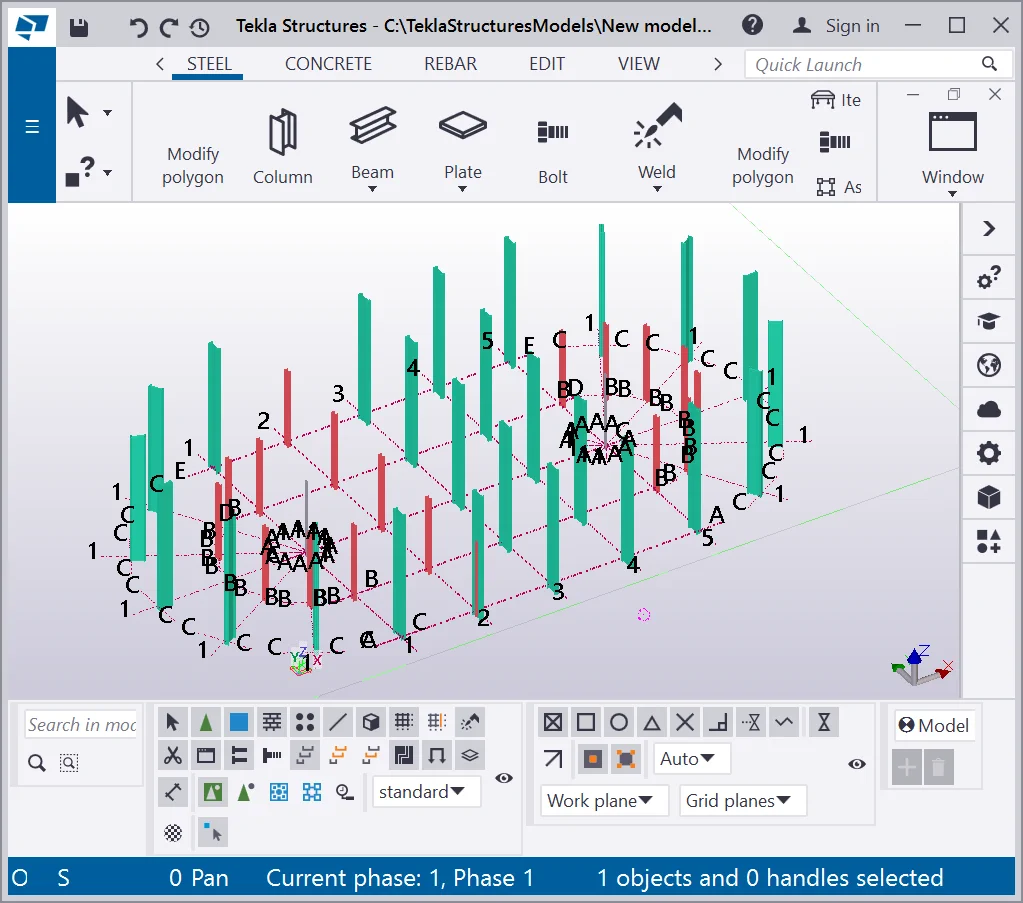
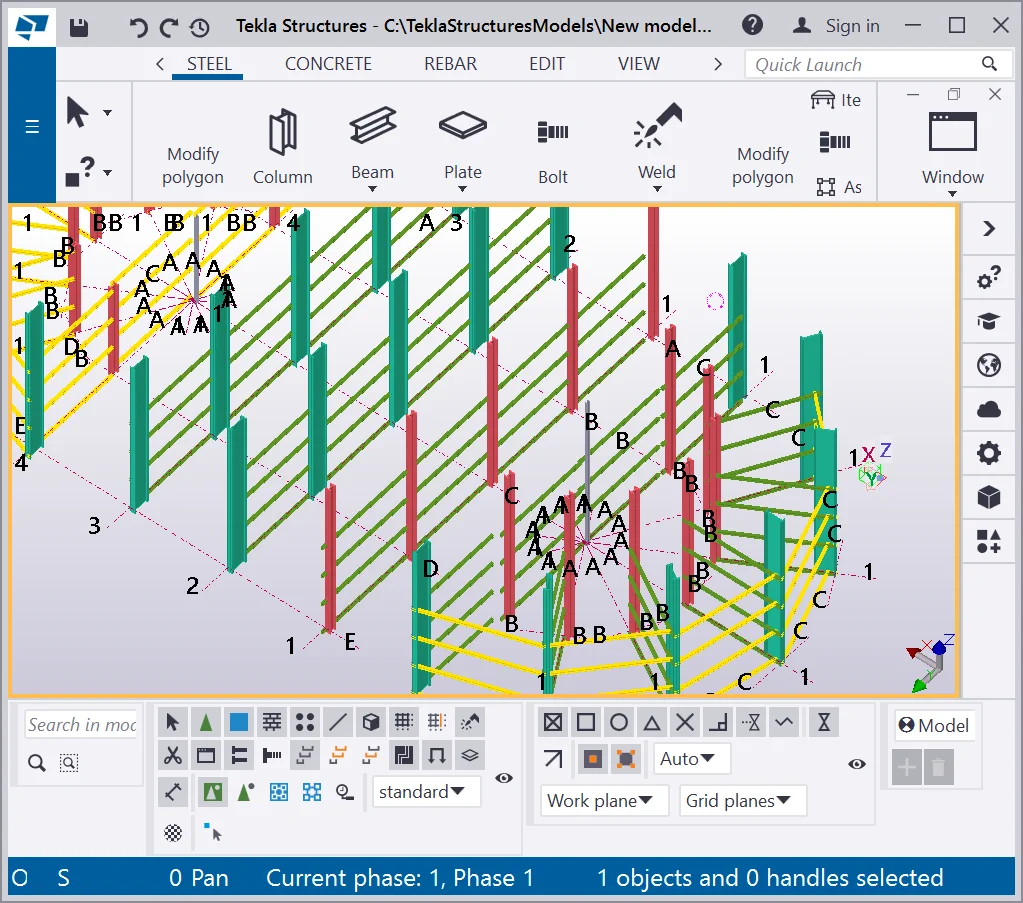
Proceed the same way for the handed part of the building.
Create beams along the E-axis (between the axes 1 and 2) and along all
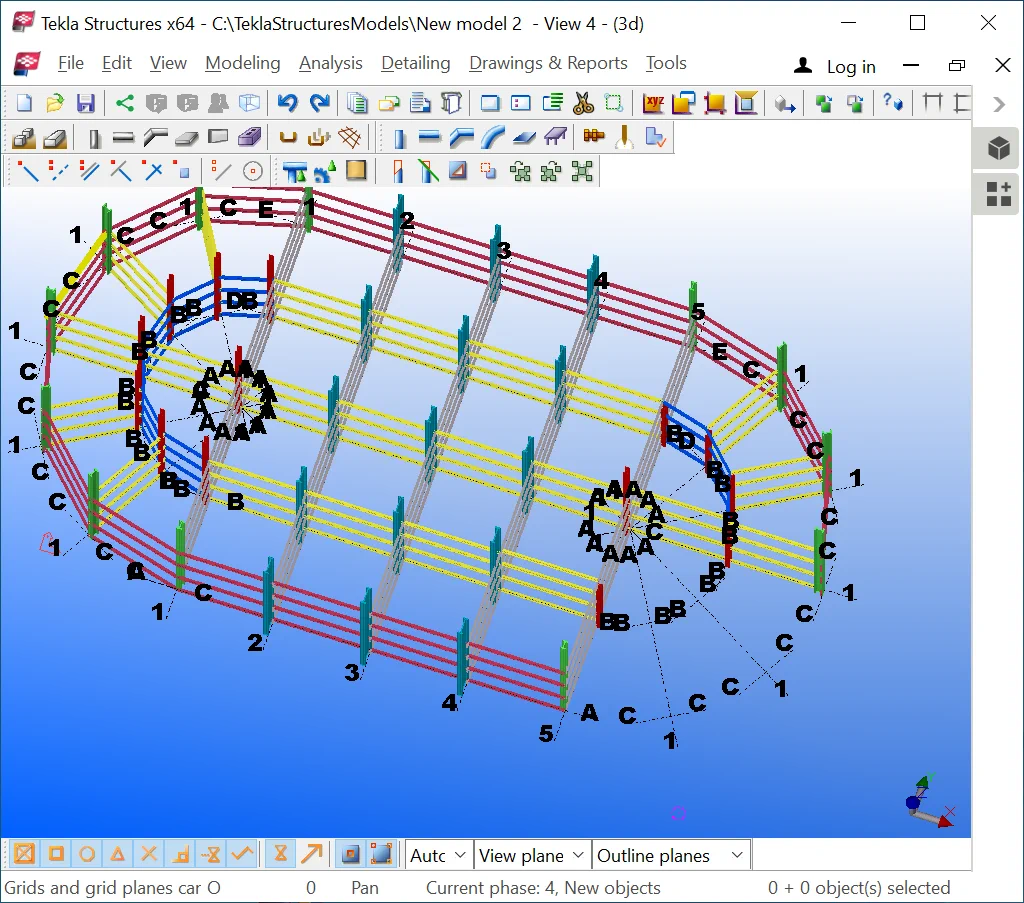
As a result, you should get a structure similar to the one presented below.
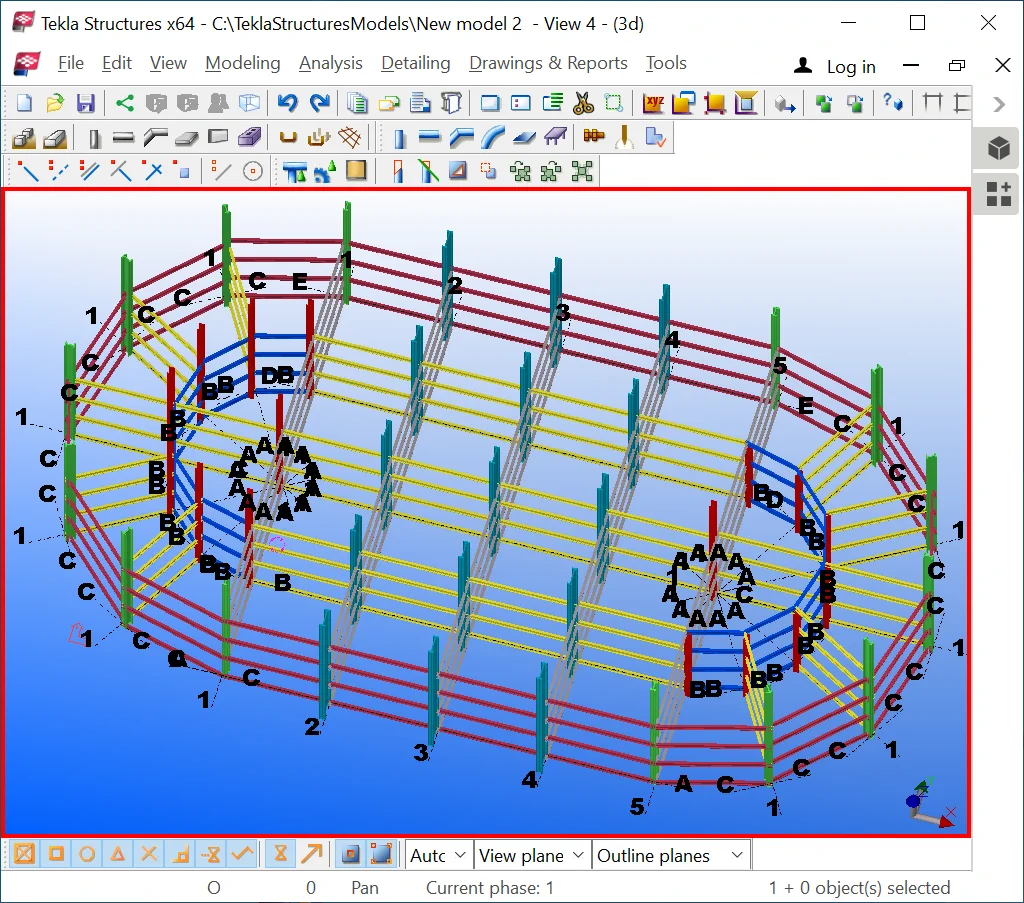

Save the model. We will be using it in our following examples.
The "Phase Manager" tool allows separating objects, such as columns, beams, plates, welding seams, etc. to various phases. Using phases is not compulsory. Phases facilitate segregating objects by:
Also, phases are useful to hide/ open definite object types.
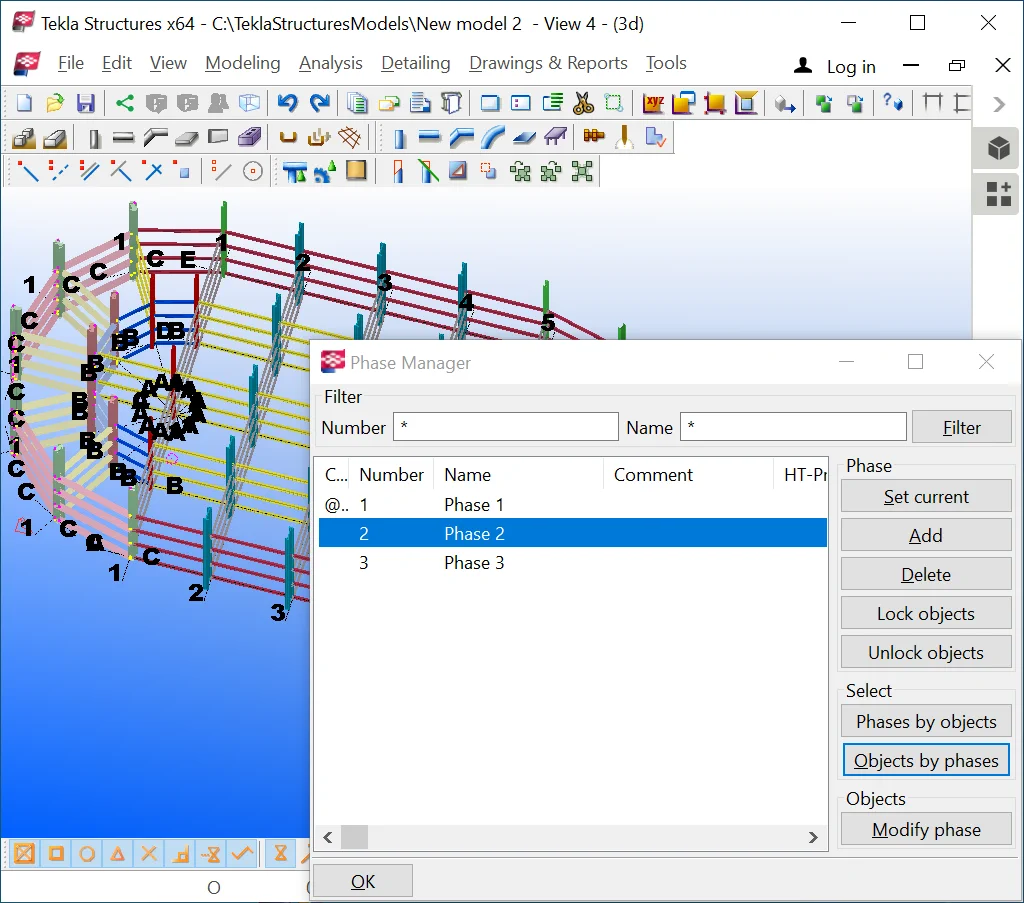
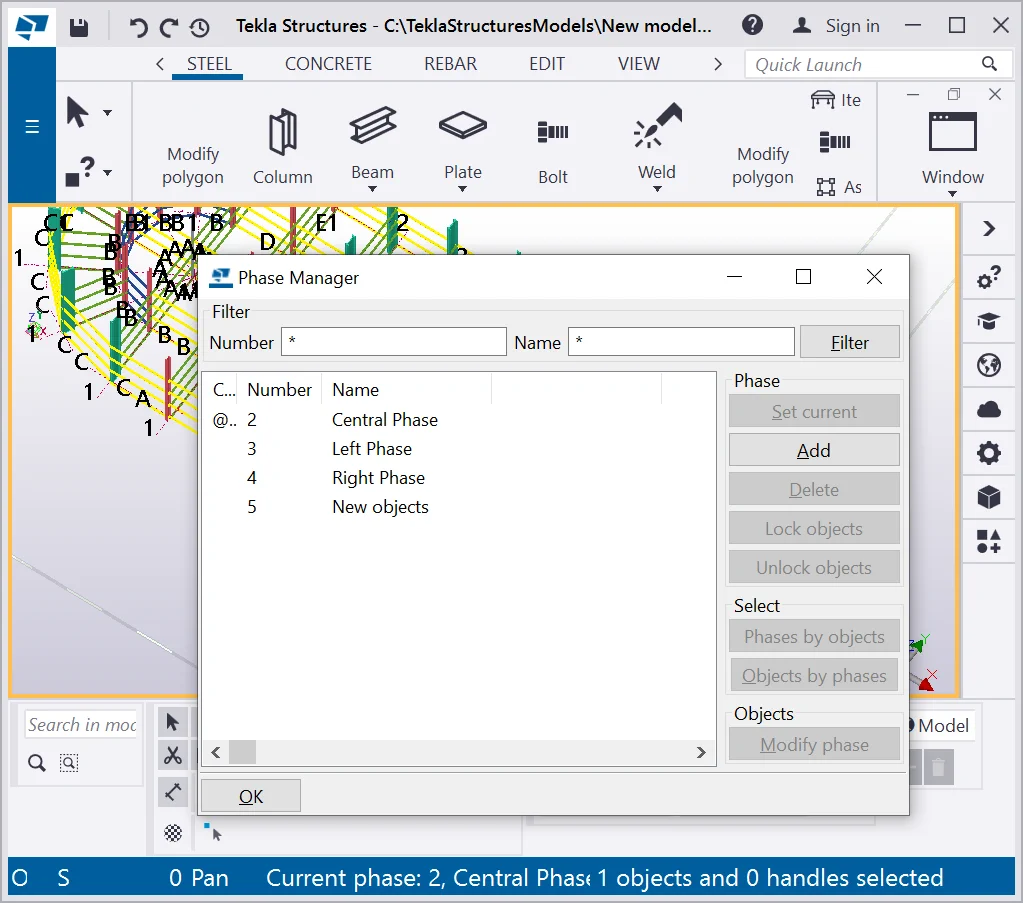
Managing phases is done via “Phase Manager”, allowing selecting,
You can access the “Phase Manager” via the main menu tab or
Enable the Ctrl+H hotkey combination.
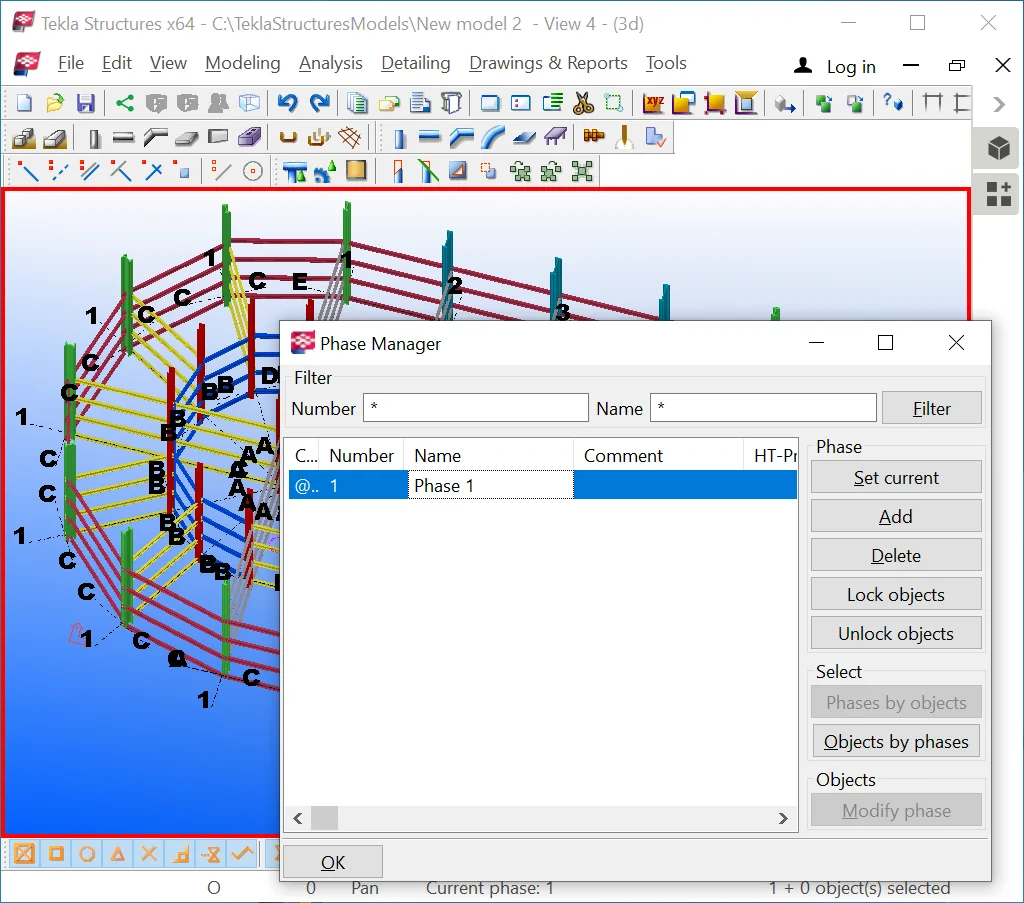
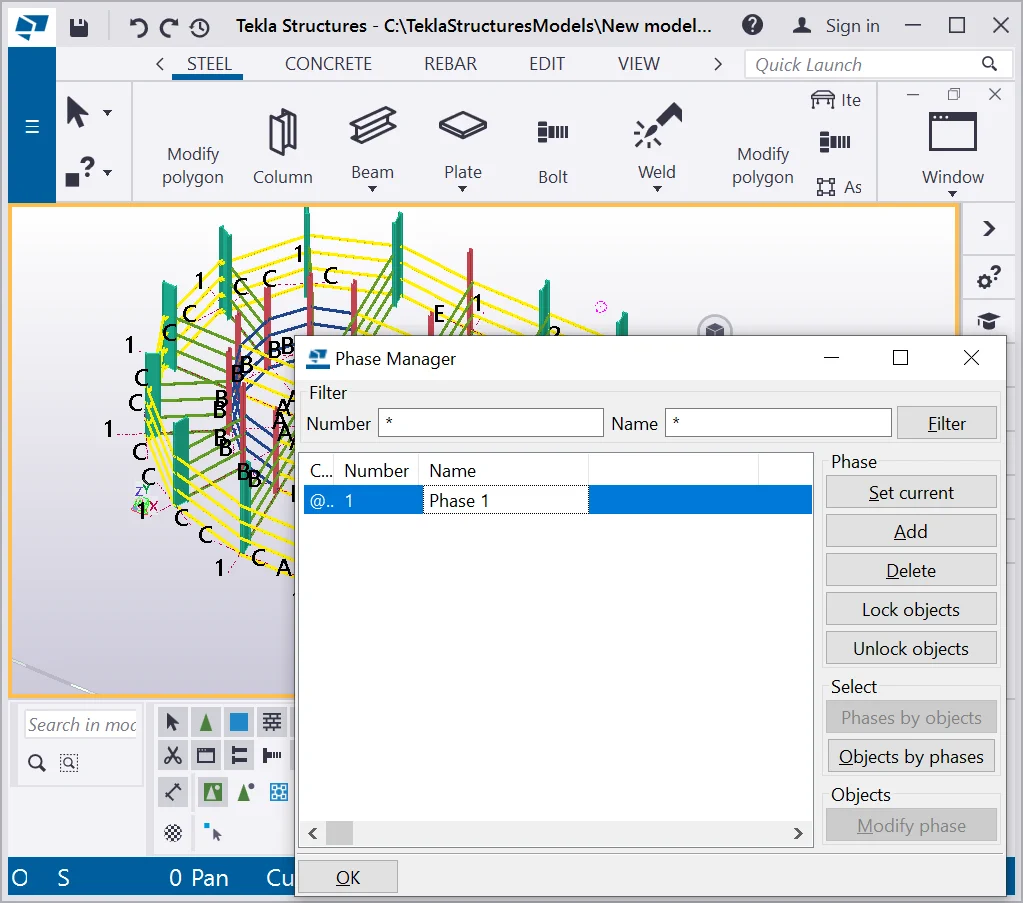
Select the phase available. It is automatically created by the TS and
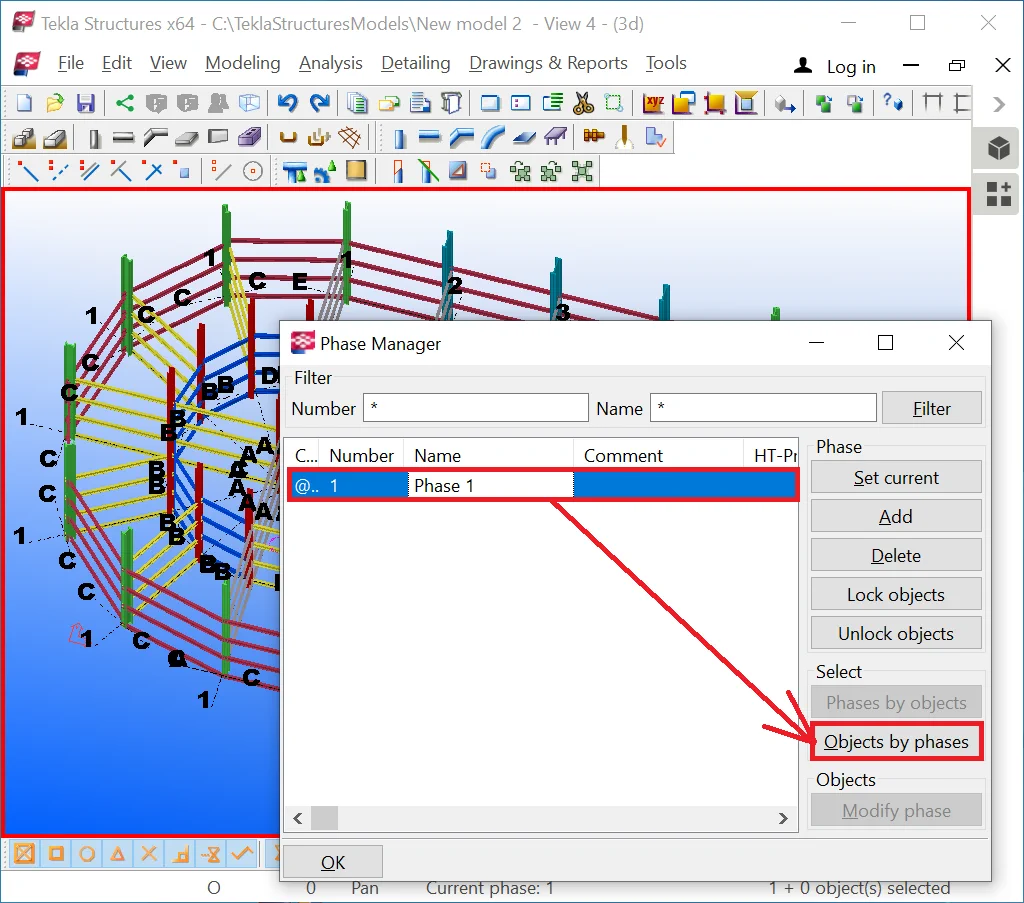
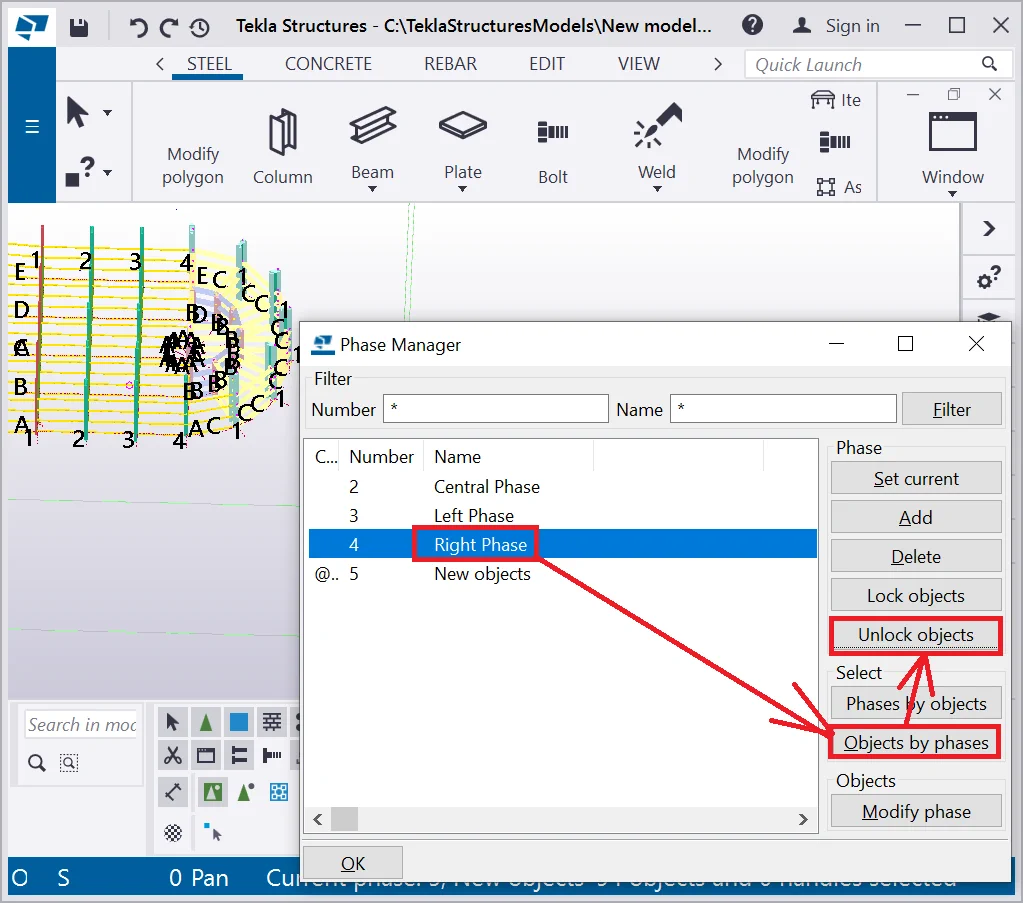
Press on the “Objects by phases” button to see the objects

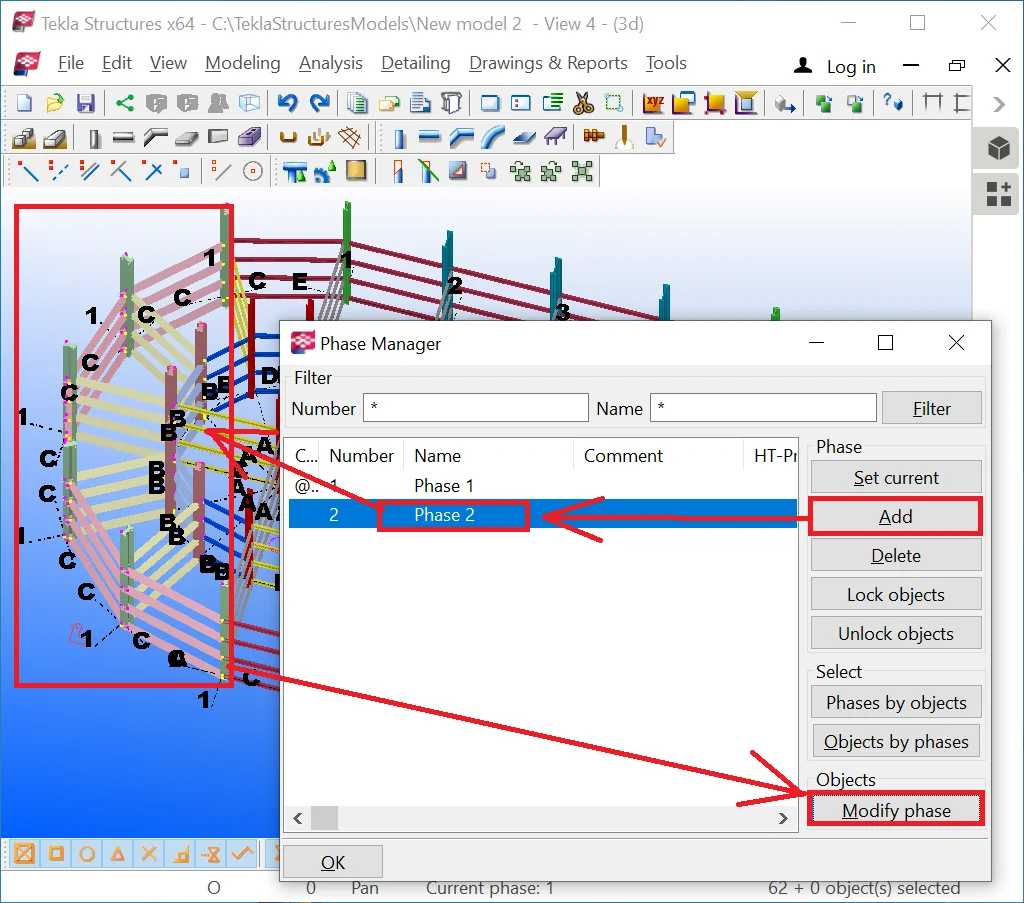
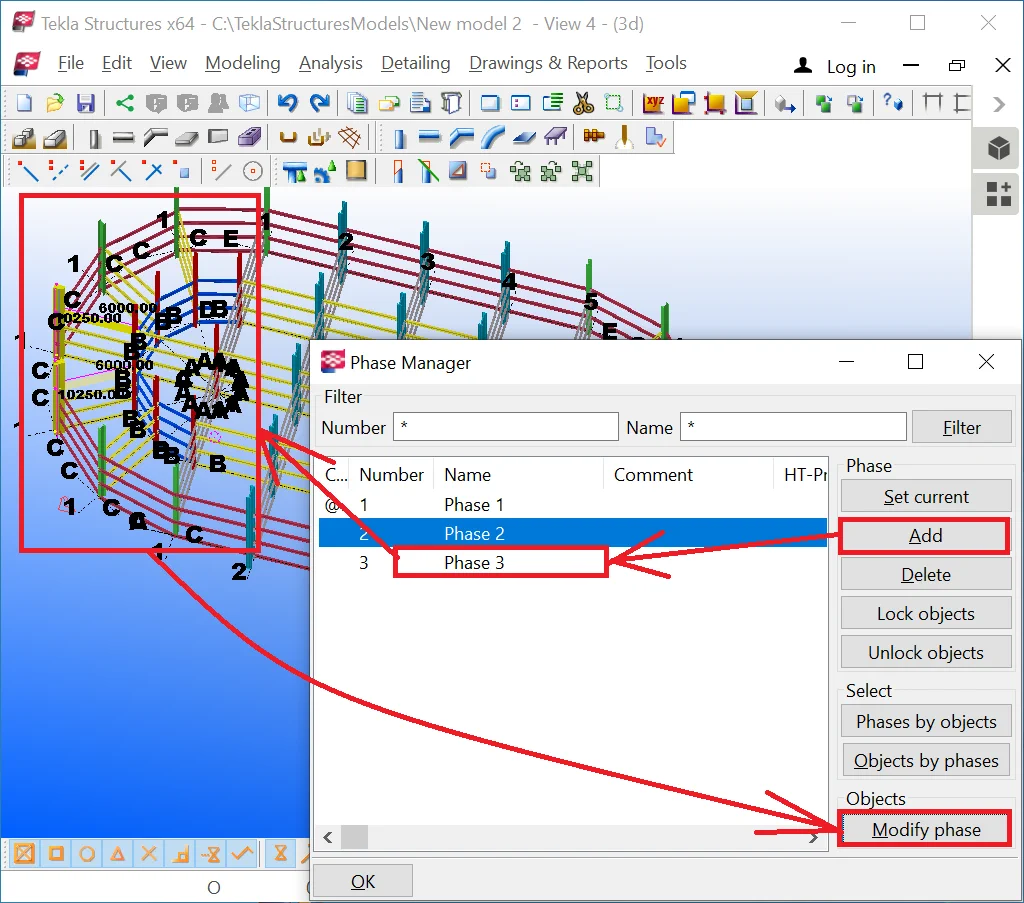
Let’s create a new phase by pressing the “Add” button. Select the phase created and pitch upon the objects you would like to transfer to another phase, afterward press the “Modify phase” button. Thus the selected objects have been transferred to another Phase. Let’s allocate the left part of the building to a separate phase. Go to the Ctrl+5 display mode.

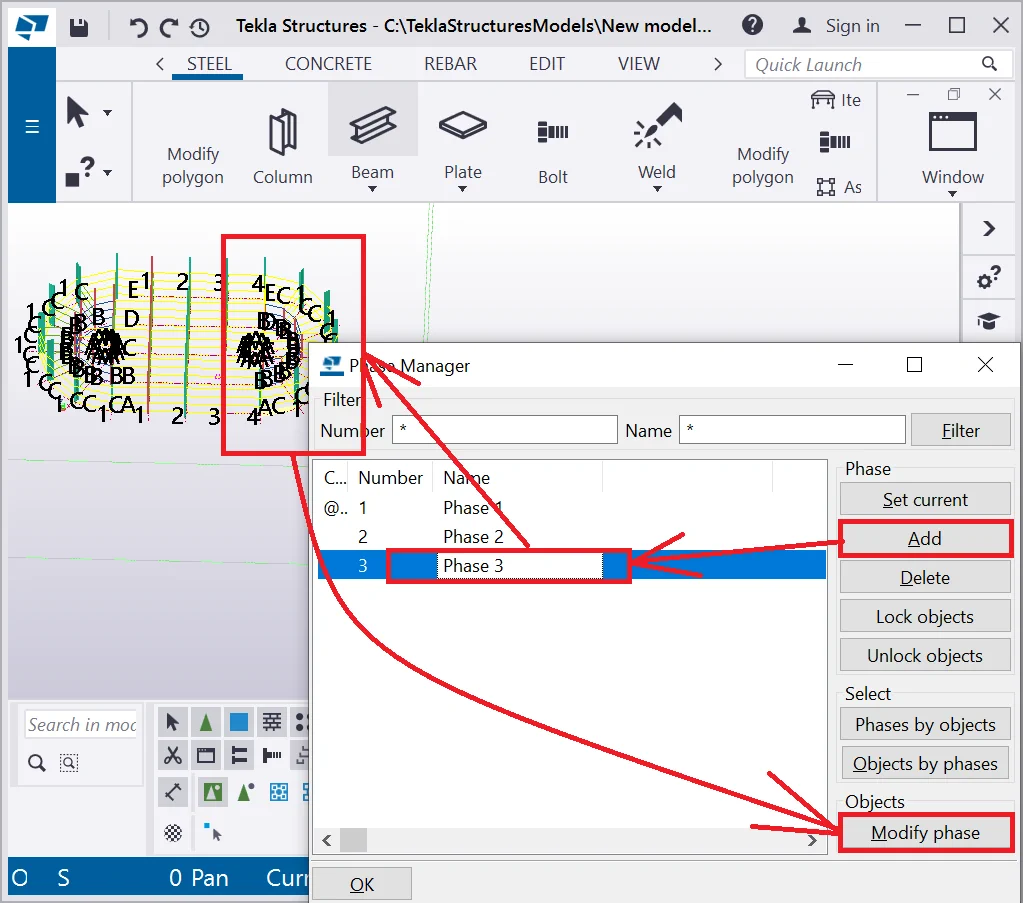
Create a new phase and allocate the right building side into it.
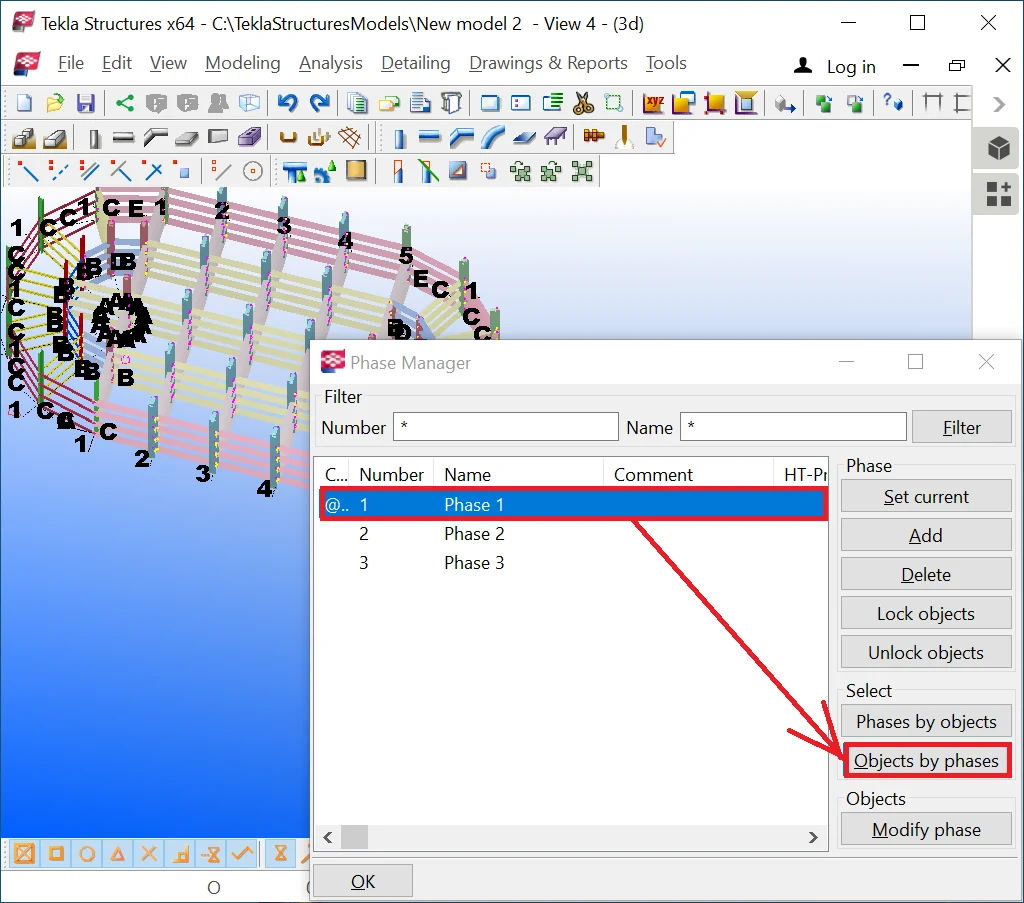
Make a left-click on the view, thus disabling all the selections. Enable the first phase and press the “Objects by phases” button to see the objects contained in it.
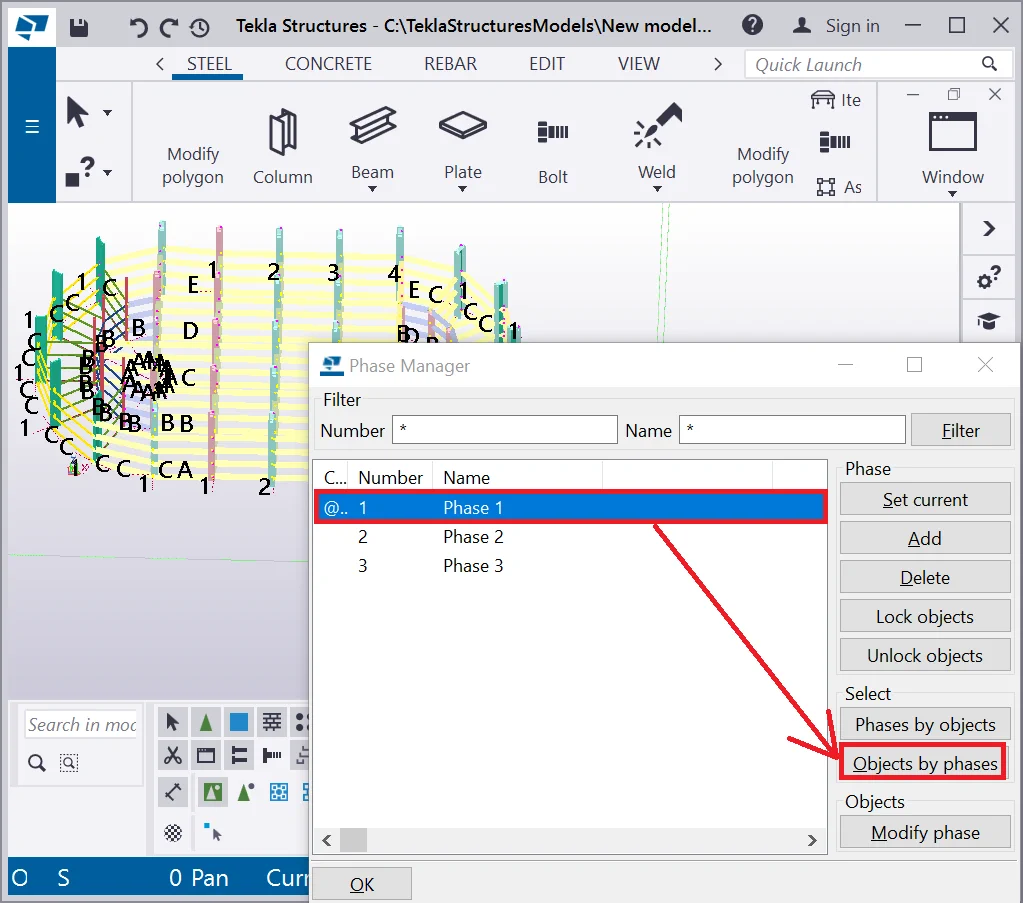
Examine Phases 2 and 3 as well.
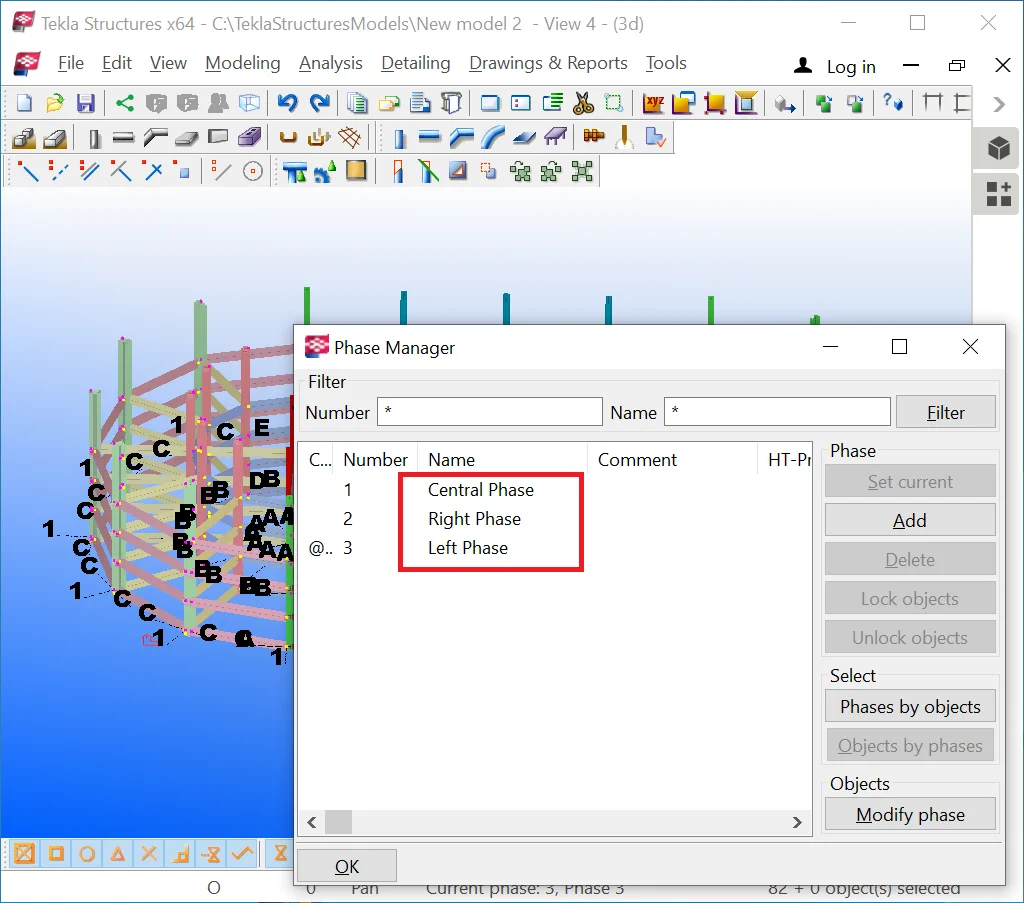
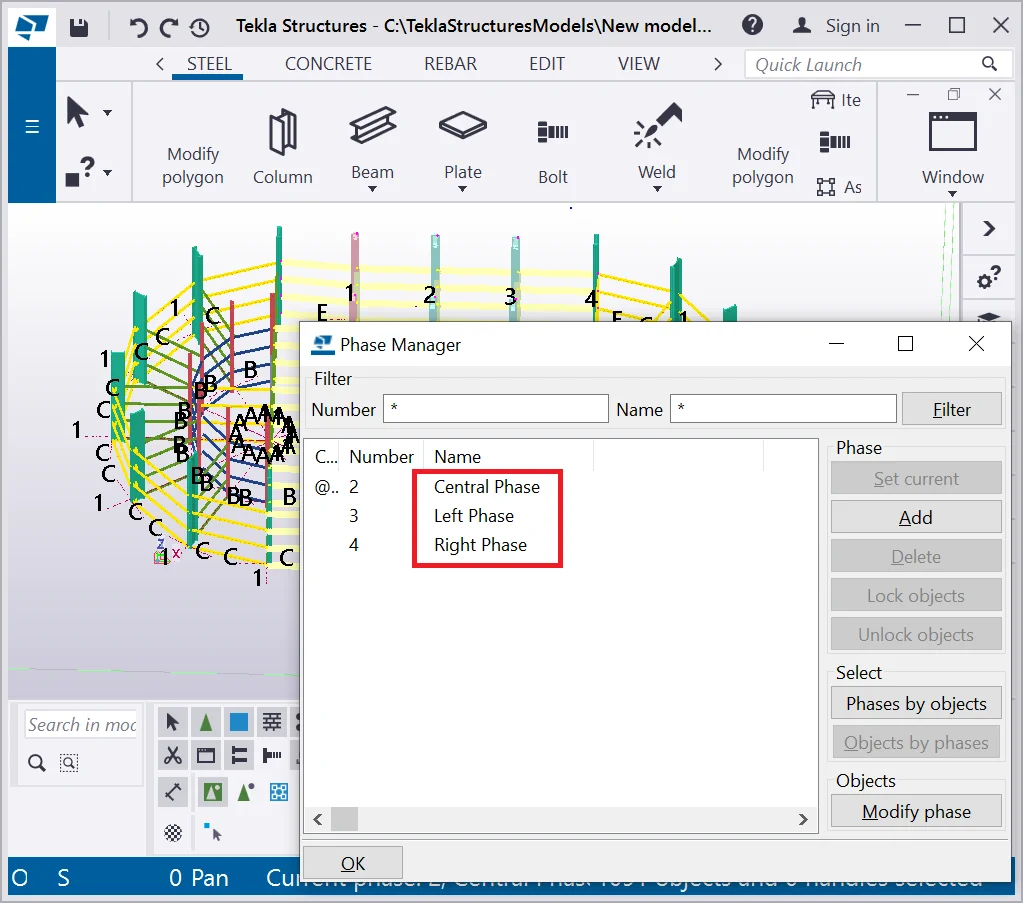
Since all the phases have been established correctly, you can freely use them. Rename the phases as follows: “Central Phase”, “Left Phase”, “Right Phase”, by selecting the current phase name and typing in the new one.
If you create new objects, then they will get allocated to the phase which
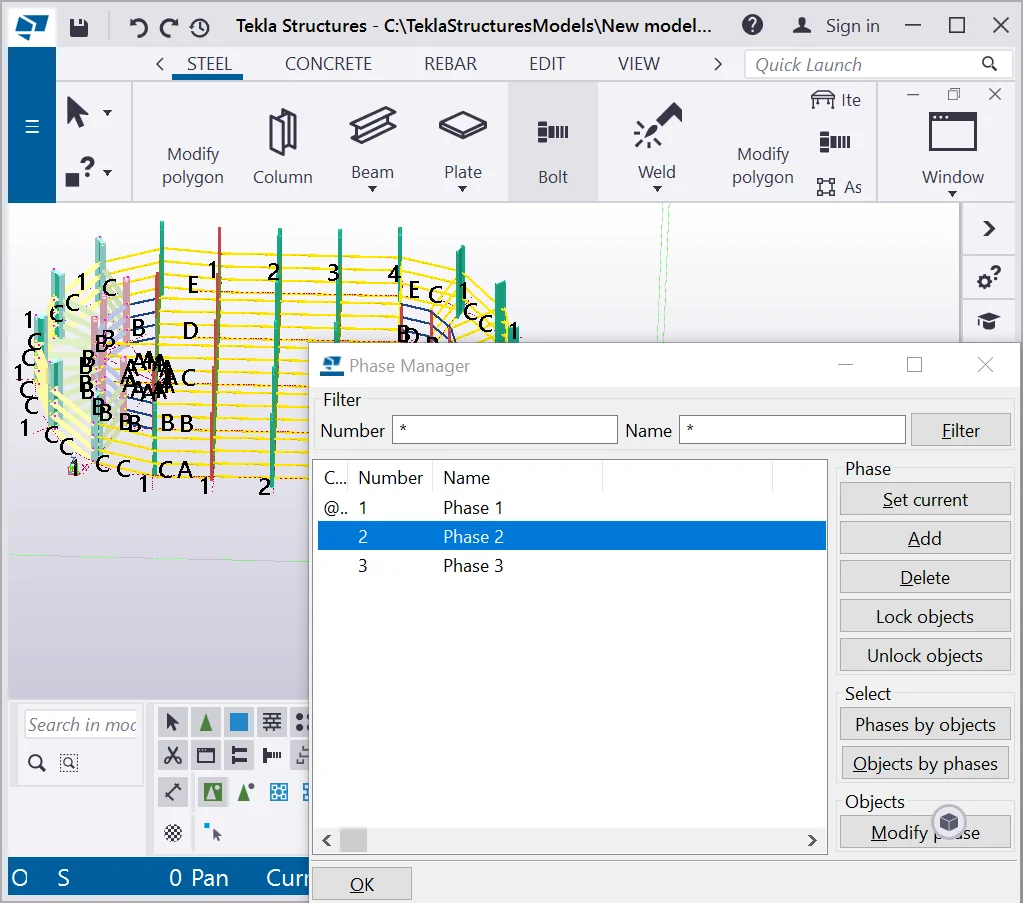
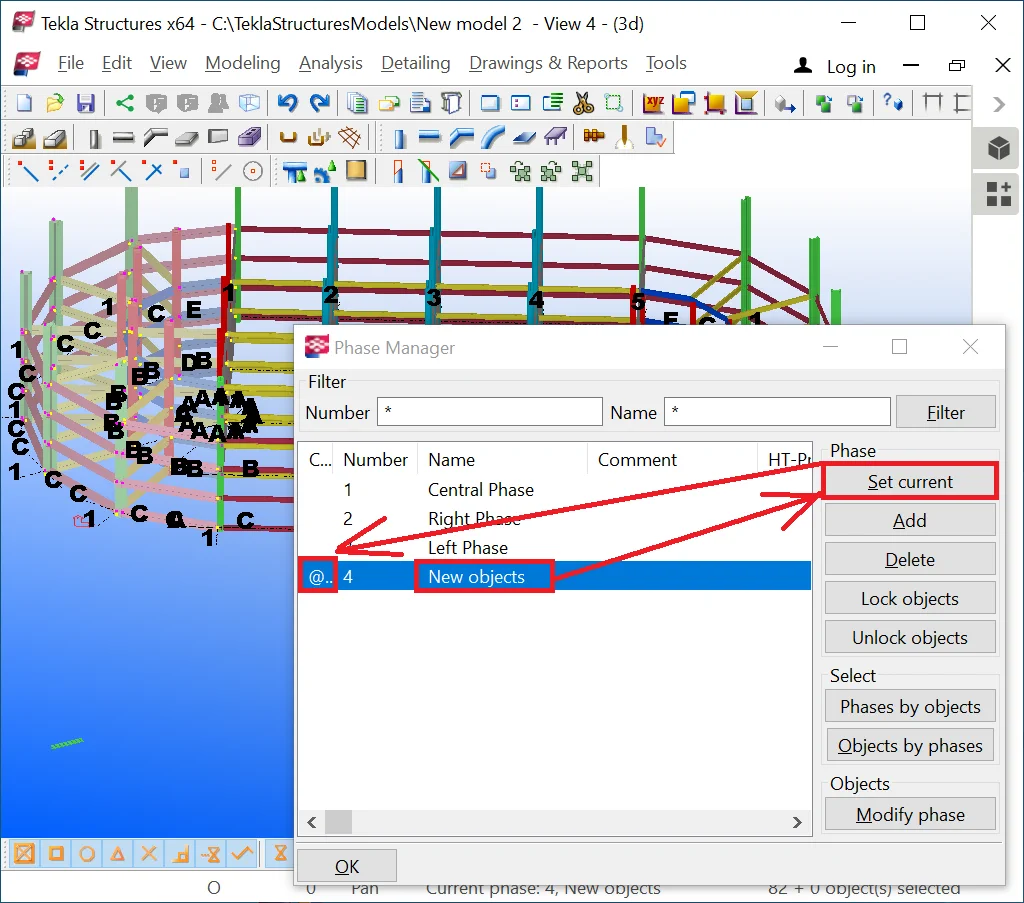
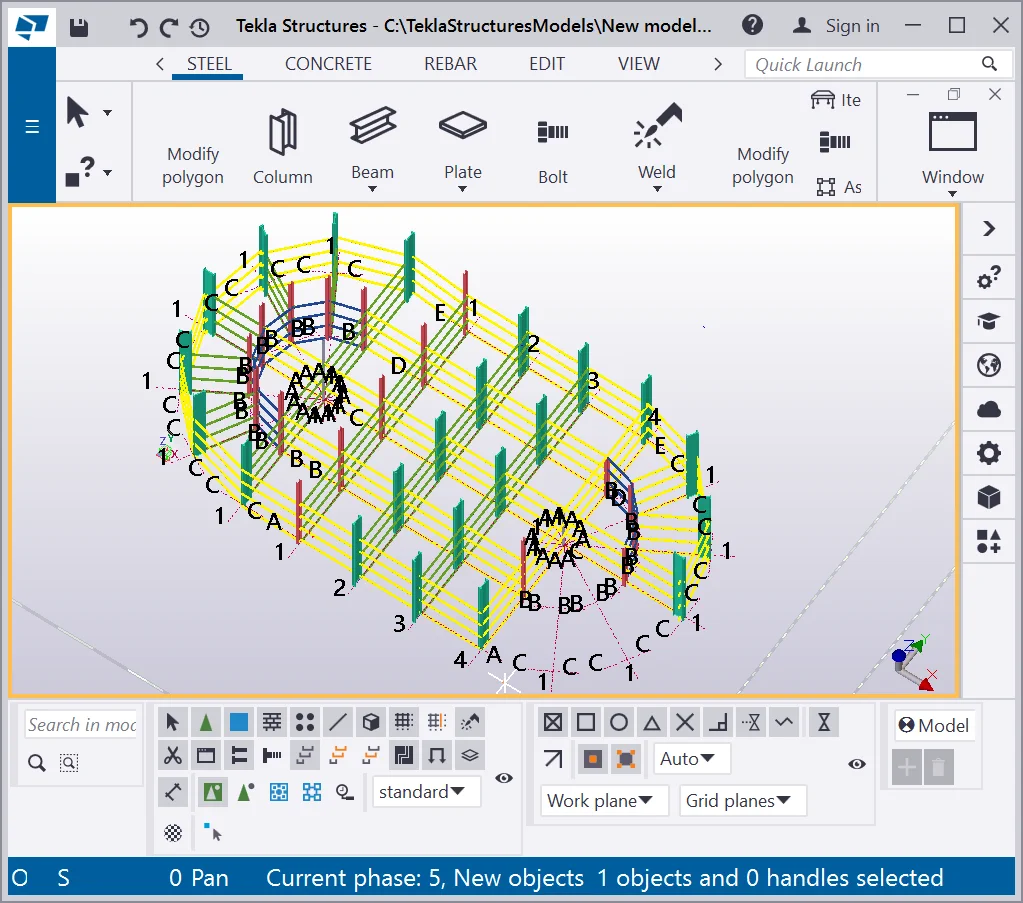
Add a new phase “New objects” and set it current, by enabling it in the “Phase Manager” window and pressing the “Set current” button. The phase line will be automatically marked by the “@” symbol.

Double-click at the phase name sets it up as current. Consecutively exercise
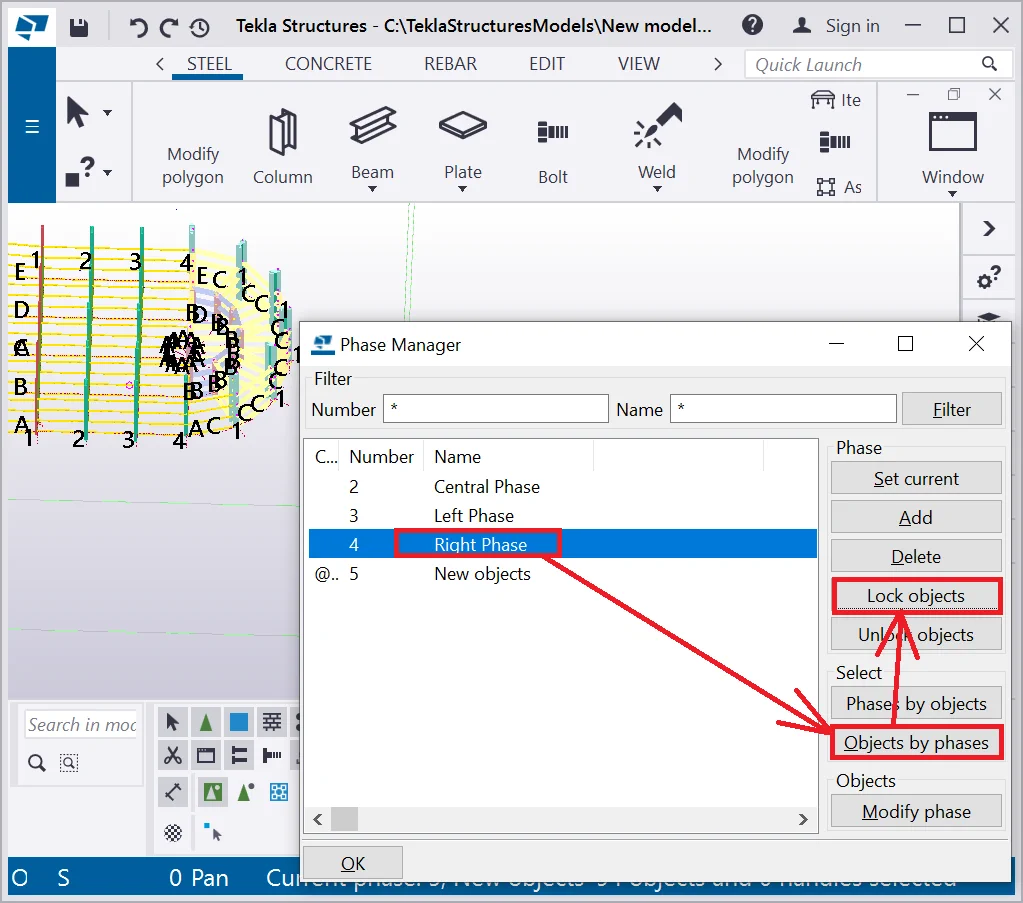
Enable the 3rd phase and press the “Lock objects” button. Thus editing the phase objects is not possible anymore. It is a useful tool, preventing unwanted changes in structural objects.

Try on your own deleting any beam included into the enabled phase. Tekla
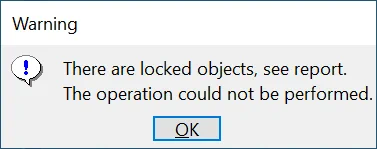
Close the “Warning” pop-up window and unlock the objects of
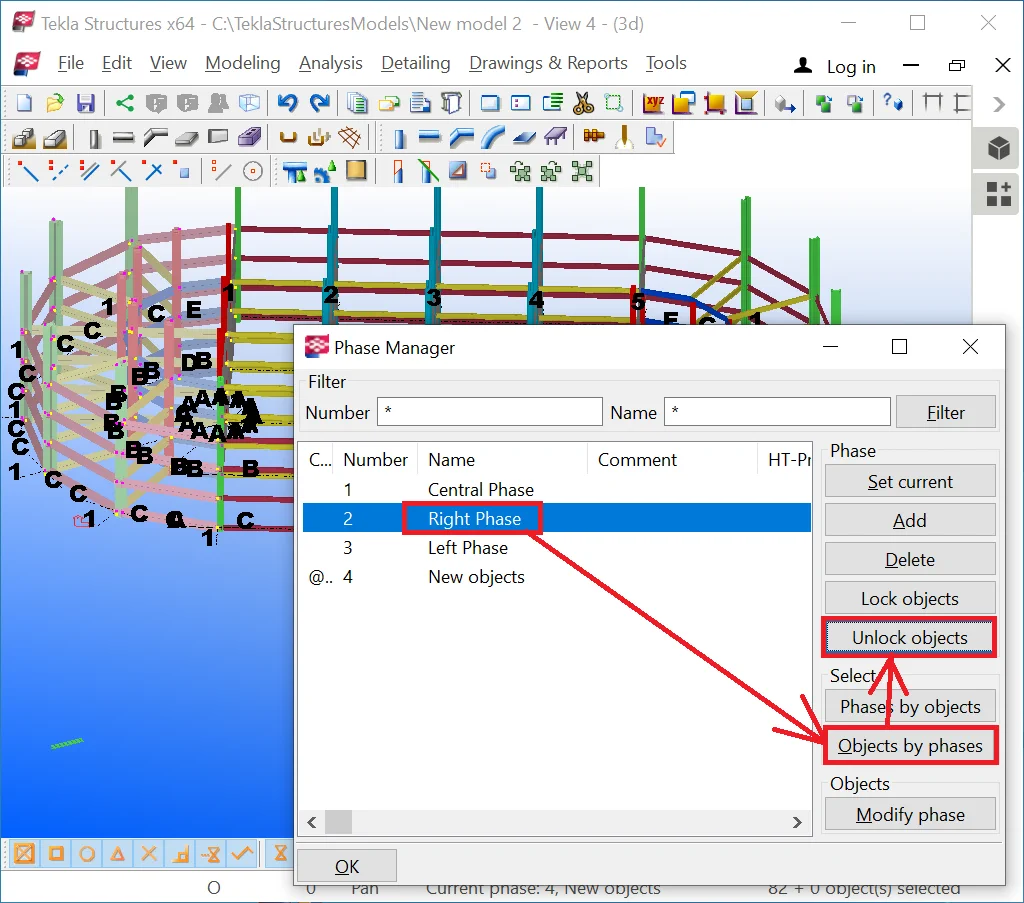
Now try out deleting several objects of the phase.
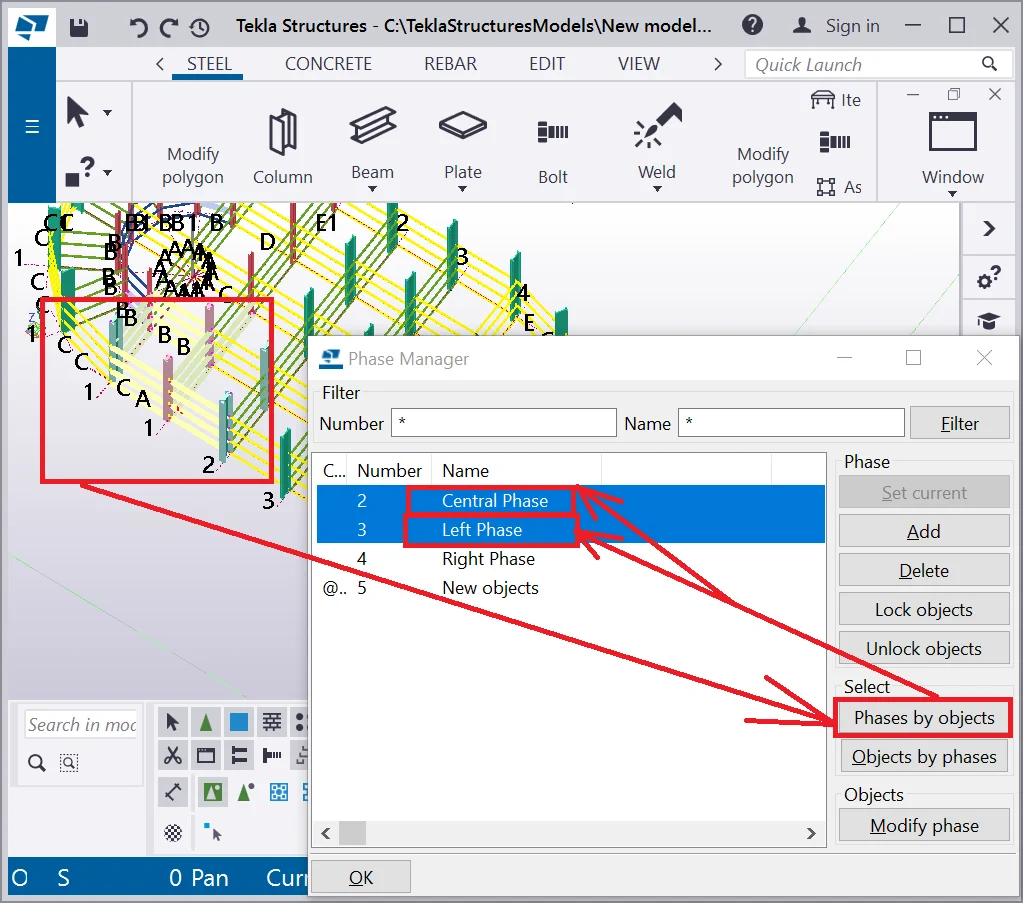
As you have already found out, it is possible to select objects by phase,
Select any beam in the model and at the “Phase Manager” window,
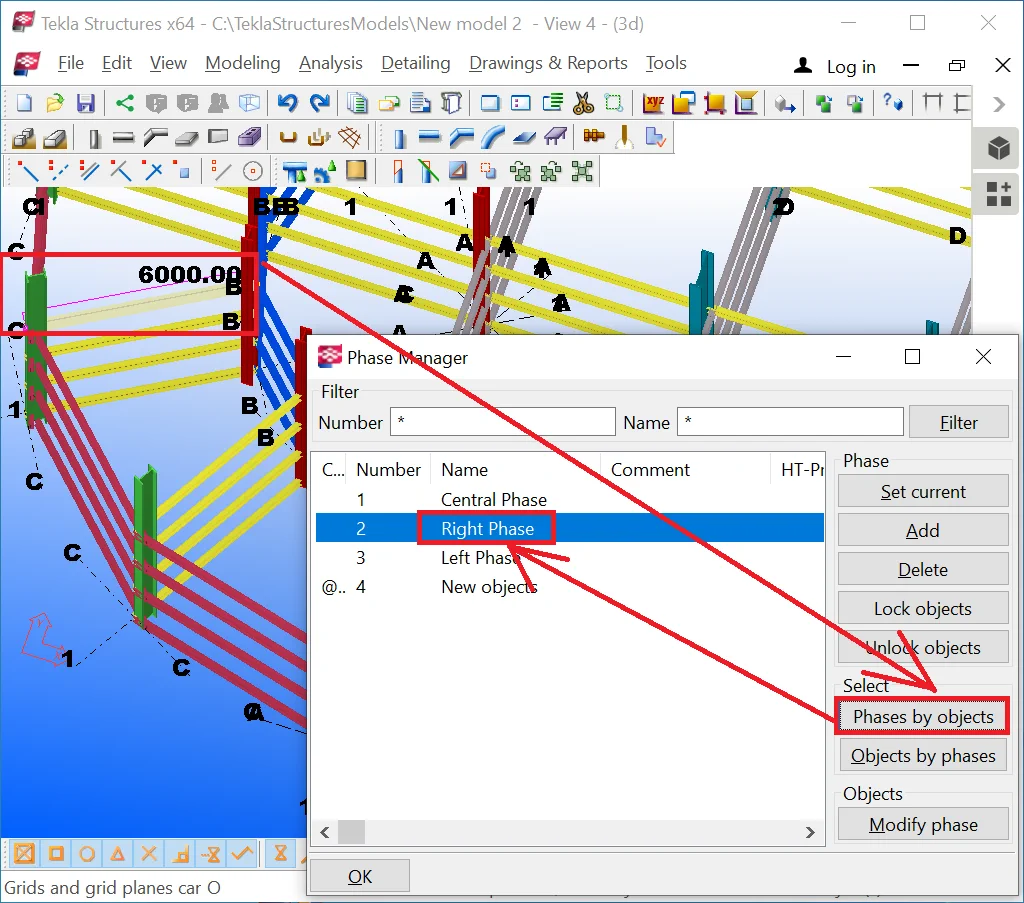
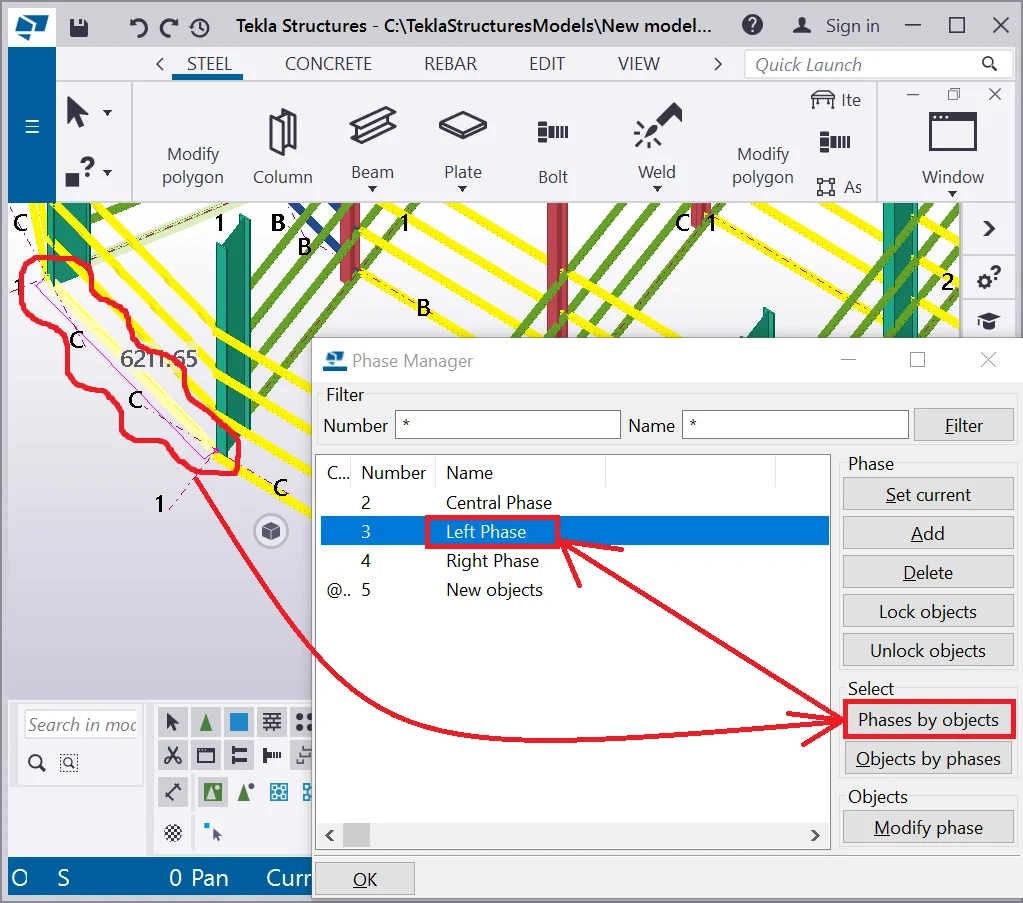
Tekla Structures automatically highlights the phase/ phases to which the

Create 10 more new phases and leave them blank. As several models might contain a large number of phases it comes out quite difficult to navigate among them. To facilitate the issue, there is a search box, where you can type in the stage title or its number.
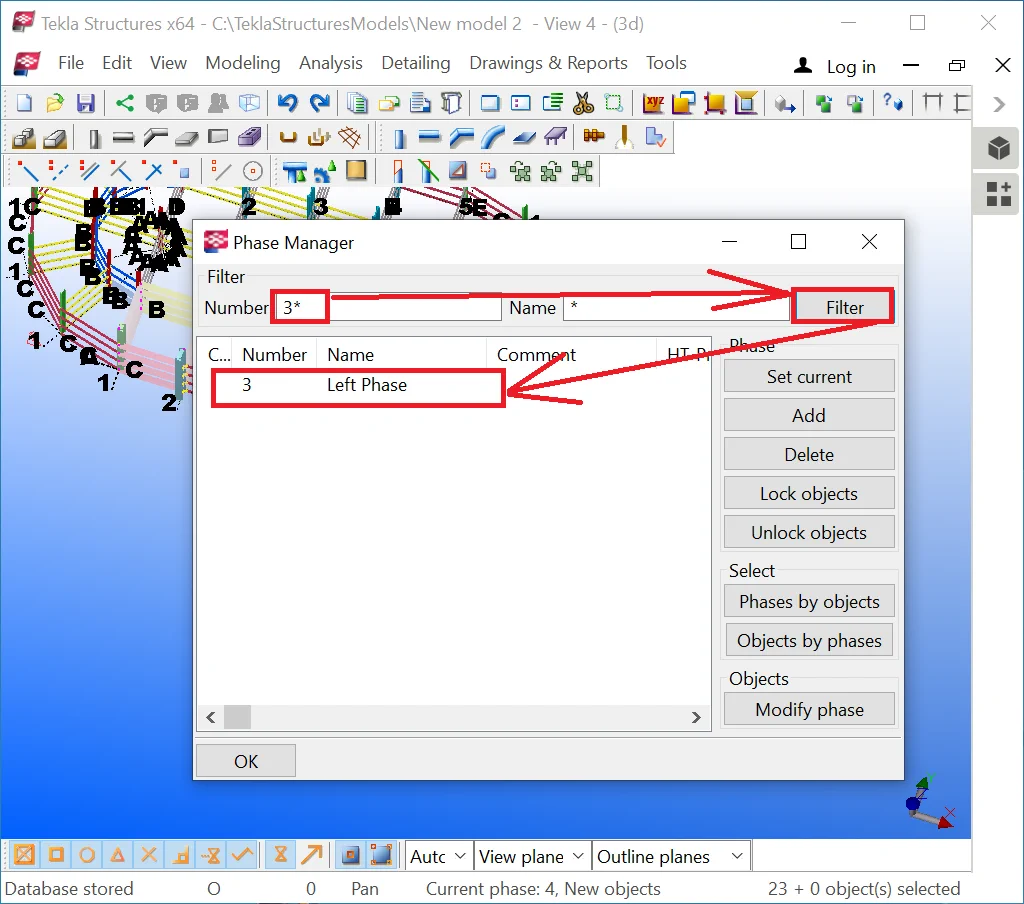
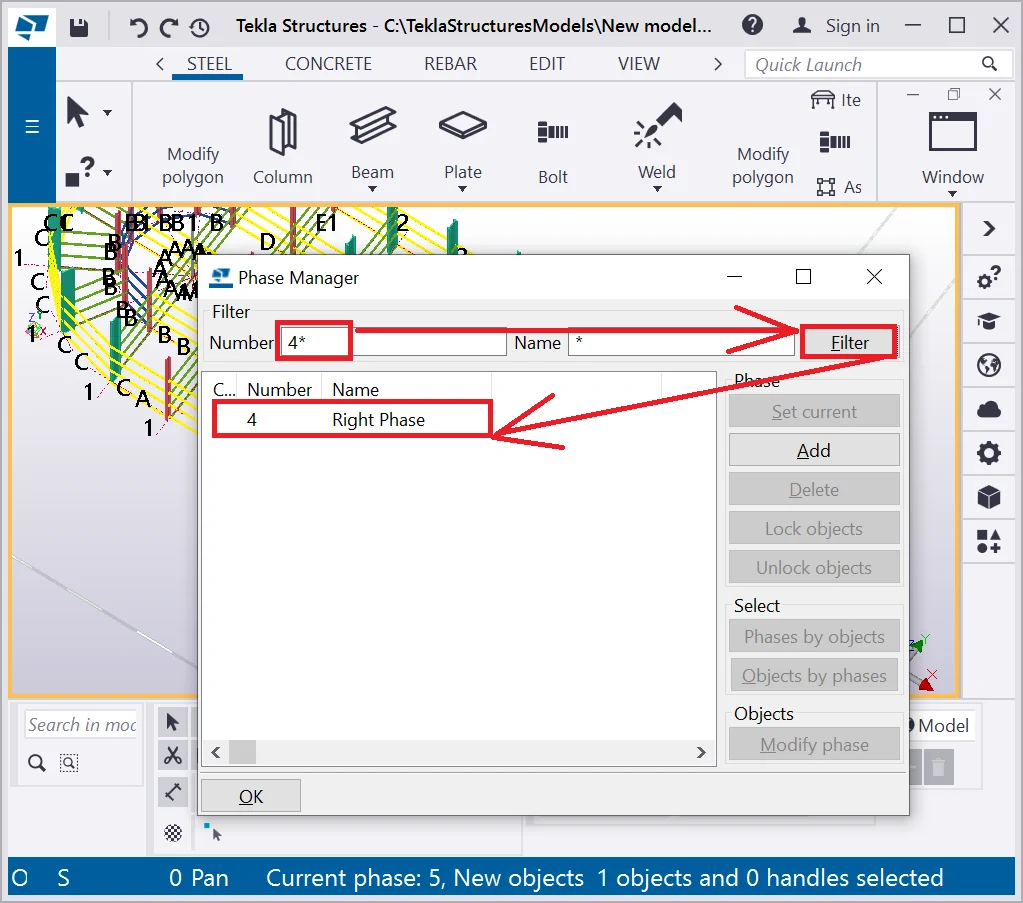
Exercise filtering a required phase by using the search box: for example,
Symbol “ * “ indicates that there can come up other symbols in the phase title. If you do not specify the “*” symbol then TS will be sourcing the exact match with the value typed in the search box.
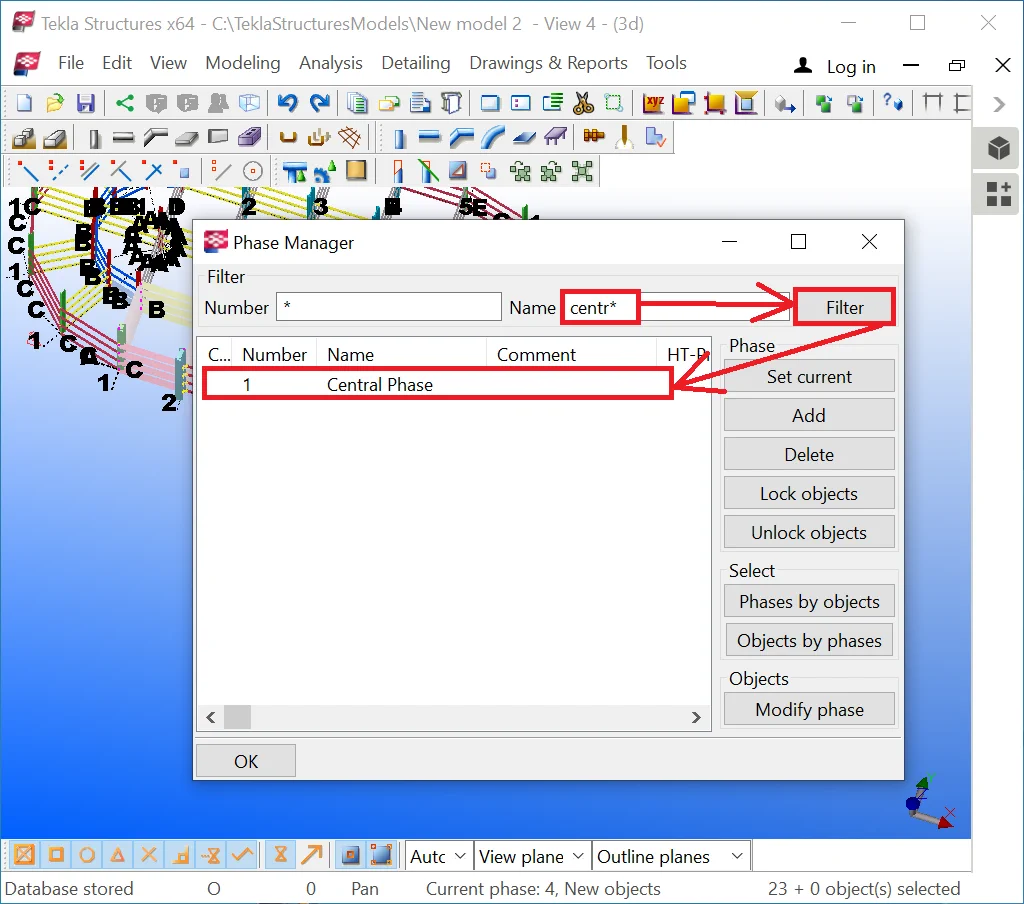
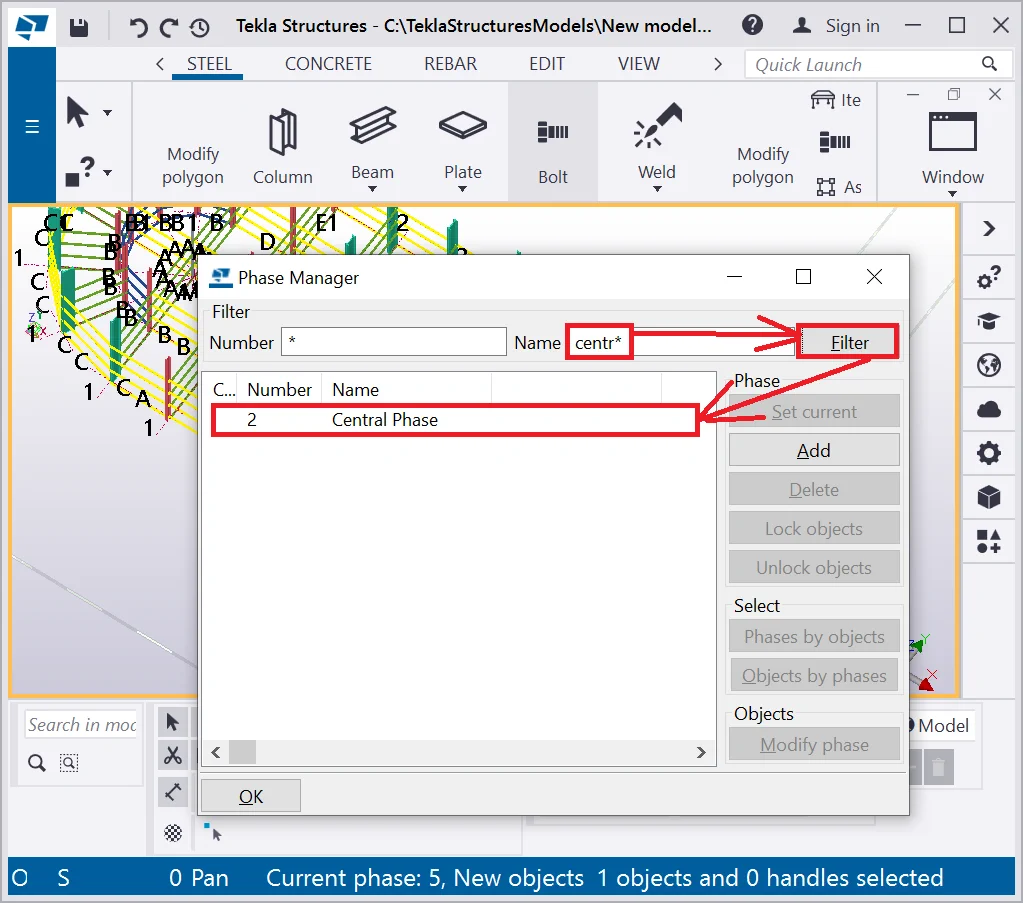
To access the full phase list, restore the search box up to the “*” symbol and press the “Enter” button. Also, exercise searching a phase by its number. Refer to the below:
If necessary, it is possible to delete unuseful phases. Select phase number five, and by holding on the “Shift” key pressed consecutively select phase number 11.
Thus the interval of phases from 5 to 11 will be selected.

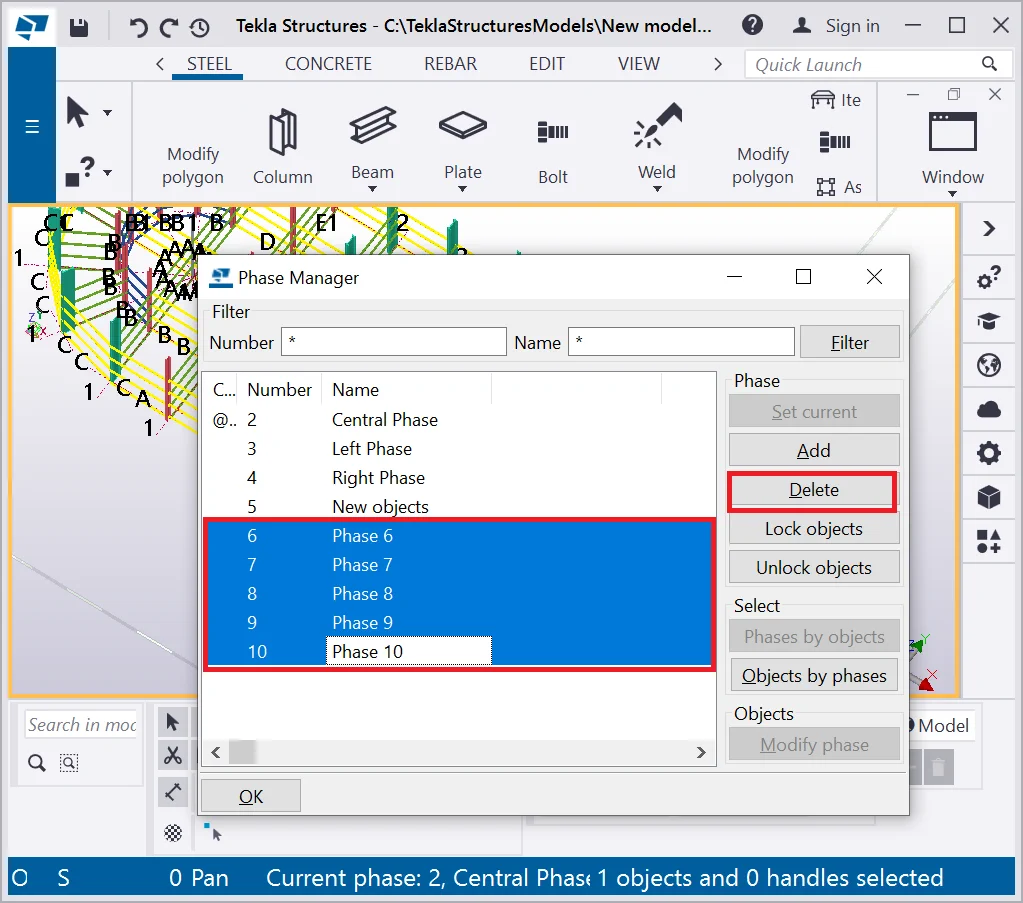
Press the “Delete” button.
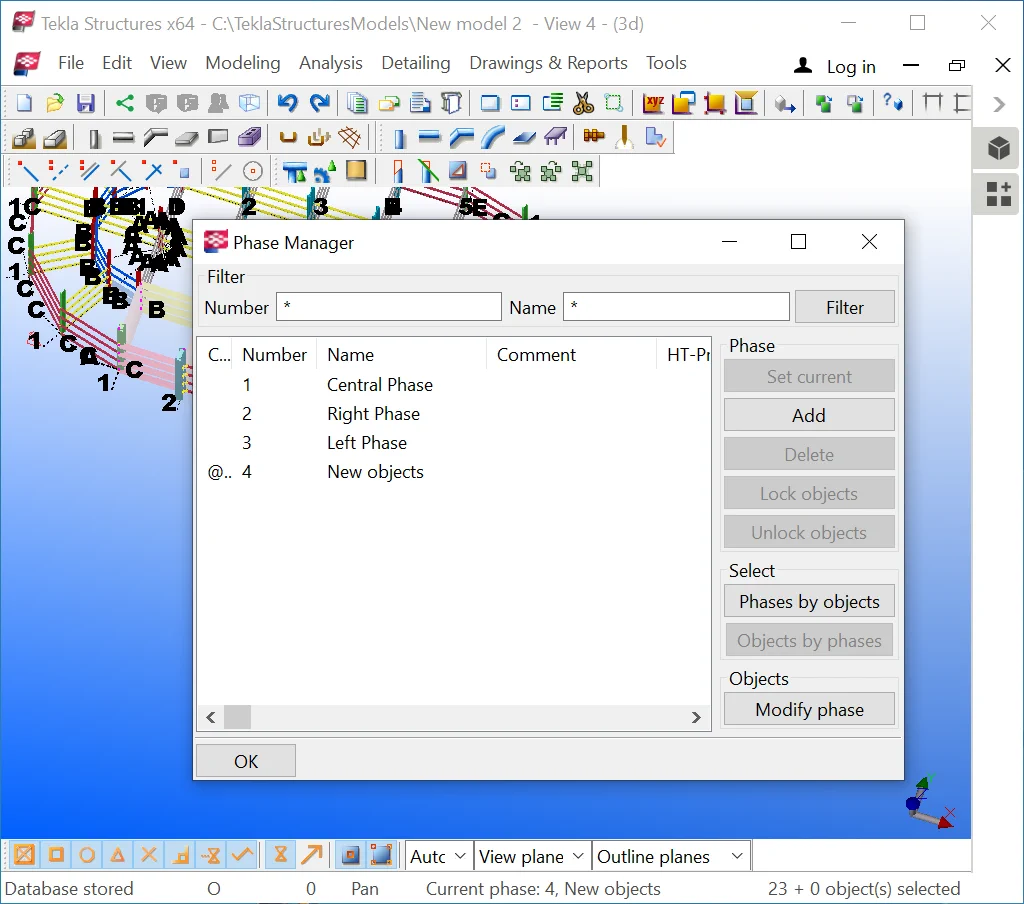
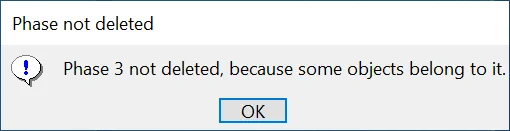
It is not possible to delete a stage containing at least an object. In this case, TS notifies about an error that occurred, which means it is not possible to accidentally delete such a phase.
The “Phase manager” comes as a very useful tool when copying
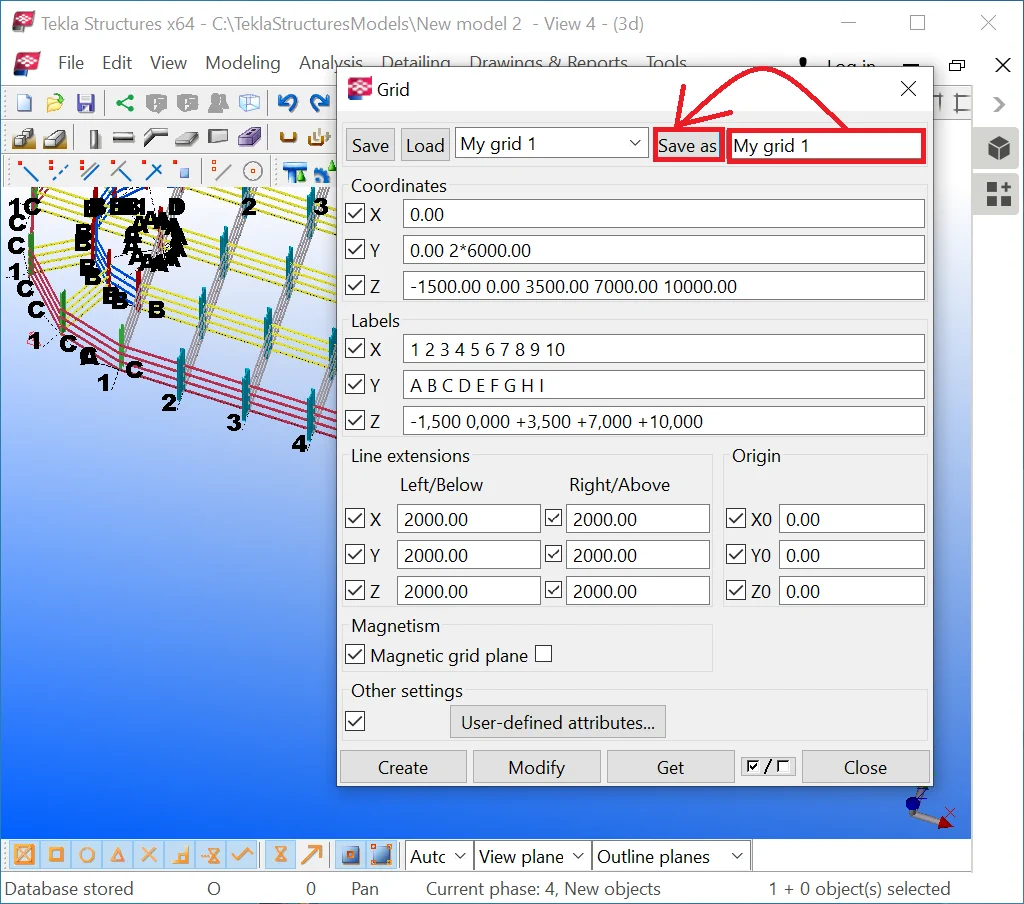
Save the model with the phases created. As well as save the grids separately.
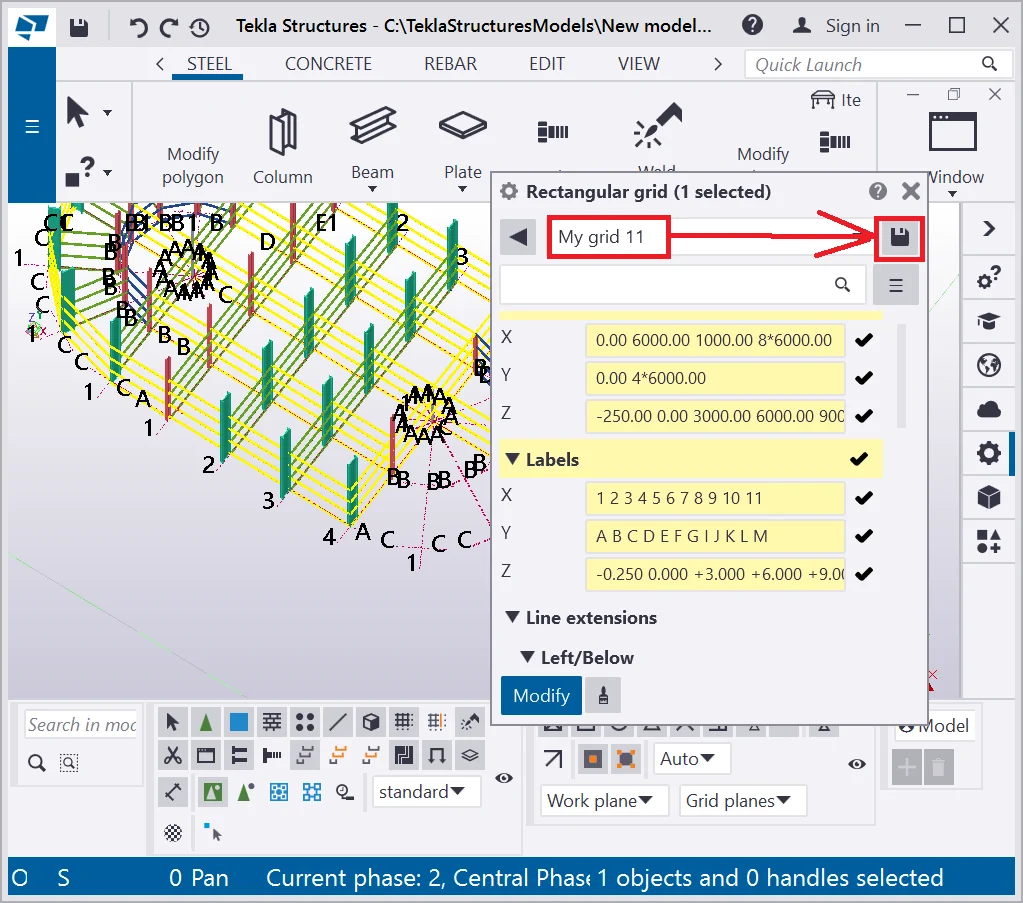
In this way, in the folder TS models\attributes, two new files had been created under the names of the new grid, and under separate extensions. Copy these files to the respective attributes folder of the new model.
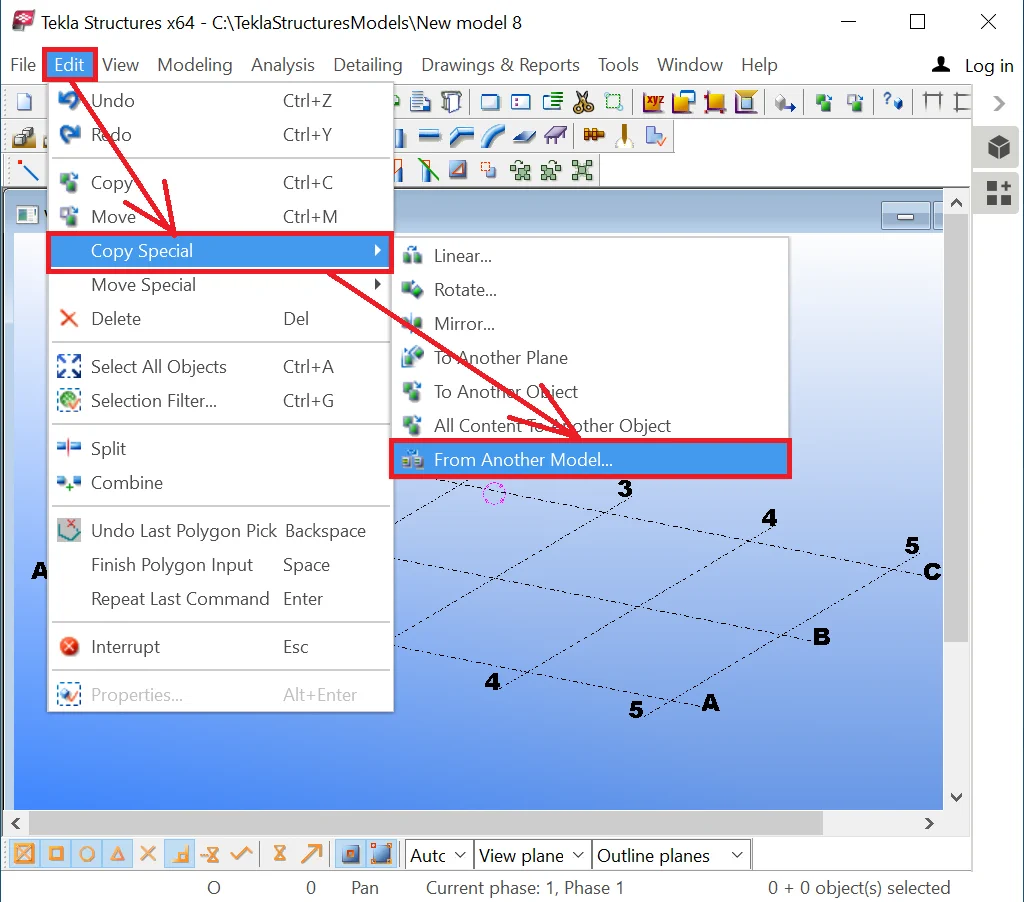
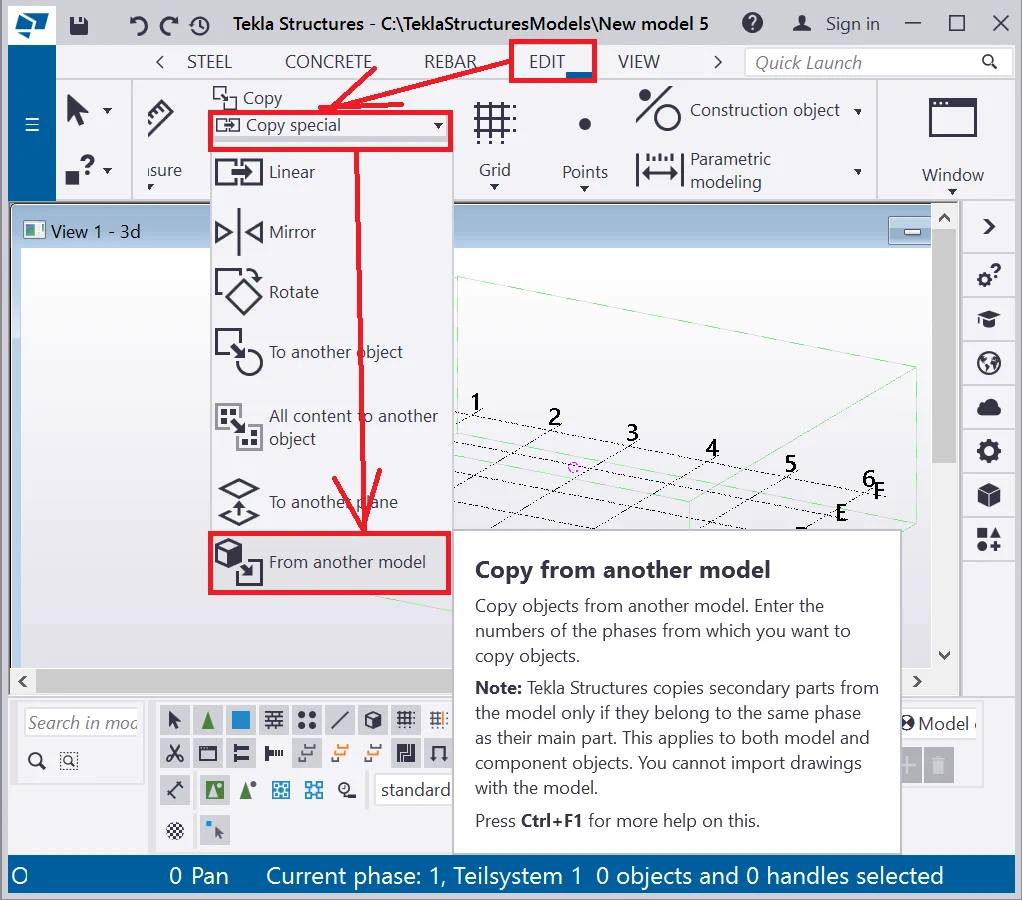
This tool can be activated only by accessing the main menu. The right-click menu does not contain it. This tool allows copying not simply an object, but the whole model or several phases (phases with respective objects, except for grids).
Thus saving phases in a model, allows copying them to another one by means
Create a new model to test on the “Copy Special - Copy from another
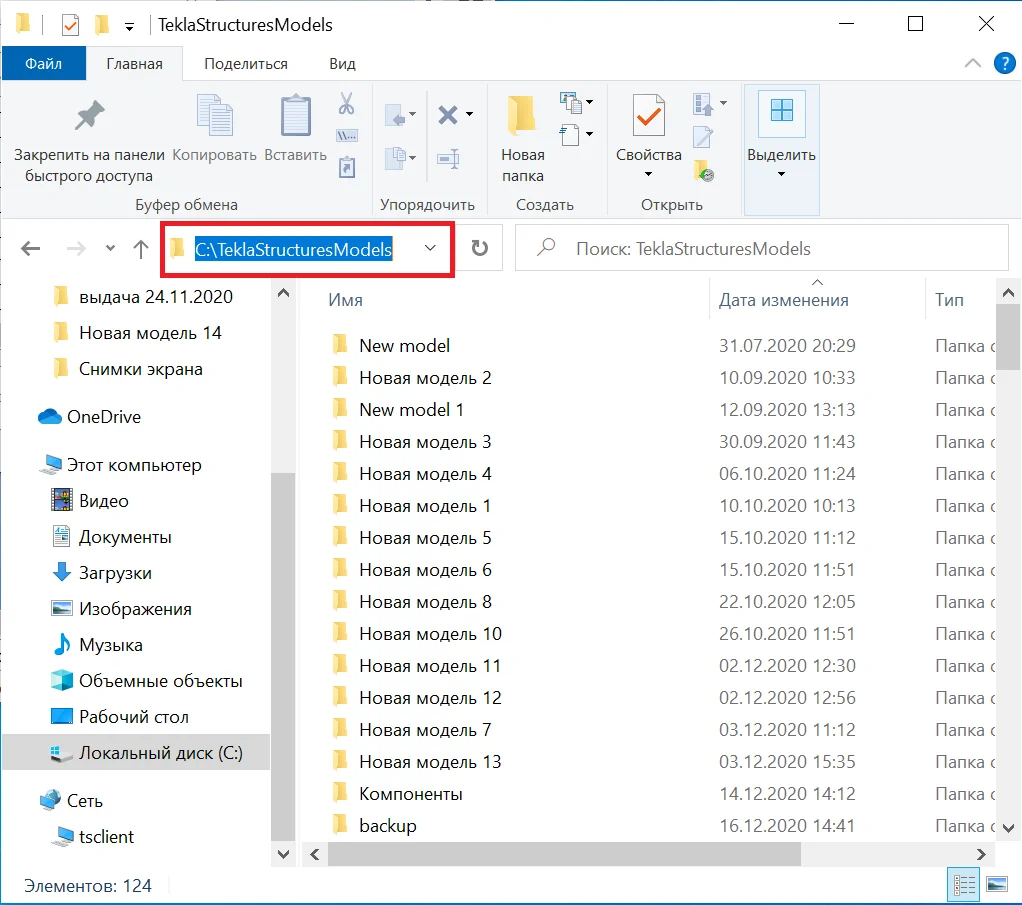
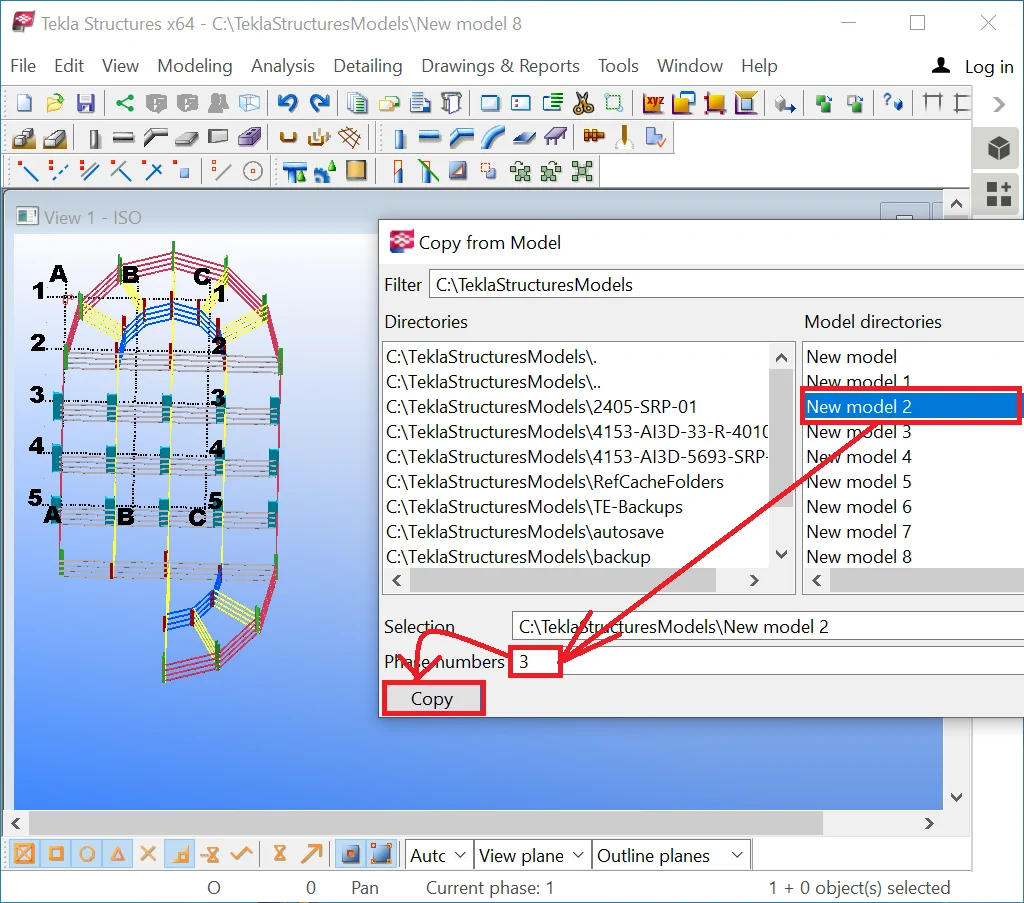
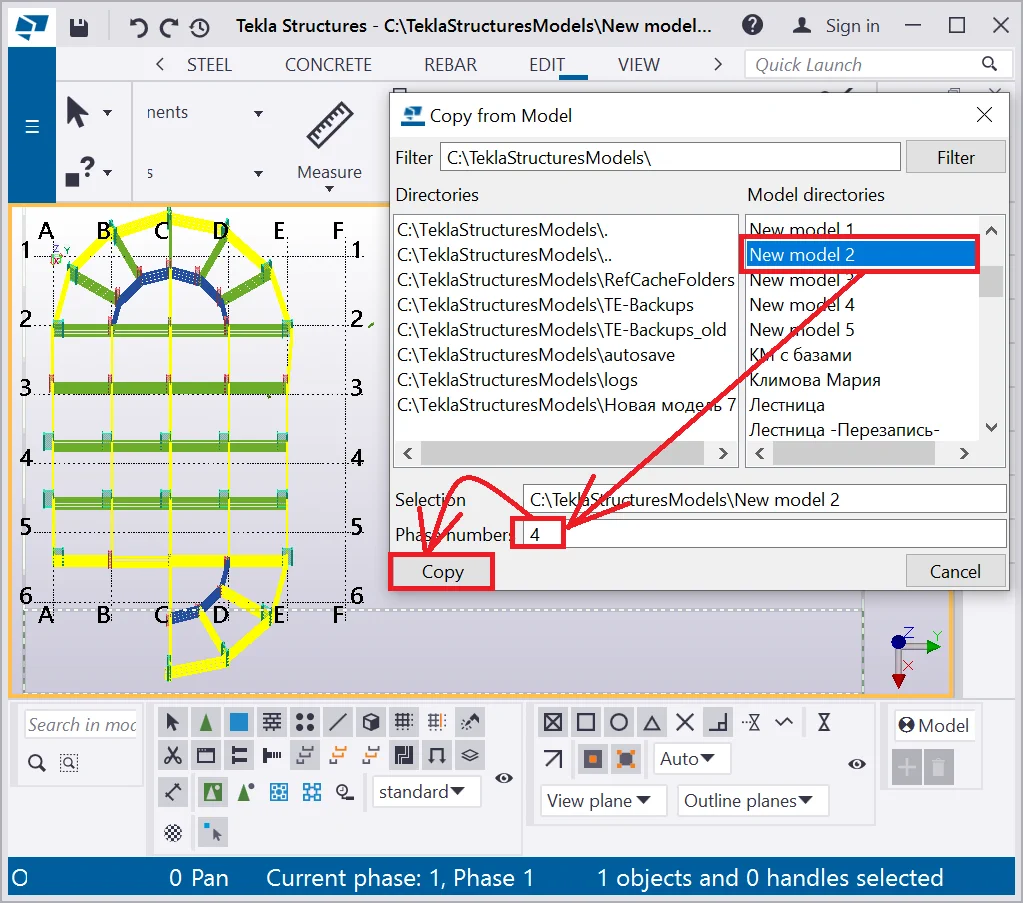
In the dialog window open there might be any available models, as TS does not browse the models through various disks. In this case, you can open the models’ list from HDD by using standard Windows tools. Usually, all models are created at the folder: C:\TeklaStructuresModels or at any other disk.
Make sure that there is the Tekla StructuresModel.xlm file available in the model's folder. This file is automatically created by saving a model into a new location. Copy the route to the model's folder.
Insert the route into the “Filter” field of the “Copy from the model” dialog window and make a left-click at the list of the models field. The list of available models shall appear.
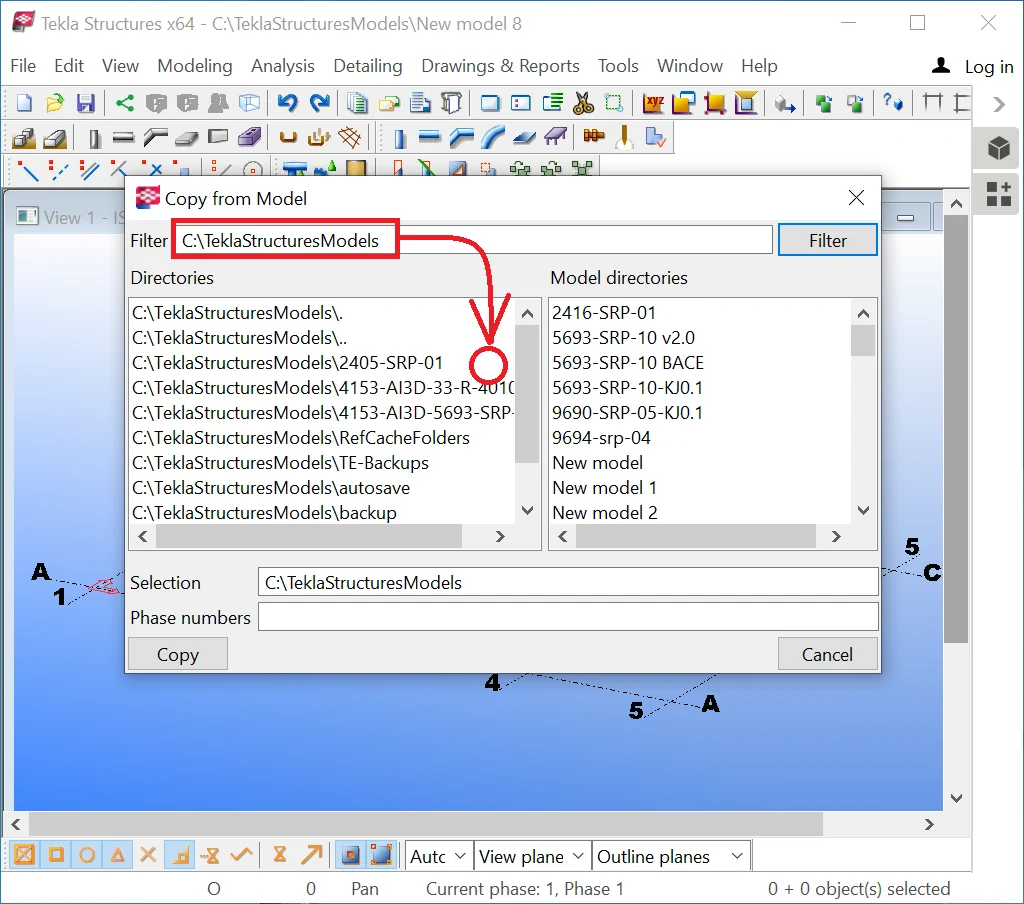
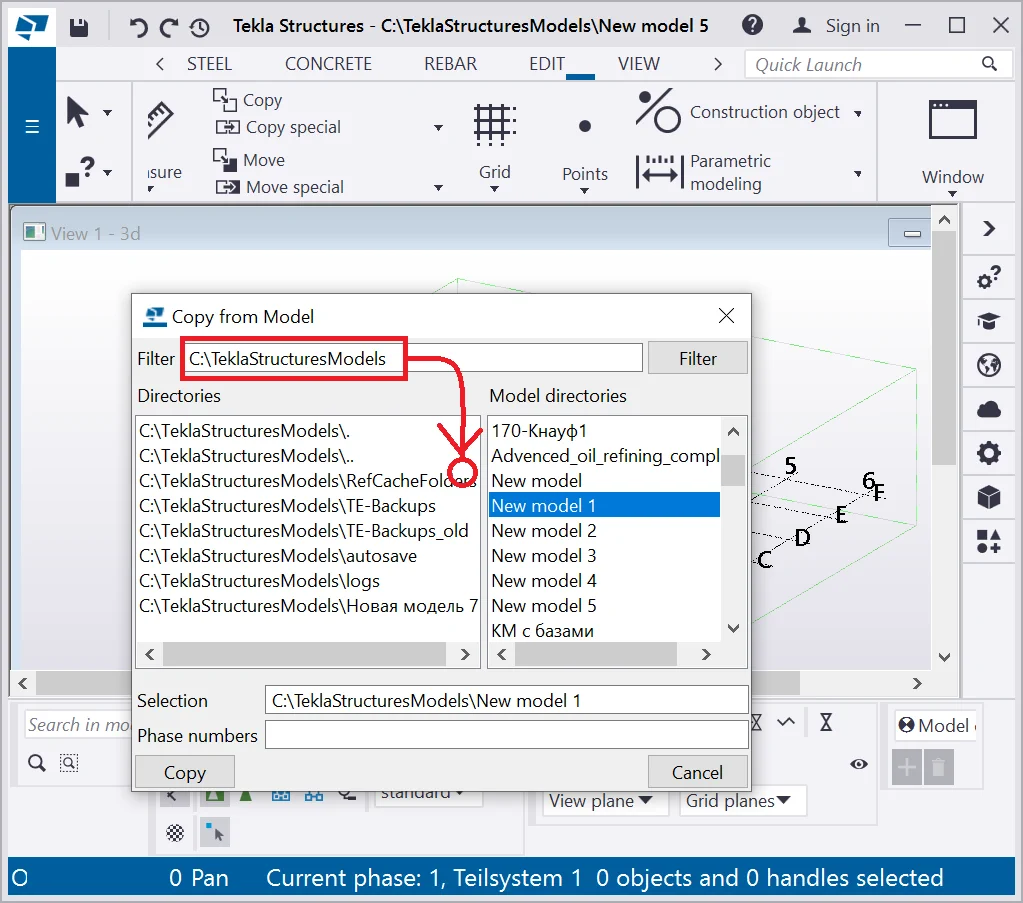
Select the initial model from which you will copy the phases.
Then indicate the phase numbers to get copied, which have to be written
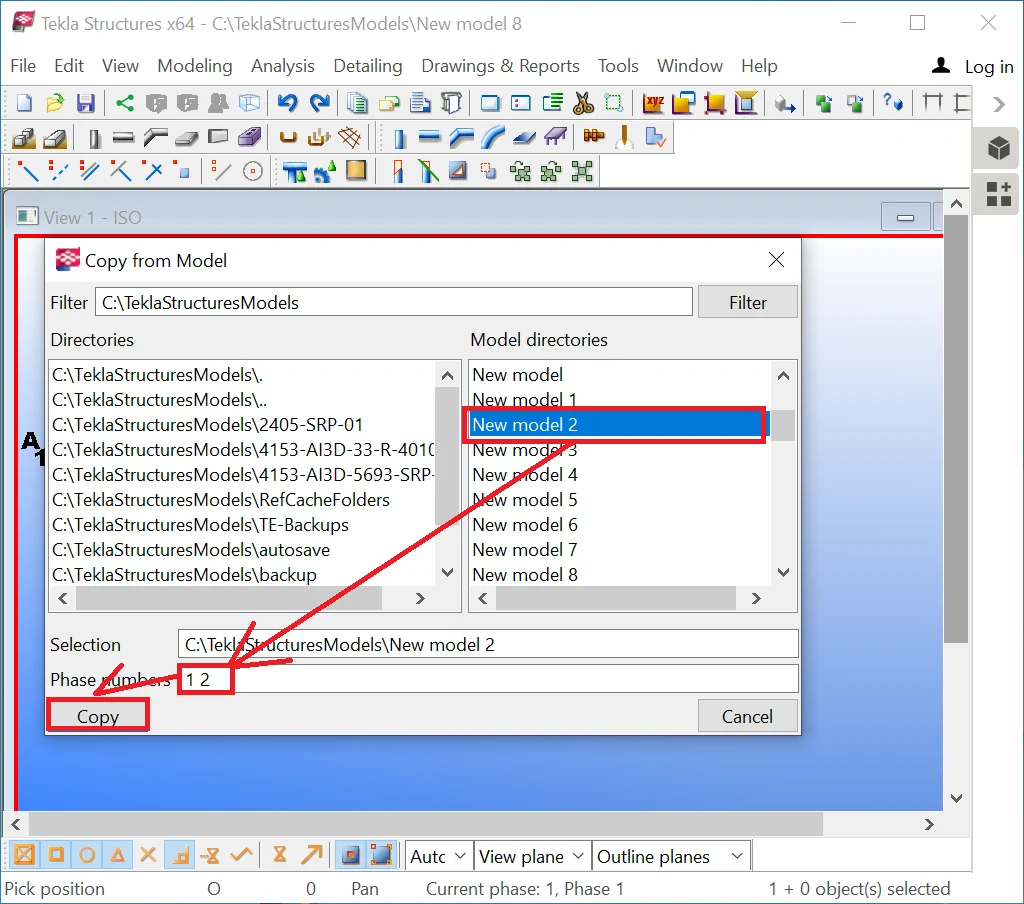
Check on the results of copying. Note that we copied only two phases,
As we already mentioned above, the “Copy from model” tool


Transferring grids from a model is done by performing the following steps: go to the C:\TeklaStructuresModels, open the required (initial) model folder, go to the "Attributes" folder and copy the grids files into the respective "Attributes" folder of the new model.
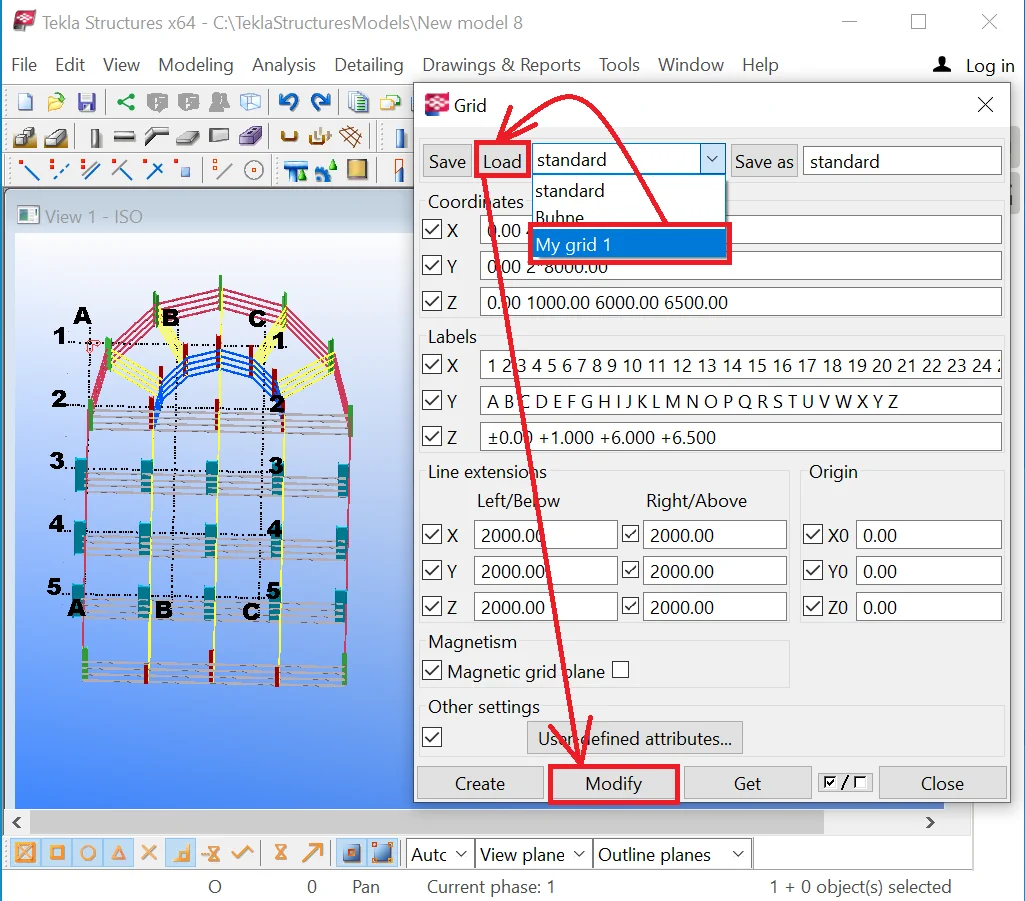

Reopen the new model, where at the “Grids Properties” dialog window by clicking on the "Save" drop-down box, you will get the saved grids list, containing the copied grids as well. Load and apply the grids to the current new model.
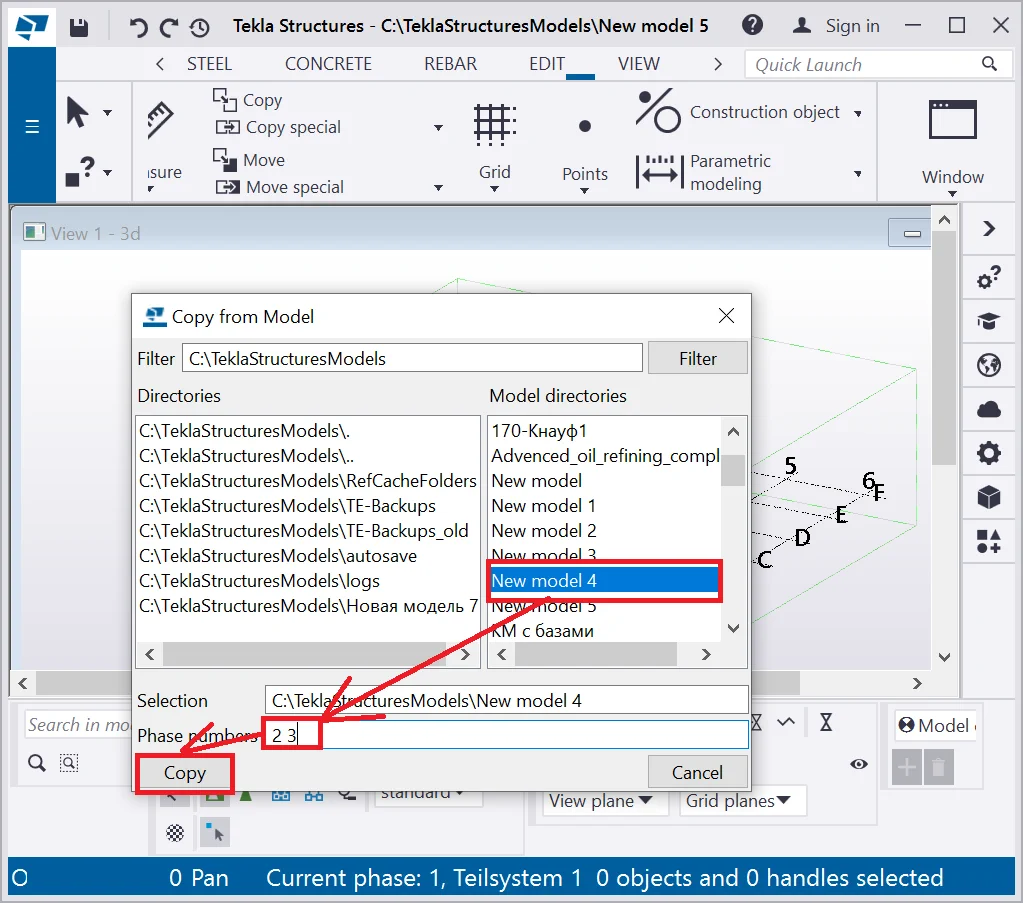
Exercise copying the last phase from the initial model to the new one.
Close the model and get back to the initial one.